Dawn - Intel GPU (PVC) Nodes
These new nodes entered Early Access service in January 2024

AIRR
Welcome to DAWN
DAWN is a powerful and user-friendly platform designed to streamline research collaboration and resource management. It enables Principal Investigators (PIs) and team members to efficiently manage projects, allocate resources, and collaborate seamlessly.
This documentation provides a comprehensive guide to navigating the system, understanding its features, and utilizing its full capabilities. Whether you’re a new user or an experienced researcher, this guide will help you get started and maximize the platform’s potential.
Macro Process
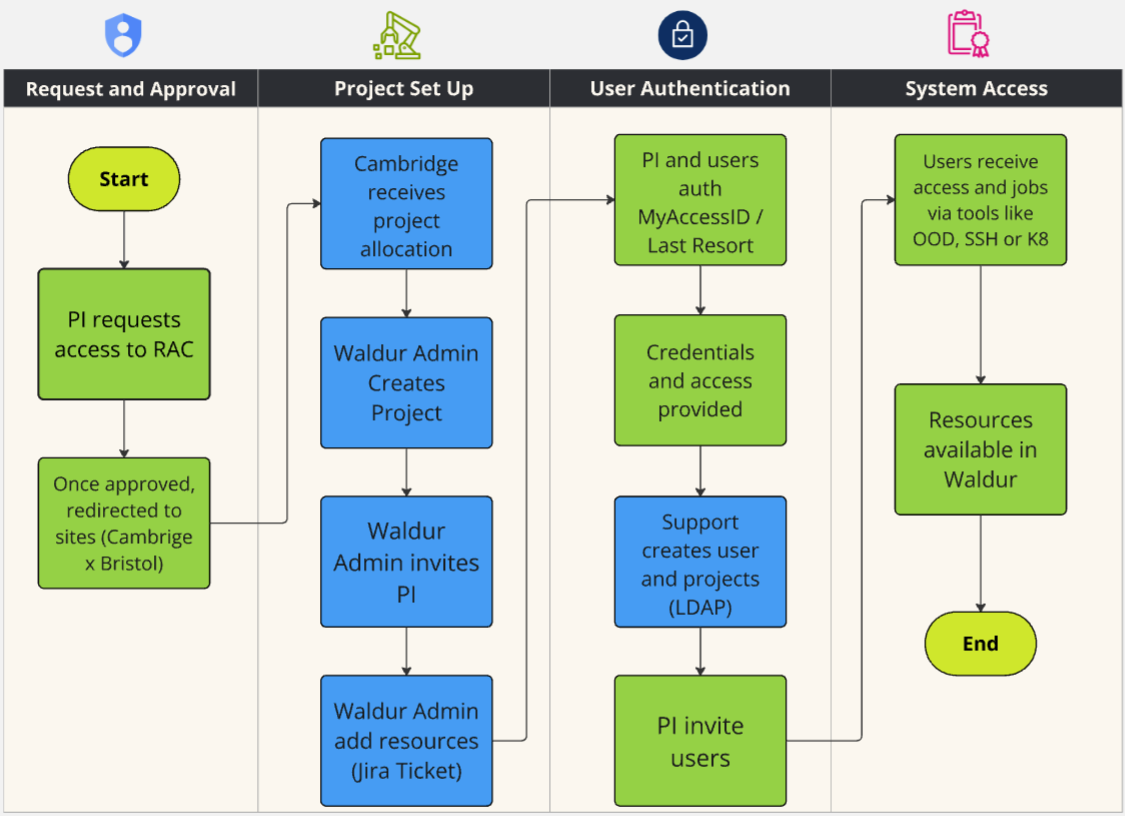
The following diagram provides a comprehensive overview of our macro-onboarding process. This visual representation outlines each step, from pre-arrival preparation to ongoing support and evaluation. By following this structured approach, we aim to ensure that every new user experiences a seamless and effective integration into our organization. The diagram below represents the onboarding process:
Applying for Access
Access to DAWN are allocated by bodies external. Prospective users will need to apply via these routes:
DSIT/UKRI Allocation
The AIRR Expression of Interest is seeking expressions of interest from researchers and innovators who can demonstrate a clear need for AI compute and may be suitable for early access to the Isambard AI and Dawn services as part of their testing phase. Closes 19-Dec-2025.
PI Accessing Portal
Receiving the Invitation E-mail
Once RAC (Resource Allocation Committee) approves your application for using DAWN’s resources, you will automatically receive an email invitation from air-admin@hpc.cam.ac.uk to access the system within a few days. This email will contain a link to access the portal; please click on that link to proceed.

Upon clicking the link, you will be directed to DAWN’s Portal.
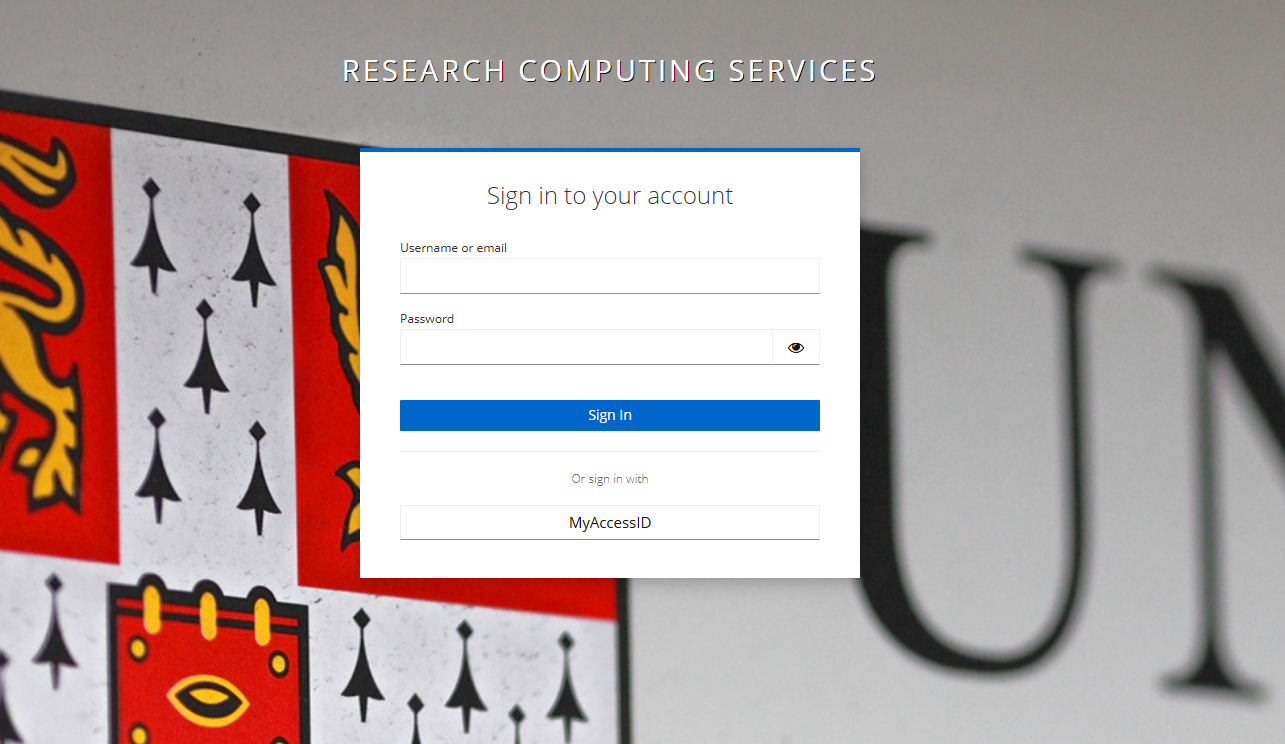
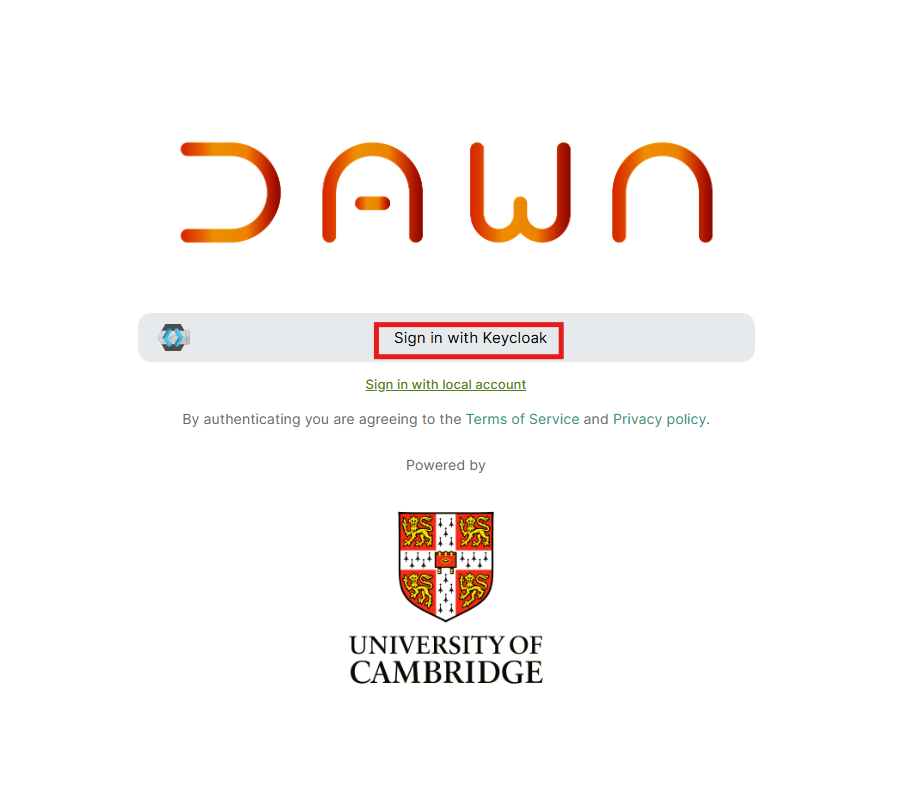
You will encounter a login page similar to the one shown below. Please select the option “Sign in with Keycloak” to begin your login process. Make sure to select the option that corresponds to the email address where you received your invitation. If your invitation was sent to your University account, choose the “Sign in with Keycloak” option. This will allow you to log in using your University credentials.
You have two choices for your identity provider:
- University Login (MyAccessID)
- Other Login (IdP of last resort)
If you encounter any issues, please email support@hpc.cam.ac.uk.
Make sure to select the option that corresponds to the email address where you received your invitation.
If your invitation was sent to your University account, choose the “Sign in with Keycloak” option. This will allow you to log in using your University credentials.

Next, click the “MyAccessID” button to authenticate using your university credentials. If you encounter any issues accessing your account with your credentials, please email support@hpc.cam.ac.uk for assistance in retrieving your user information.
After clicking the button, you will be directed to a page where you can select your preferred identity provider for logging in.
University Login (MyAccessID)
You will be redirected to the MyAccessID login page; begin by typing the name of your university. You should see it listed among the options.
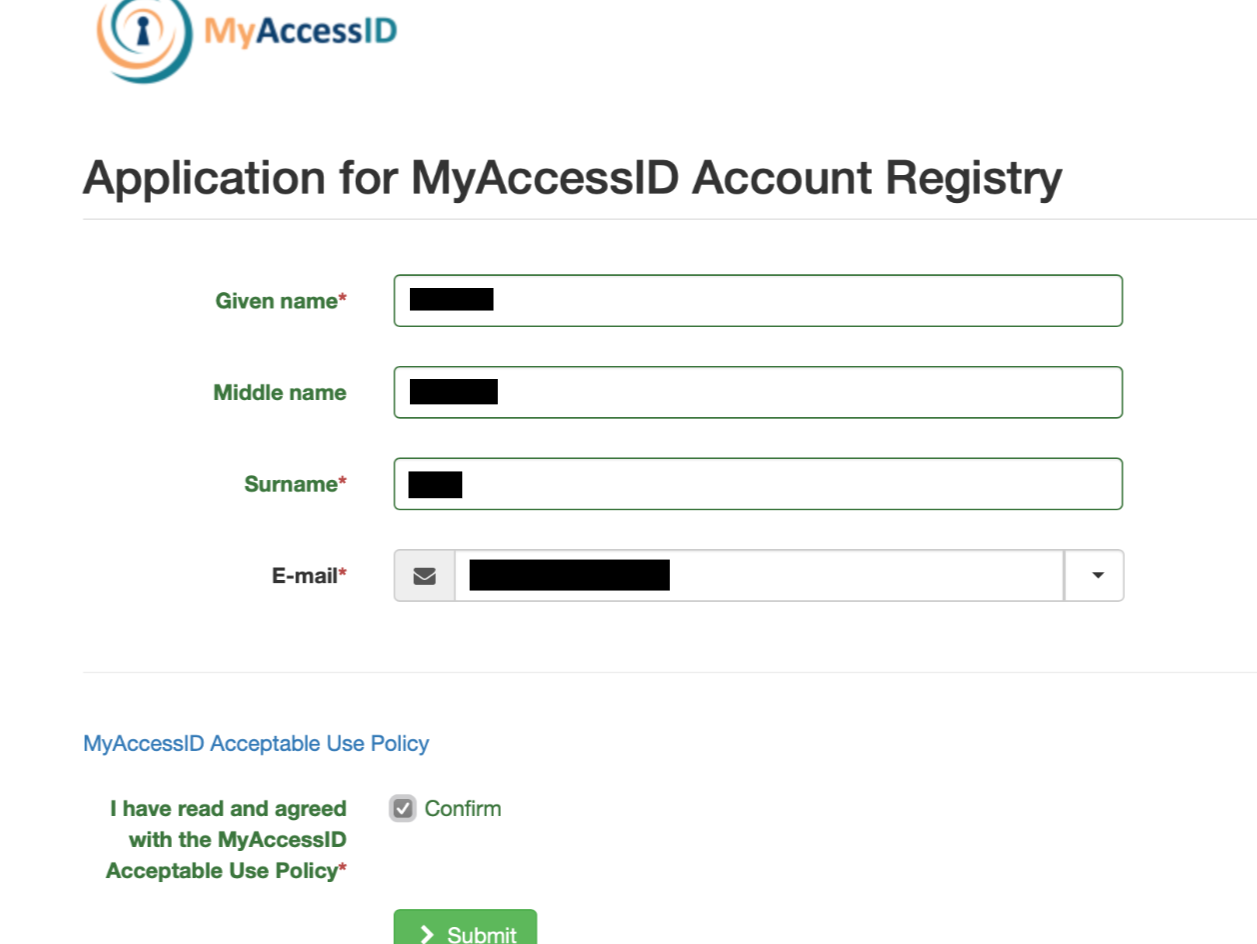
If this is your first time accessing MyAccessID, please ensure that you provide the necessary details and take a moment to review their policy.
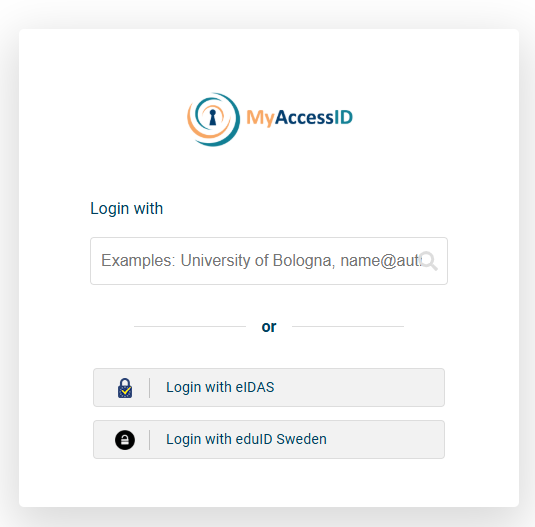
Start typing in the name of your university. You will hopefully see your university appear in the list of options.
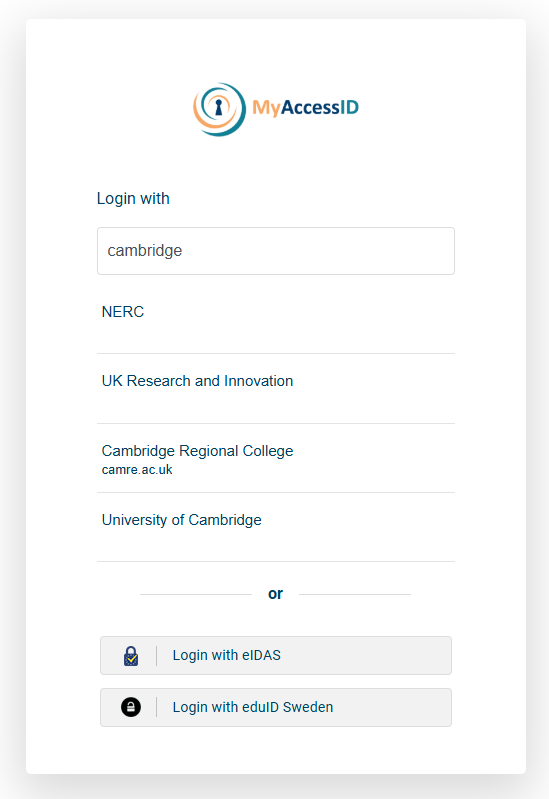
Click on your University - this will take you to your normal University login page. Log in as you would normally. This will bring you back to the RCS portal.

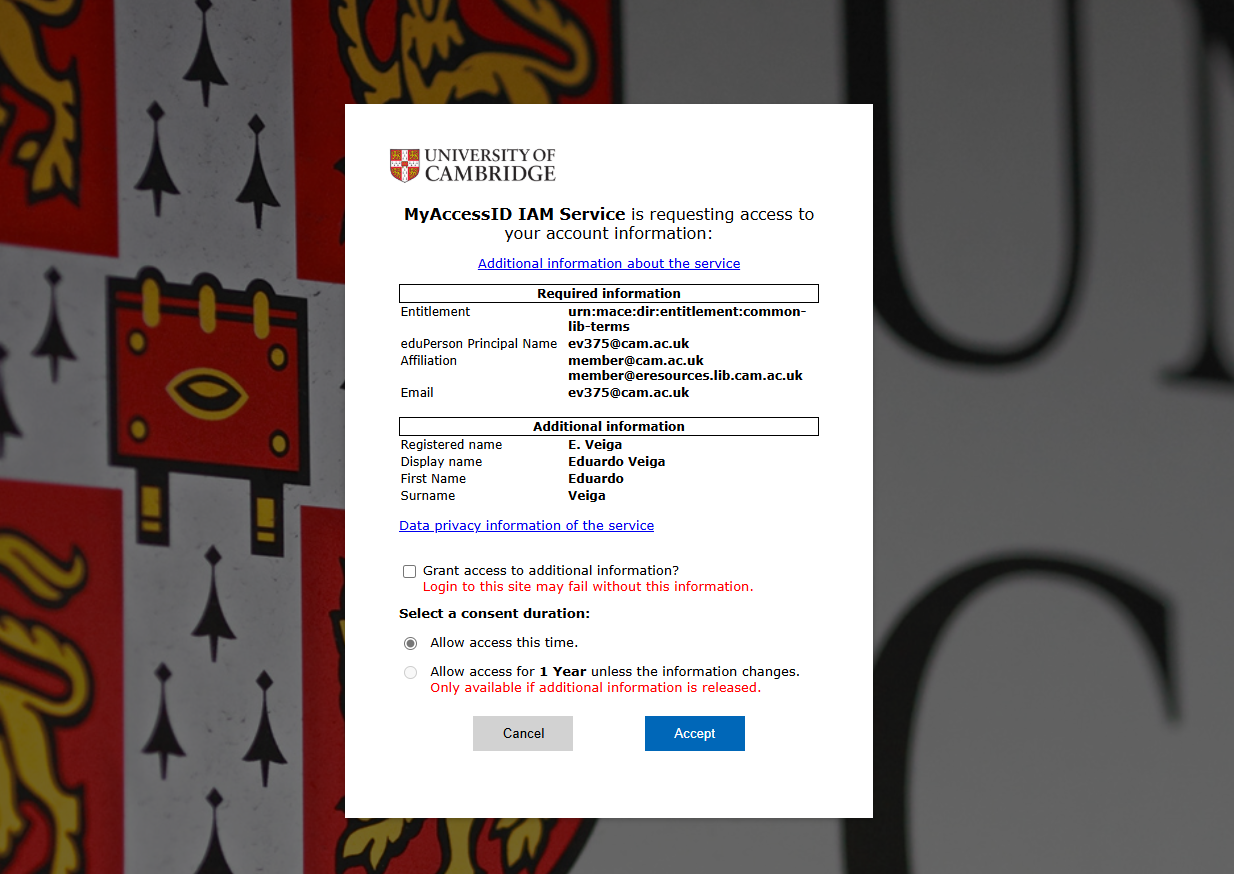
After entering your university credentials, you will be prompted to configure the second-factor authentication. Once you complete this step, a confirmation pop-up will appear. Please click “Accept” to proceed.
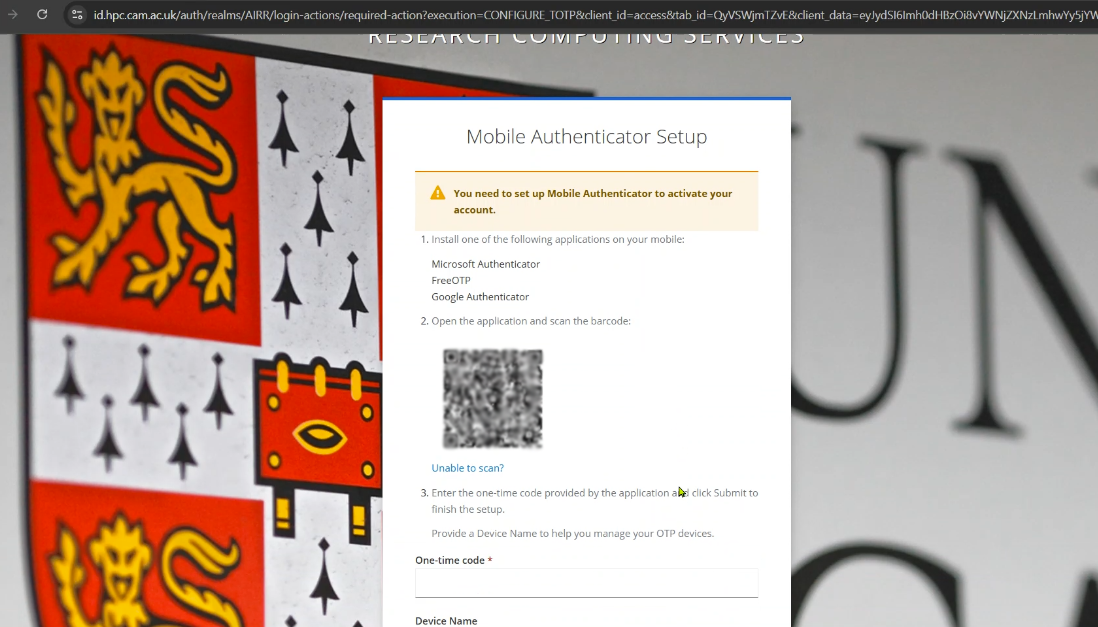
To secure your account, you must set up Multi-Factor Authentication (MFA). Scan the QR code using your authentication app, configure it on your phone, and enter the one-time code to complete the setup.
Once you complete the previous steps, you will gain access to the portal.
Accepting the Invitation
Upon entering the system, a pop-up notification will prompt you to accept the invitation. To continue, simply click on “Accept Invitation.”
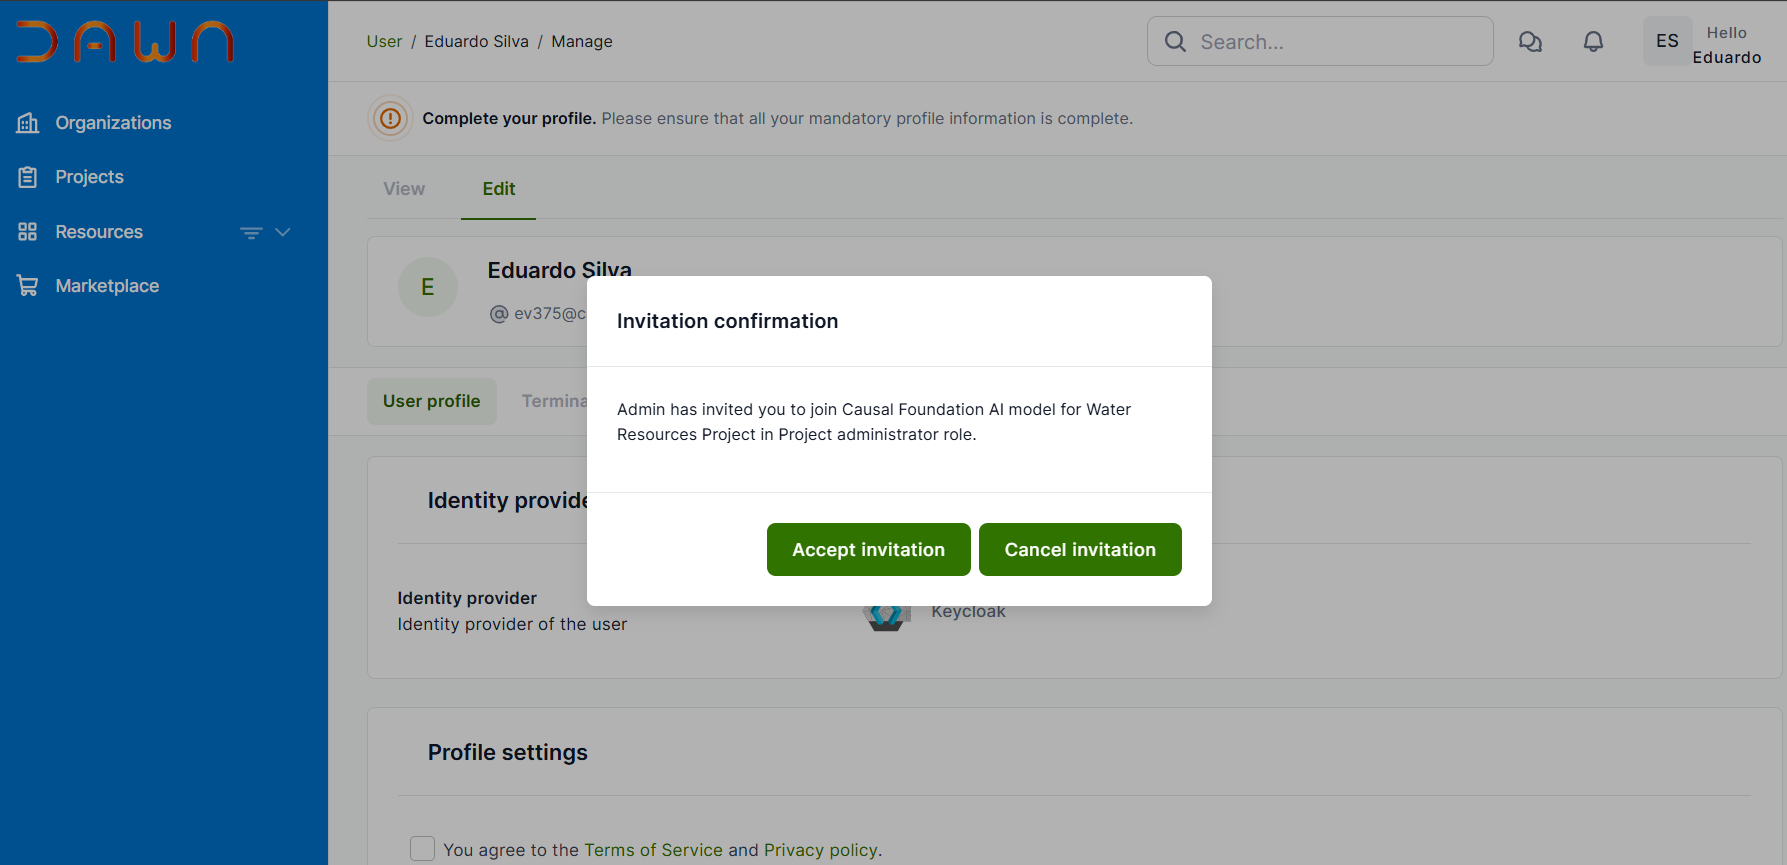
Upon acceptance, you will be directed to the home page. The next step involves reading and agreeing to the terms and conditions.
DAWN has several policies that must be accepted before you can utilize any of its services. Once you log in, a list of these policies will be presented for your acceptance. You will encounter them on screens that resemble the following format.

Upon accepting the policy, you will be online and ready to begin using the system.
PI Managing Projects - Inviting Users
Once you have successfully onboarded to the portal, you can begin accessing its features and functionalities.
The documentation below will cover inviting team members:
Inviting someone to your project
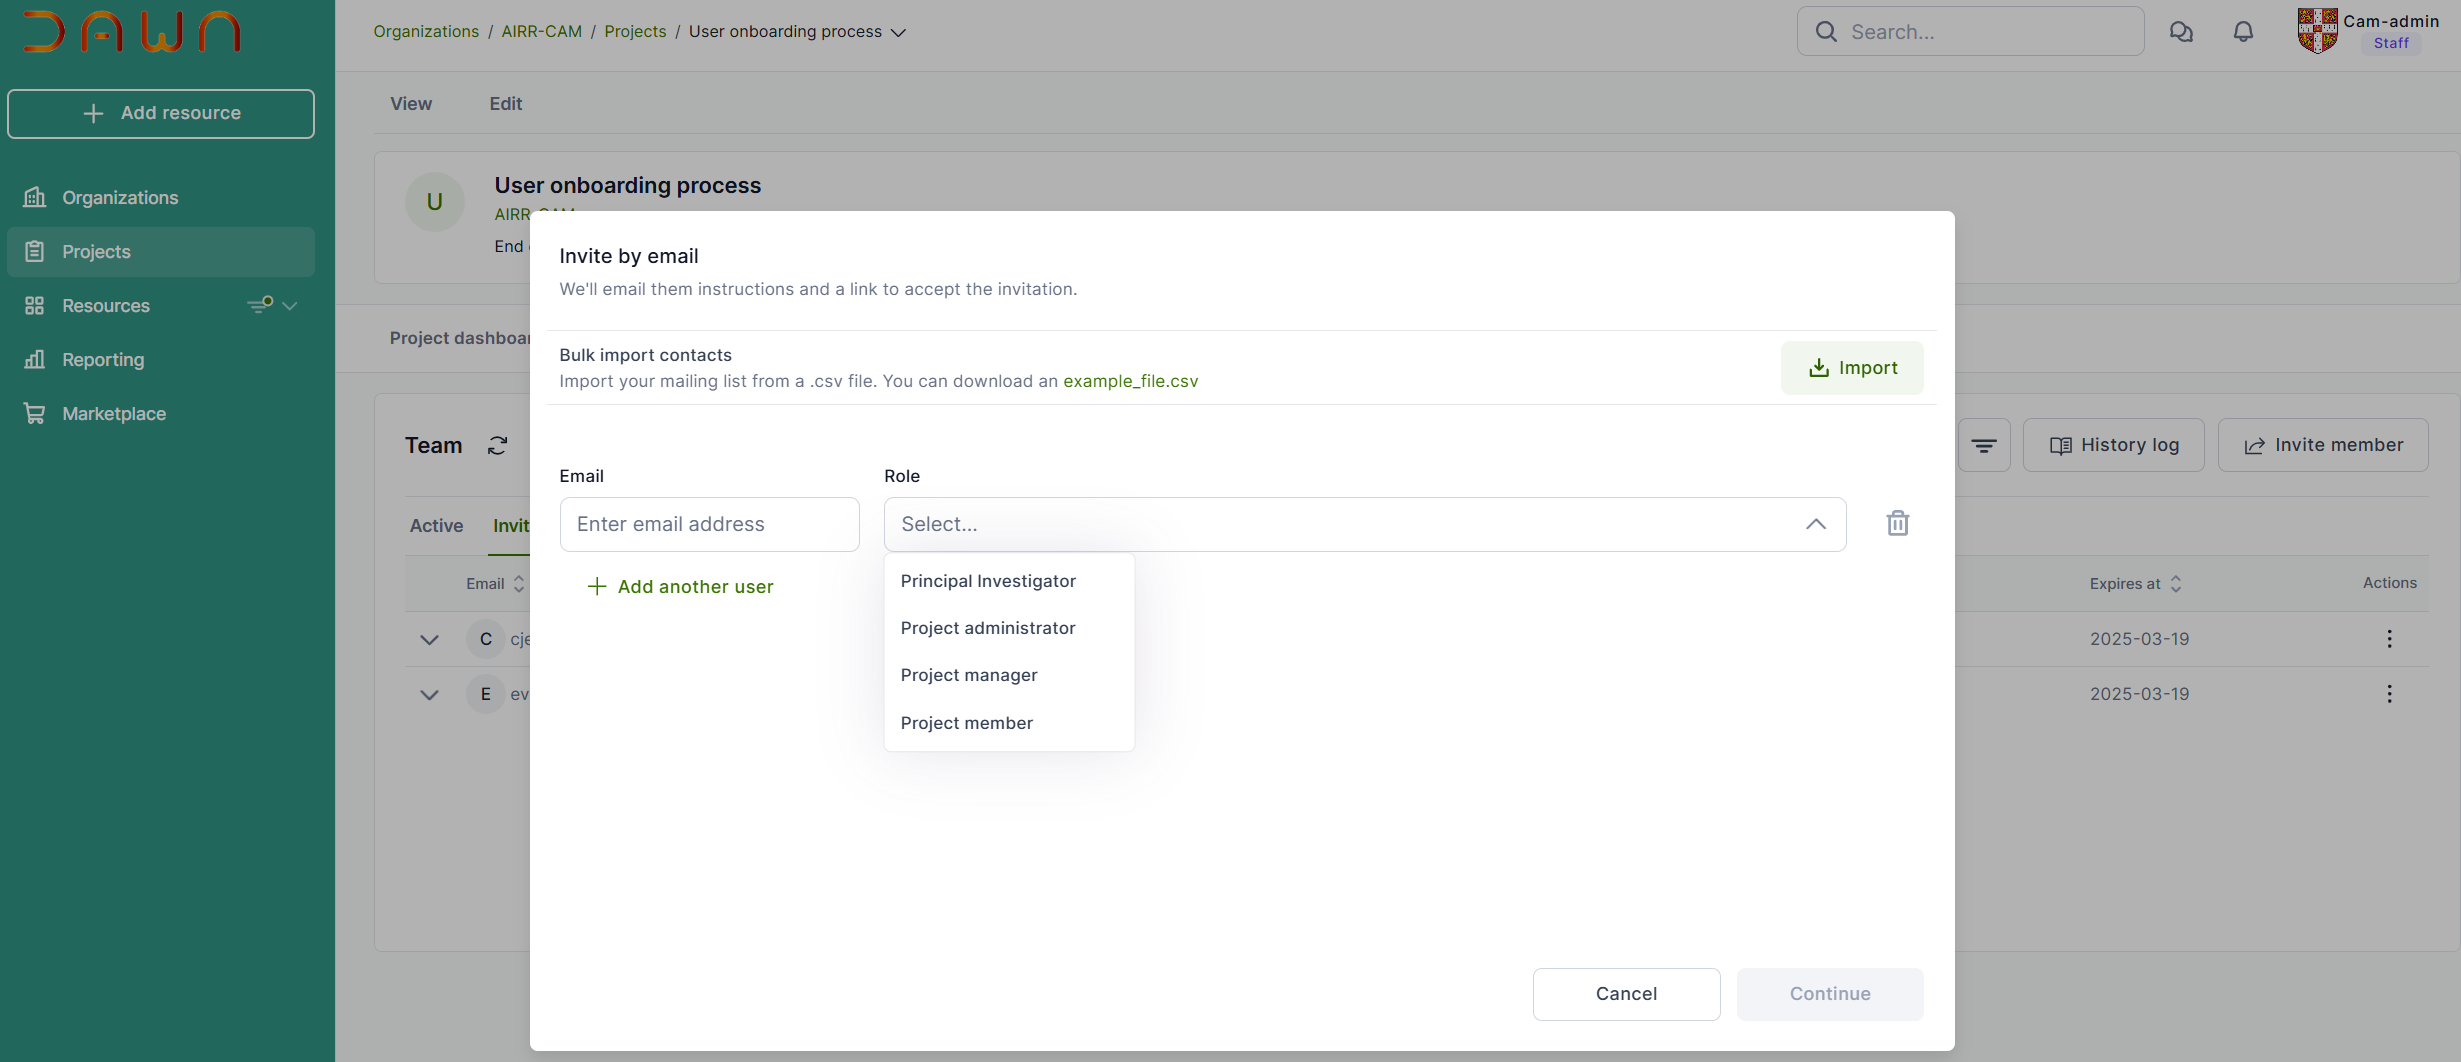
There are three roles you can have on a project:
- Principal Investigator
- Project Manager
- Project Member
The Principal Investigator (PI) is a special role that should be held only by the person (or people) who are legally responsible for the project.
The PI will have to accept specific Terms and Conditions (provided separately) that relate to their use of the project and their obligations to DAWN.
Because of this, ONLY the PI can invite people onto their project.
In doing so, the PI confirms that they have conducted the required due diligence on the person they are inviting, and that they are happy to take responsibility for the actions of the person they invite.
To invite someone to your project, click the “Projects” link in the left menu to access your projects.
The administrator will already create your project within DAWN; click on the project that you want to invite someone to. This will take you to that project’s management page.
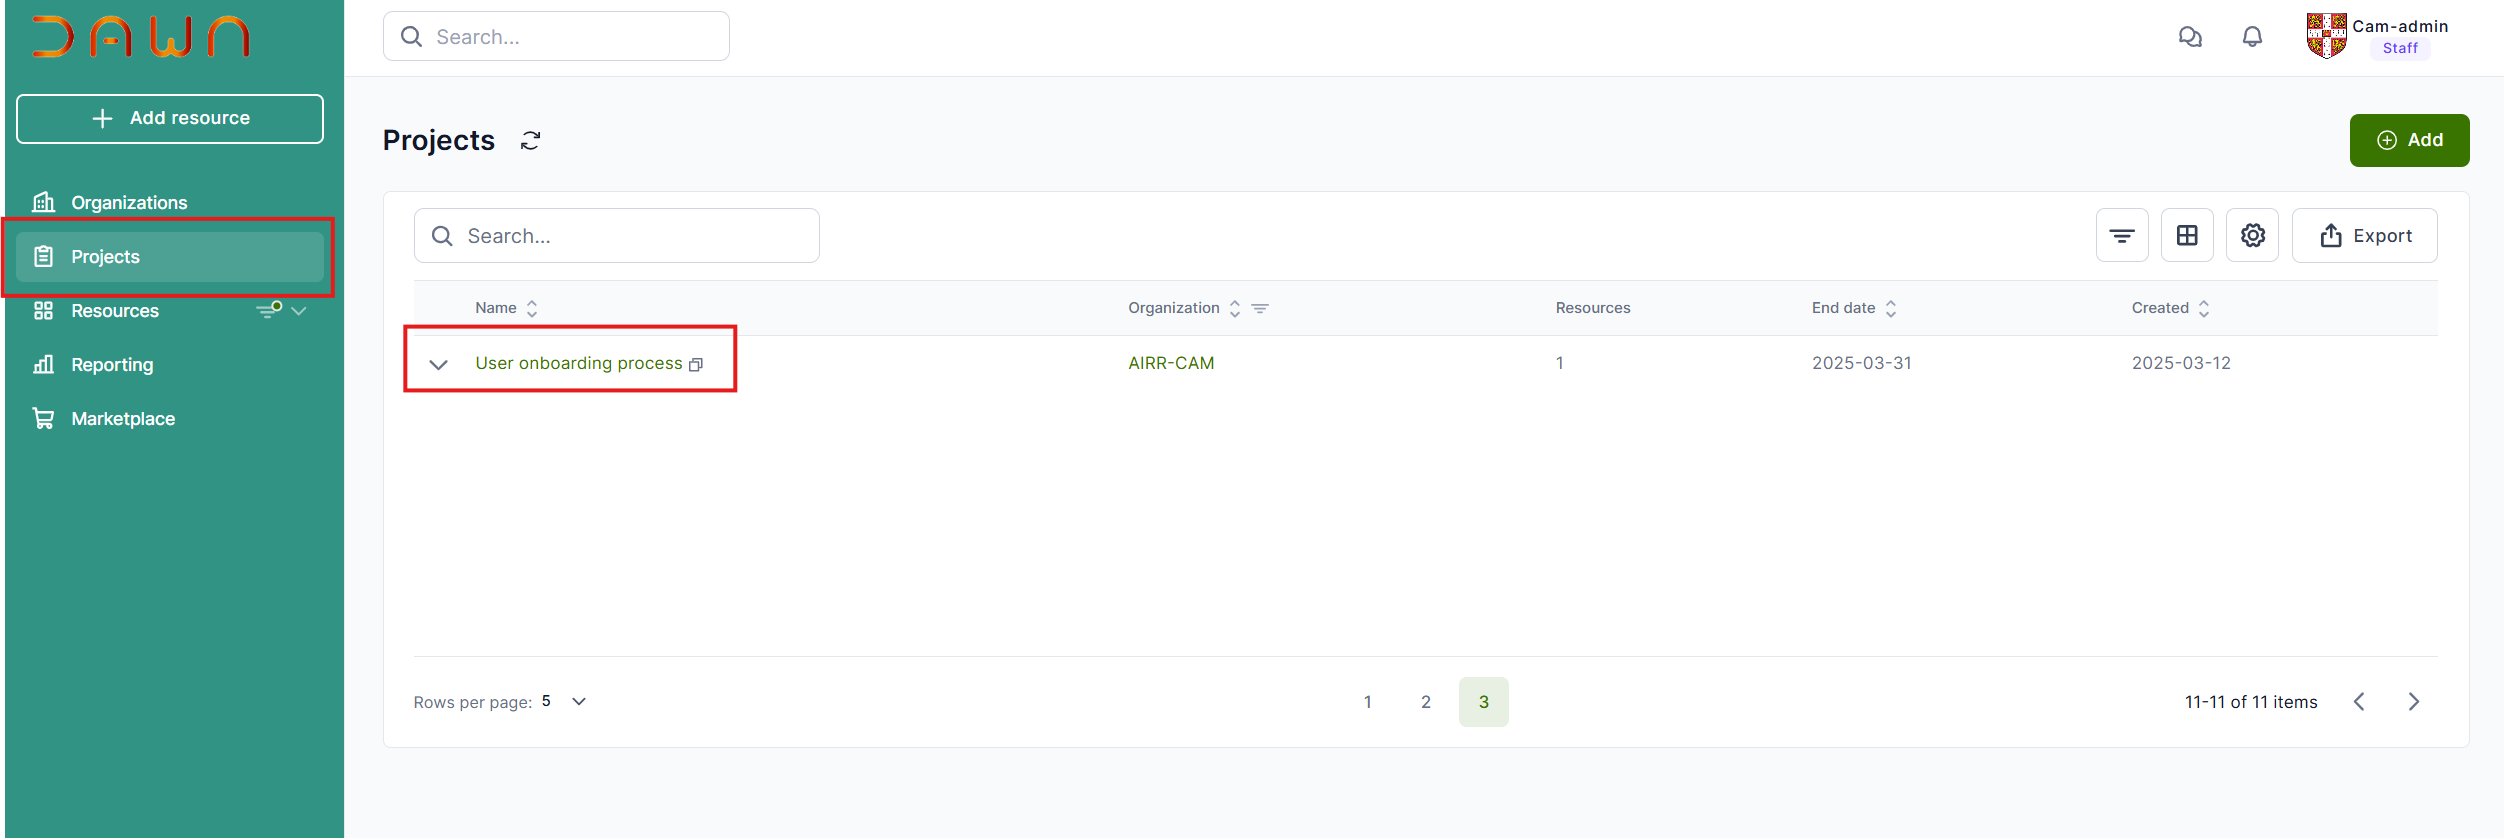
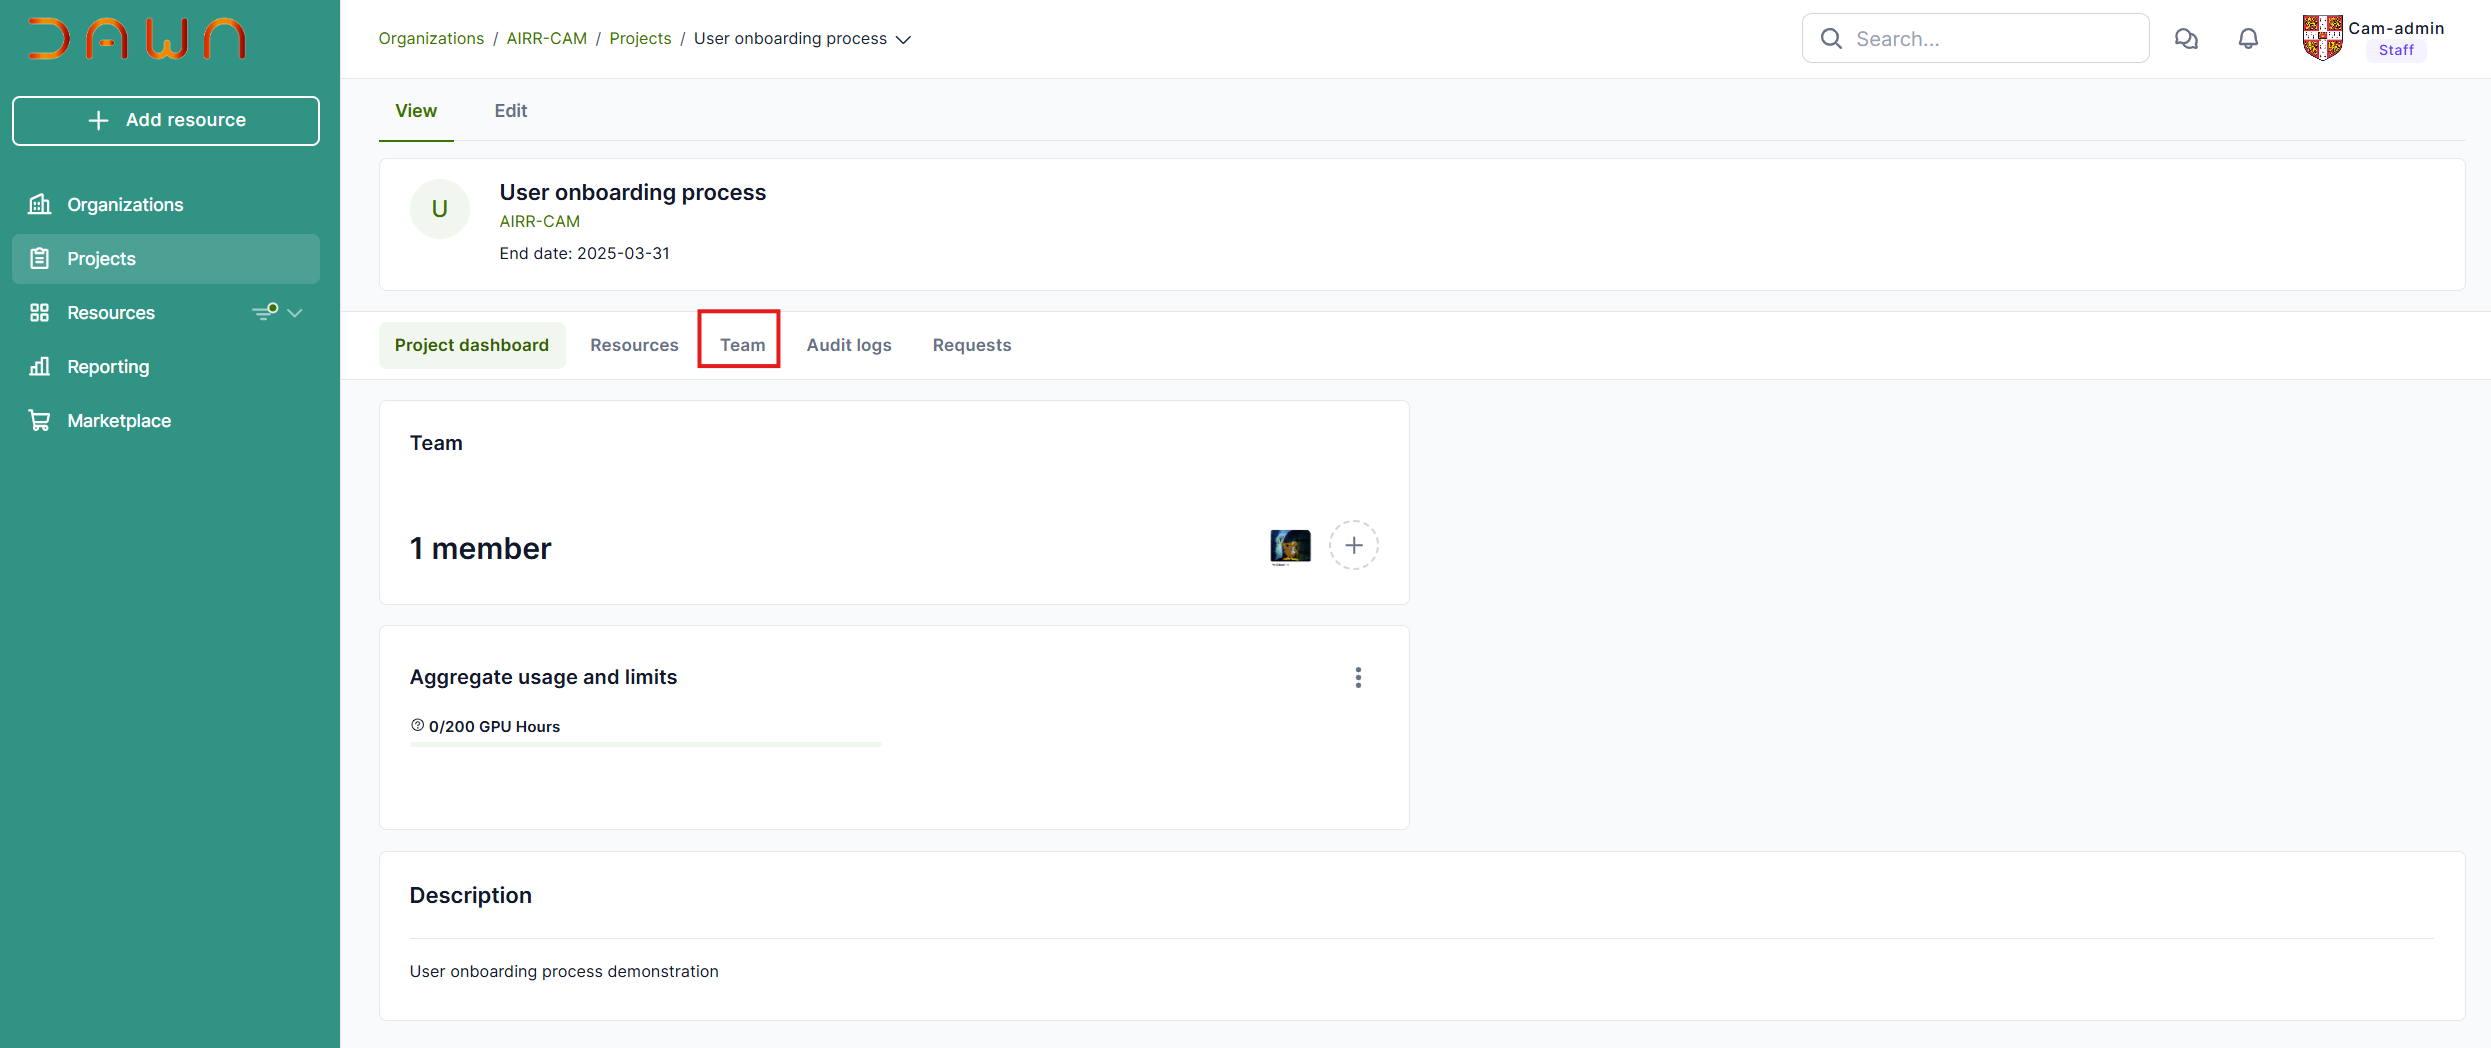
The Project Management Page in DAWN provides essential tools to help users efficiently oversee their projects, manage team members, and track resource usage. This page serves as a central hub for project-related activities, offering the following key sections:
- Project Dashboard - Displays a general overview of the project, including user details, resource consumption, and a brief project description.
- Resources - Allows users to view and manage project resources. Note: During the early access phase, only Waldur administrators will have resource management permissions.
- Team - Enables users to add and remove team members, facilitating collaboration.
- Audit Logs - Provides a detailed history of actions taken within the project, ensuring transparency and security.
- Requests - Displays service desk tickets, allowing users to track and manage support requests.
This procedure outlines the steps for inviting new users. To begin, click on the “Team” tab.
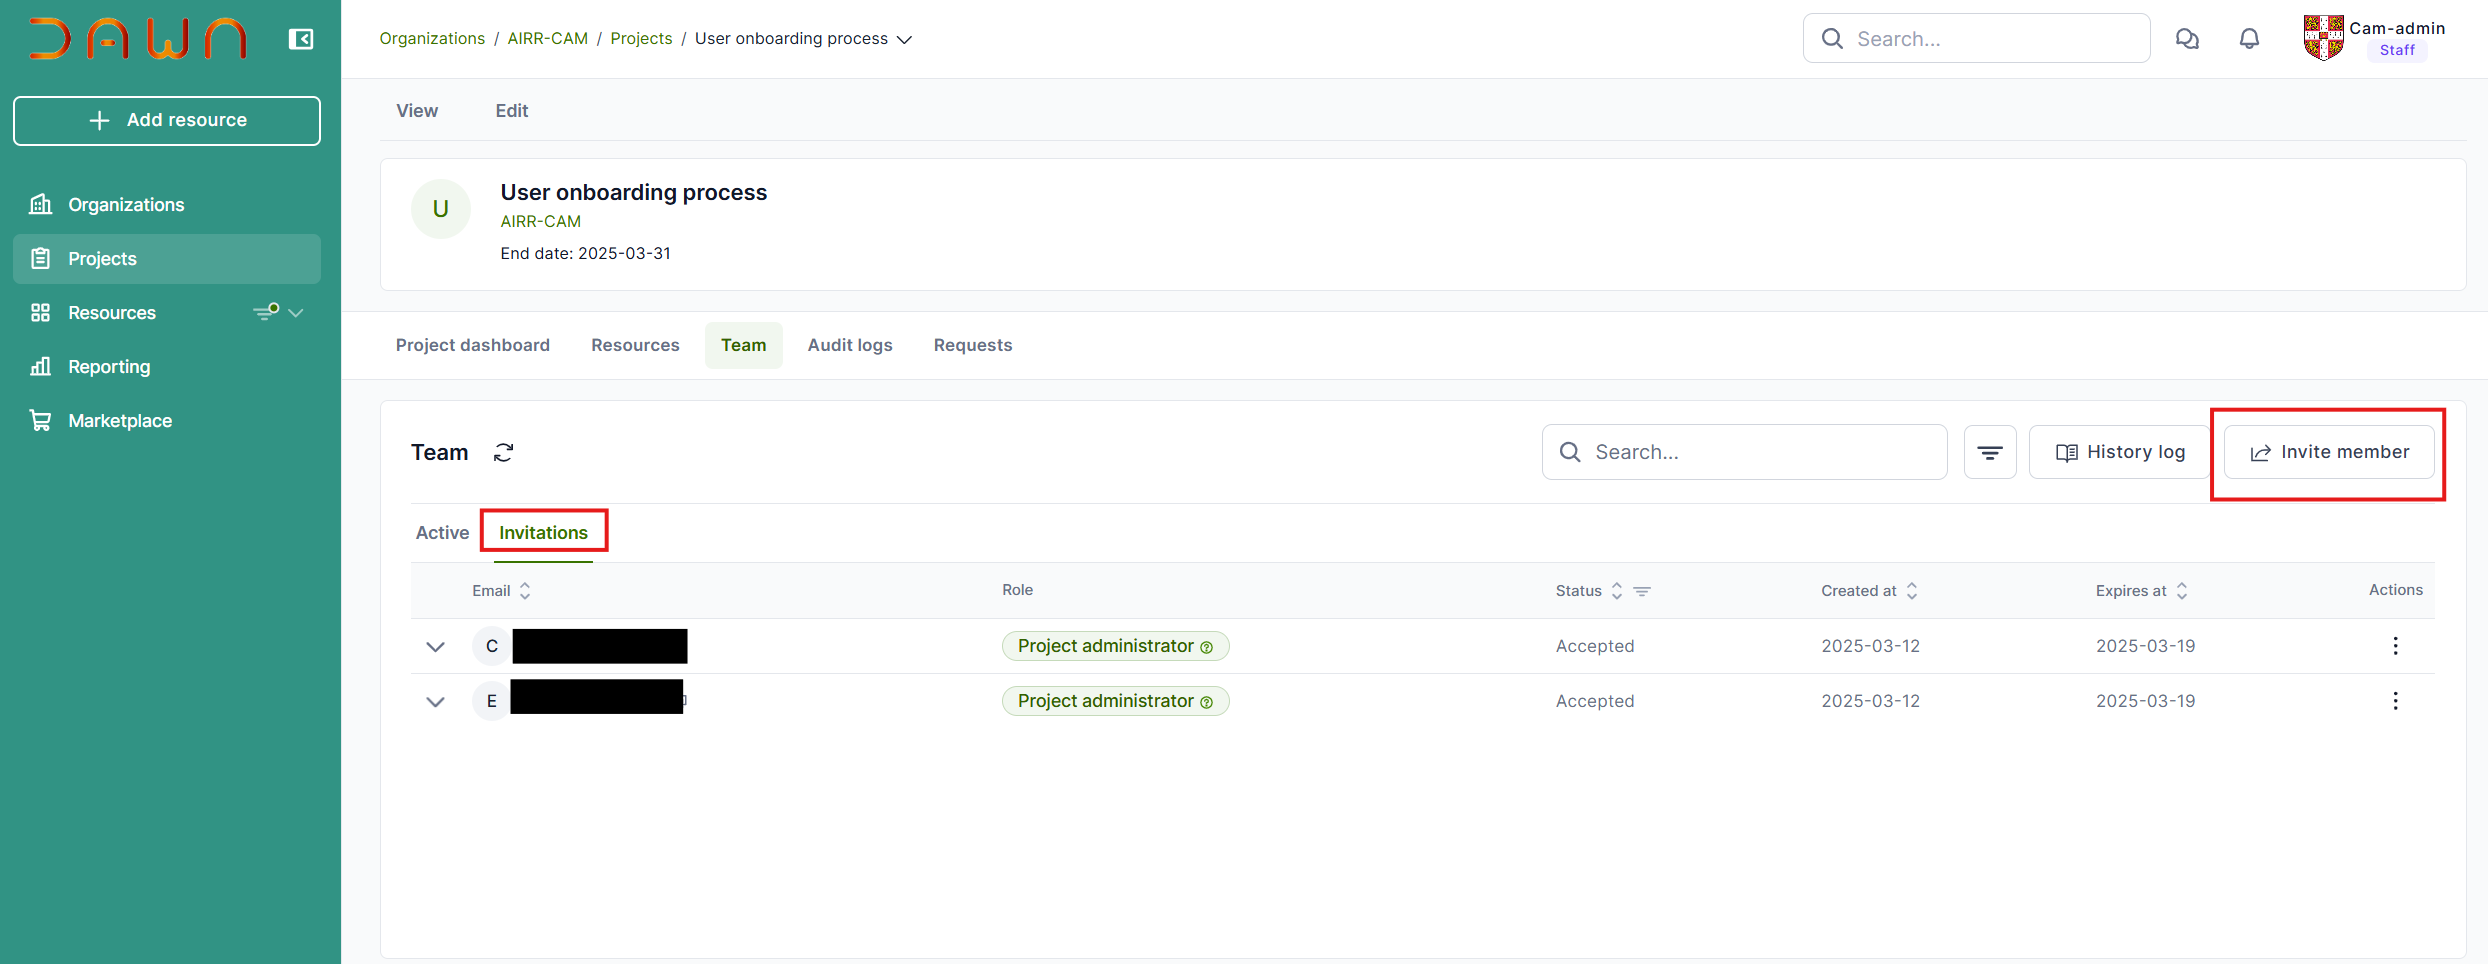
To view your invitation history, click on the “Invitations” tab. Next, select “Invite Member” to proceed.
Enter the email of the person that should be invited and select the role.
User Roles & Permissions
DAWN provides a role-based access system to ensure efficient collaboration and security.
- Principal Investigator
- Invite team members to DAWN Portal and to the project.
- Manage team members (add / remove) users from a project.
- Project Member
- Can access and utilize project resources.
- Cannot create new resources or invite team members.
- Can use dashboard to understand resource`s usage.
Once you have completed the step, click on “Continue,” and the invitation will be sent.
Users will adhere to the following procedure to log in.
Users accessing Open On Demand via the Portal
Authentication Process

Upon clicking the link, you will be directed to DAWN’s Portal.
You will encounter a login page similar to the one shown below. Please select the option “Sign in with Keycloak” to begin your login process.
You have two choices for your identity provider:
- University Login (MyAccessID)
- Other Login (IdP of last resort)
If you encounter any issues, please email support@hpc.cam.ac.uk.
Make sure to select the option that corresponds to the email address where you received your invitation.
If your invitation was sent to your University account, choose the “Sign in with Keycloak” option. This will allow you to log in using your University credentials.

Next, click the “MyAccessID” button to authenticate using your university credentials. If you encounter any issues accessing your account with your credentials, please email support@hpc.cam.ac.uk for assistance in retrieving your user information.
After clicking the button, you will be directed to a page where you can select your preferred identity provider for logging in.

University Login (MyAccessID)
You will be redirected to the MyAccessID login page; begin by typing the name of your university. You should see it listed among the options.
If this is your first time accessing MyAccessID, please ensure that you provide the necessary details and take a moment to review their policy.


Start typing in the name of your university. You will hopefully see your university appear in the list of options.

Click on your University - this will take you to your normal University login page. Log in as you would normally. This will bring you back to the RCS portal.

After entering your university credentials, you will be prompted to configure the second-factor authentication. Once you complete this step, a confirmation pop-up will appear. Please click “Accept” to proceed.

To secure your account, you must set up Multi-Factor Authentication (MFA). Scan the QR code using your authentication app, configure it on your phone, and enter the one-time code to complete the setup.

Once you complete the previous steps, you will gain access to the portal.
Accepting the Invitation
Upon entering the system, a pop-up notification will prompt you to accept the invitation. To continue, simply click on “Accept Invitation.”

Upon acceptance, you will be directed to the home page. The next step involves reading and agreeing to the terms and conditions.
DAWN has several policies that must be accepted before you can utilize any of its services. Once you log in, a list of these policies will be presented for your acceptance. You will encounter them on screens that resemble the following format.

Upon accepting the policy, you will be online and ready to begin using the system.
Once you gain access to the system, please go to projects and you can see projects that you were invited, please click in project and after that select the project that you want to access.

Upon opening your project, kindly navigate to the Resources tab to review the available resources that you can access.
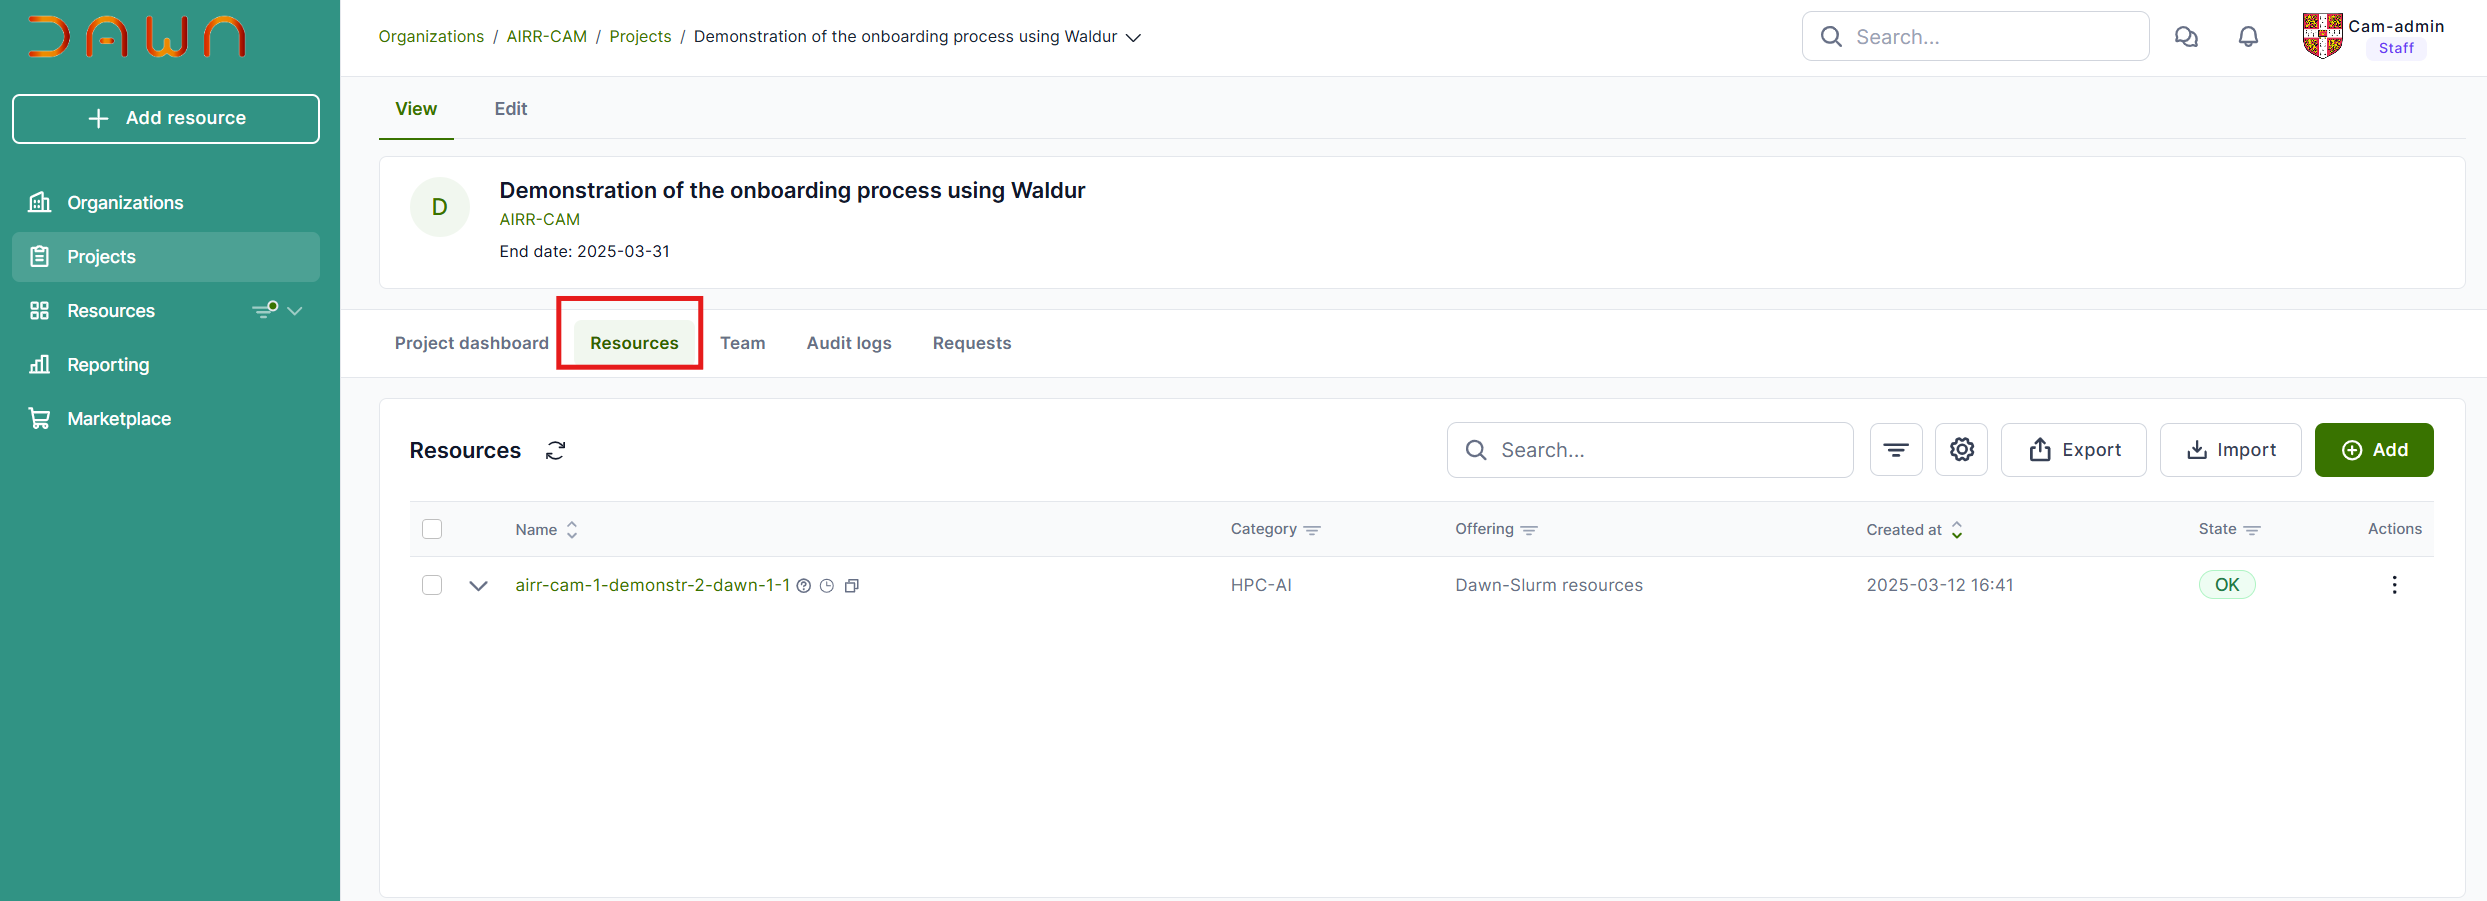
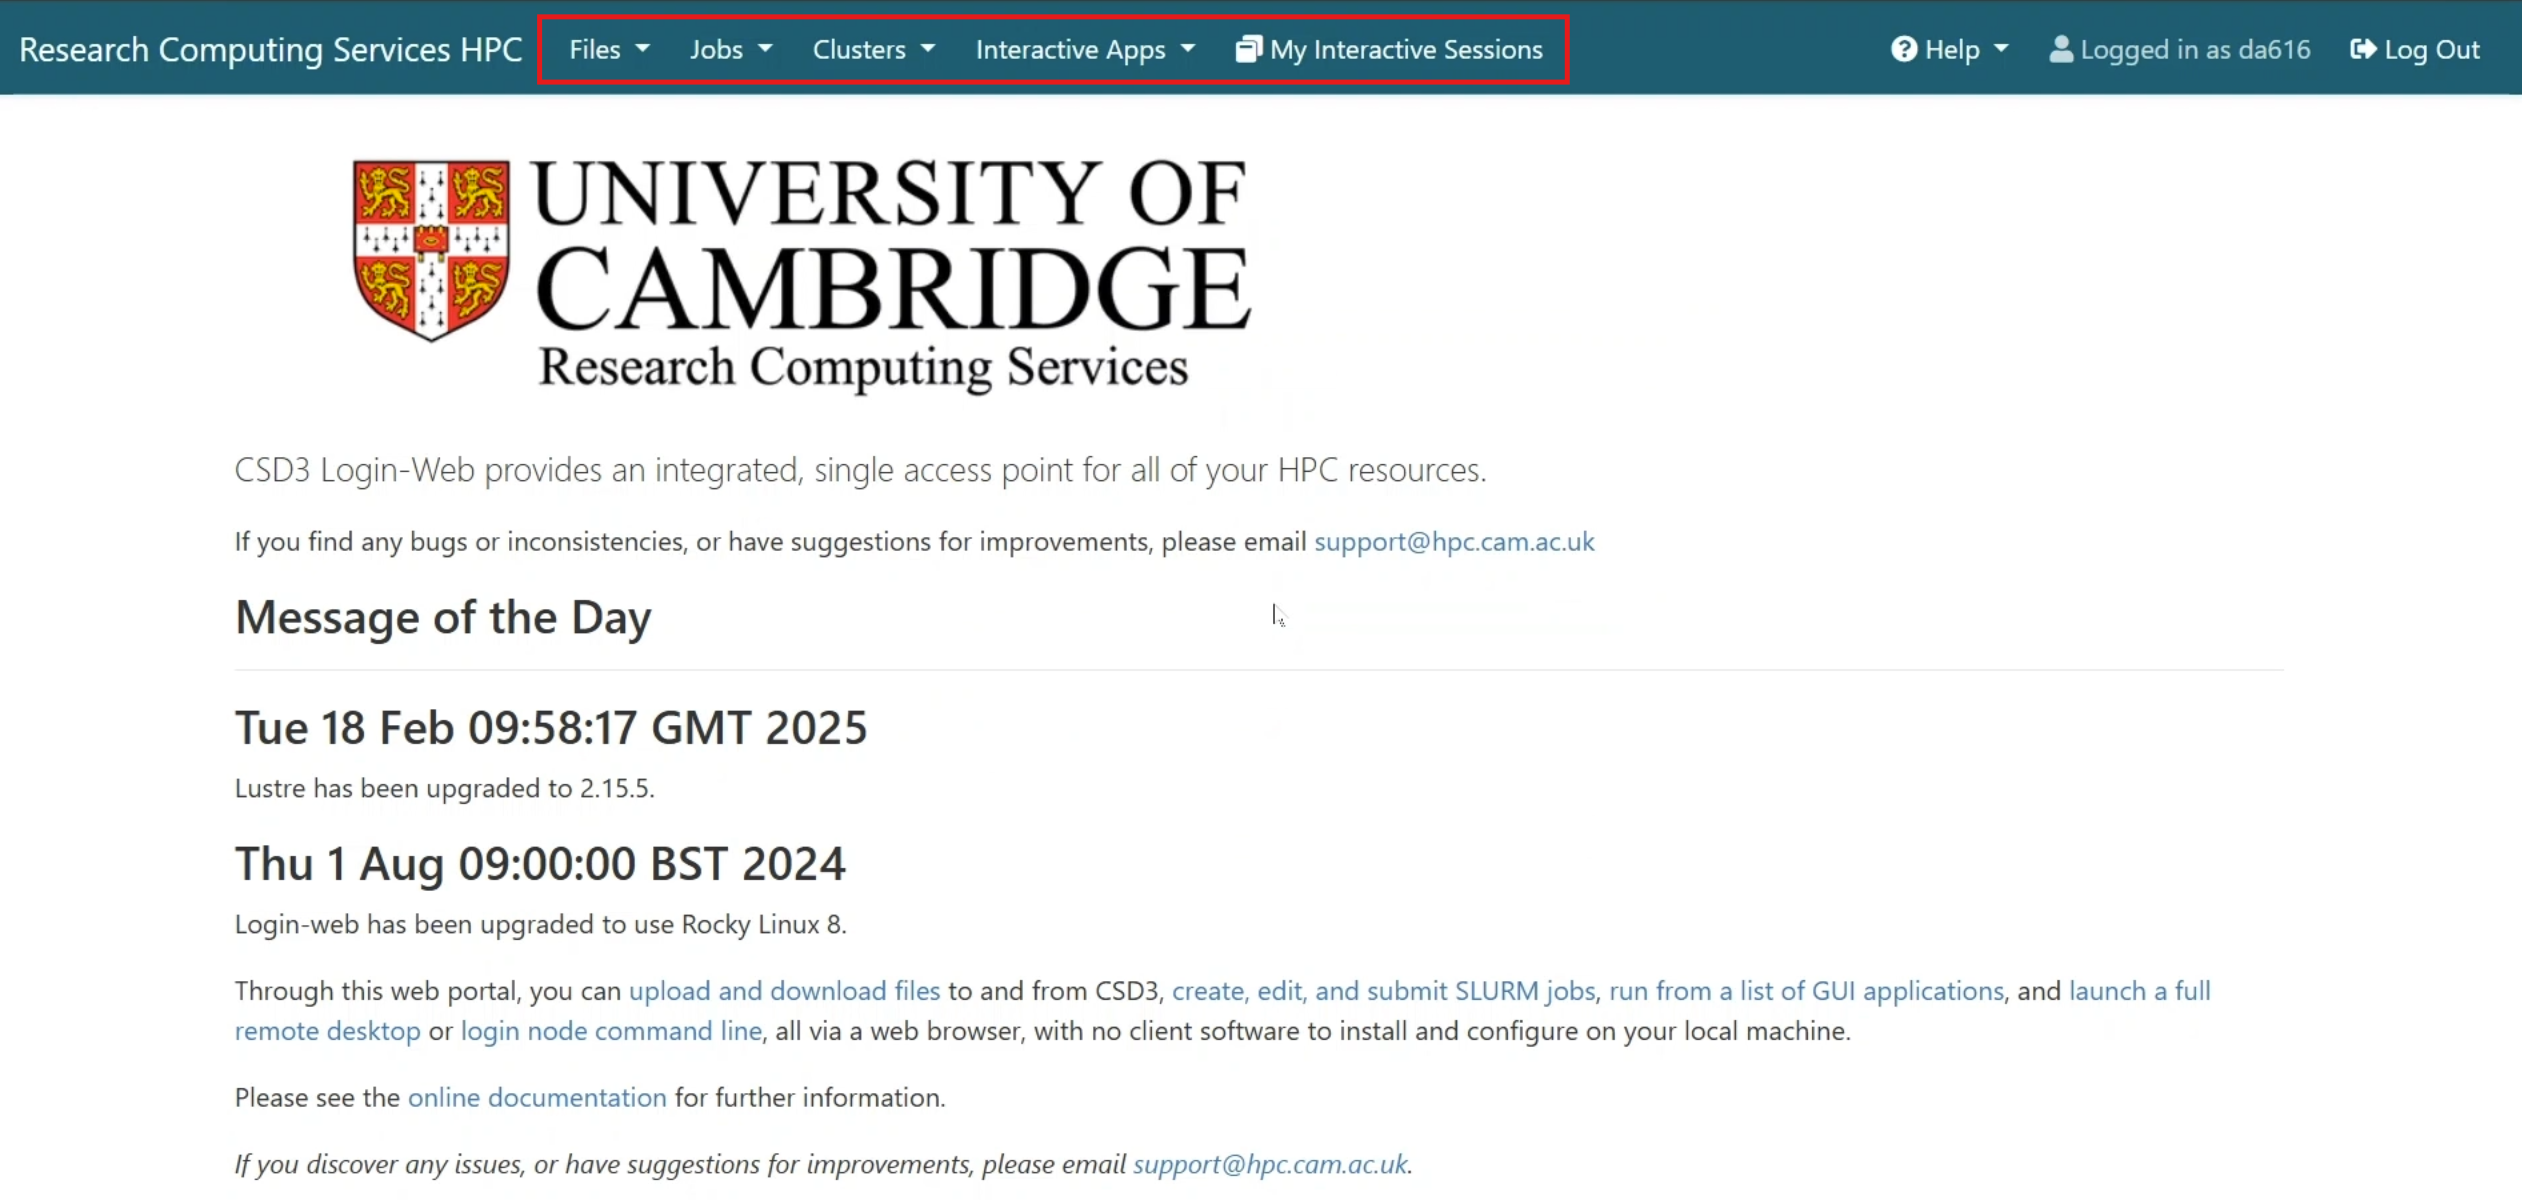
On the main page, you will find the URL to access the system. Please click on it and begin using the platform after completing the authentication process.

Upon completing the authentication process, you will gain access to the resources.
Accessing without MyAccessID - Last Resort
If you are experiencing difficulties using MyAccessID because you cannot find your organisation within the system, it is crucial to take the necessary steps to address this issue. In such a case, you will need to request a local account from our service desk.
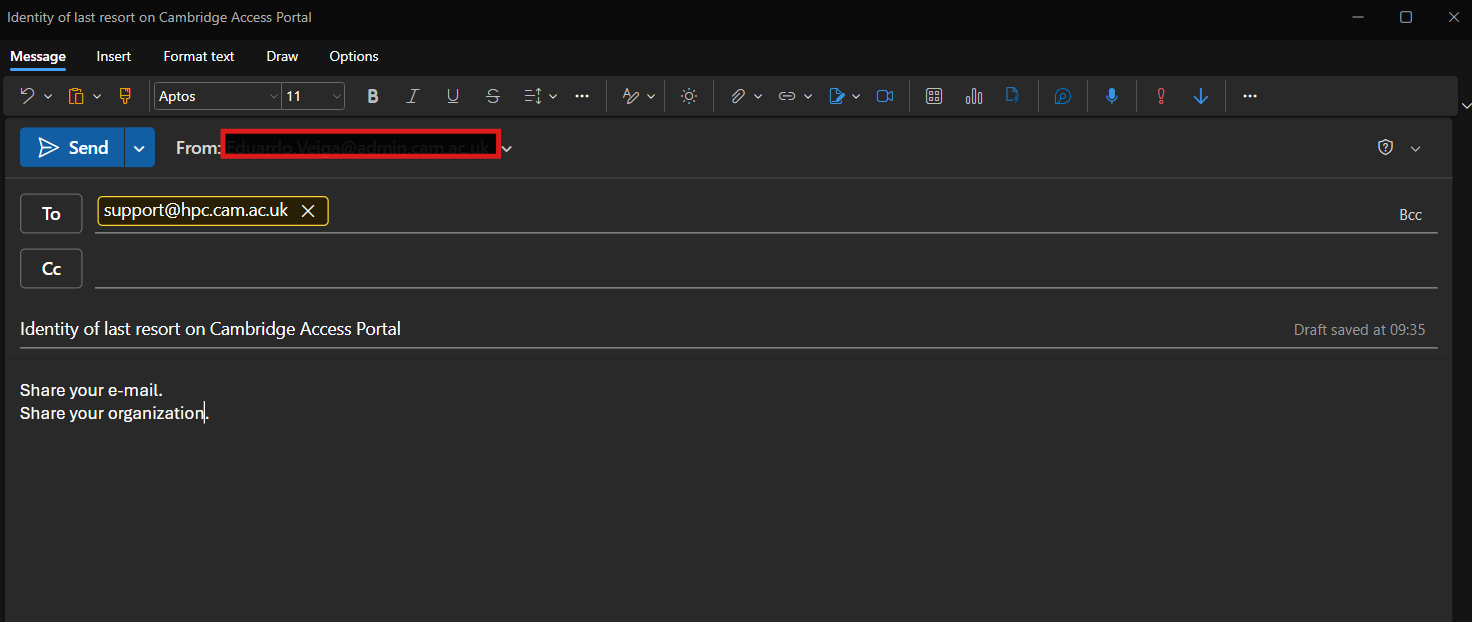
At the bottom of the page, you will find a support option. Please click on it and copy the email address: support@hpc.cam.ac.uk .

When composing your email, make sure to include the title “Identity of last resort on Cambridge Access Portal” in the subject line. This will help the support team to identify your request promptly.
Please provide the name of your organisation along with the email address that will be used to access the Portal.
The service desk team will process your ticket and create your local account in our Keycloak system. You will receive an email with a link to setup your local account password from the service desk team.
Please click on the link provided in the email to set up your password.

Now that you have the password, you can begin the authentication process from the project invitation link received either from your PI or from Cambridge Access Portal admin.
Please select “Sign in with Keycloak.”
To access the Portal, you need to provide your username or email address along with your password. It is important to ensure that the email you enter is identical to the one that was requested for the identity of last resort.
Furthermore, the password you use should be the one that you established by following the link that was shared with you by the service desk. This process is essential for maintaining security and ensuring that only authorised users can access the service desk functionalities.
Once you provide your local account credentials, please click on the “Sign In” button.
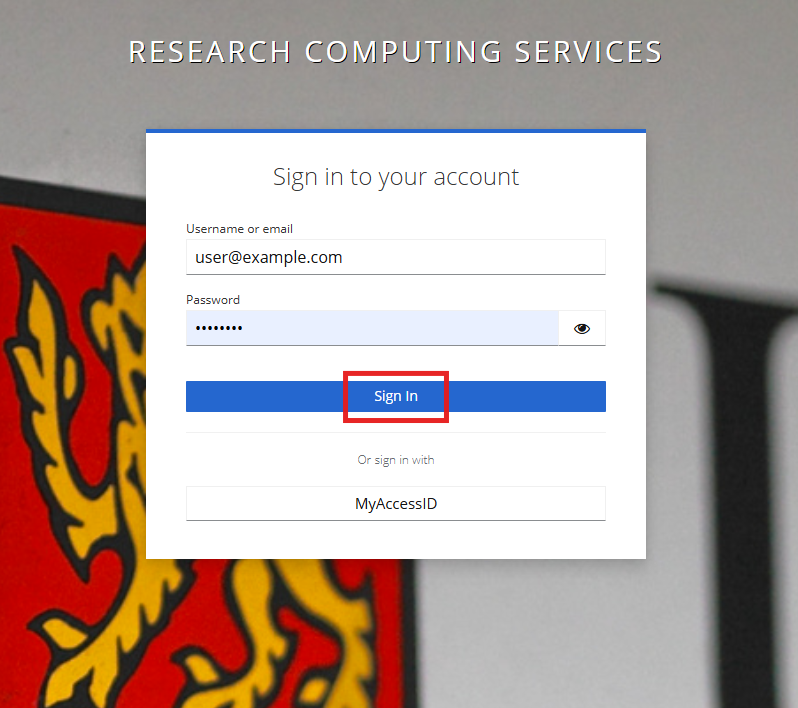
For the first-time login, you will be prompted to set up multi factor authentication. Please note that this multi factor authentication is separate from the ones used for the CSD3 and Open OnDemand services, in case you are already using them for those platforms.
Hardware
The Dawn (PVC) nodes are:
- 256 Dell PowerEdge XE9640 servers
each consisting of:
- 2x Intel(R) Xeon(R) Platinum 8468 (formerly codenamed Sapphire Rapids) (96 cores in total)
- 1024 GiB RAM
- 4x Intel(R) Data Center GPU Max 1550 GPUs (formerly codenamed Ponte Vecchio) (128 GiB GPU RAM each)
- Xe-Link 4-way GPU interconnect within the node
- Quad-rail NVIDIA (Mellanox) HDR200 InfiniBand interconnect
and each PVC GPU contains two stacks (previously known as tiles) and 1024 compute units.
Software
At the time of writing, we recommend logging in initially to the CSD3 login-dawn nodes (login-dawn.hpc.cam.ac.uk). To ensure your environment is clean and set up correctly for Dawn, please purge your modules and load the base Dawn environment:
module purge
module load rhel9/default-dawn
The PVC nodes run Rocky Linux 9, which is a rebuild of Red Hat Enterprise Linux 9 (RHEL9). The Sapphire Rapids CPUs on these nodes are also more modern and support newer instructions than most other CSD3 partitions.
As we provide a separate set of modules specifically for dawn nodes, in general, we don’t support running software built for other CSD3 partitions on Dawn nodes. Therefore you are strongly recommended to rebuild your software on the Dawn nodes rather than try to run binaries previously compiled on CSD3.
Be aware that the software environment for Dawn is optimised for its hardware and the binaries may fail to run on other CSD3 compute nodes and all login nodes. If you wish to recompile or test against this new environment, we recommend requesting an interactive node with command:
sintr -t 01:00:00 -A YOURPROJECT-DAWN-GPU -p pvc9 -N 1 -c 24 --gres=gpu:1
The nodes are named according to the scheme pvc-s-[1-256].
Slurm partition
The PVC (pvc-s) nodes are in a new pvc Slurm partition.
Dawn Slurm projects follow the CSD3 naming convention for GPU projects and contain units of GPU hours. Additionally Dawn project names follow the pattern NAME-DAWN-GPU.
Recommendations for running on Dawn
The resource limits are currently set to a maximum of 64 GPUs per user with a maximum wallclock time of 36 hours per job.
These limits should be regarded as provisional and may be revised.
Default submission script for dawn
A template submission script will be provided soon.
To submit a job to the Dawn PVC partition, your batch script should look similar to the following example:
#!/bin/bash -l
#SBATCH --job-name=my-batch-job
#SBATCH --account=<your Dawn SLURM account>
#SBATCH --partition=pvc9 # Dawn PVC partition
#SBATCH -n 4   # Number of tasks (usually number of MPI ranks)
#SBATCH -c 24  # Number of cores per task
#SBATCH --gres=gpu:1 # Number of requested GPUs per node

. /etc/profile.d/modules.sh
module purge
module load rhel9/default-dawn
# Set up environment below for example by loading more modules

srun <your_application>
Jobs requiring N GPUs where N < 4
Although there are 4 GPUs in each node it is possible to request fewer than this, e.g. to request 3 GPUs use:
#SBATCH --nodes=1
#SBATCH --gres=gpu:3
#SBATCH -p pvc9
Jobs requiring multiple nodes
Multi-node jobs need to request 4 GPUs per node, i.e.:
#SBATCH --gres=gpu:4
Jobs requiring MPI
We currently recommend using the Intel MPI Library provided by the oneAPI toolkit:
module av intel-oneapi-mpi
To use GPU Aware MPI and allow passing device buffers to MPI calls, set the I_MPI_OFFLOAD
environment variable to 1 in your submission script:
export I_MPI_OFFLOAD=1
If you are sure that your code only involves buffers of the same type (e.g. only GPU buffers or only host buffers) in a single MPI operation you can further optimize MPI communication between GPUs by setting
export I_MPI_OFFLOAD_SYMMETRIC=1
This will disable handling of MPI communication between GPU buffers and host buffers.
Multithreading jobs
If your code uses multithreading (e.g. host-based OpenMP), you will need to specify the number of threads per process in your Slurm batch script using the cores-per-task parameter. For example, to run a hybrid MPI-OpenMP application using 24 processes and 4 threads per task:
#SBATCH -n 24 # or --ntasks
#SBATCH -c 4 # or --cores-per-task
If you do _not_ specify the cores-per-task parameter Slurm will pin the threads to the same core, reducing performance.
Recommended Compilers
We recommend using the Intel oneAPI compilers for C, C++ and Fortran:
module avail intel-oneapi-compilers
These compilers support both standard, host-based code as well as SYCL for C++ codes, and OpenMP offload in C, C++ and Fortran. Please note that the ‘classic’ Intel compilers (icc, icpc and ifort) have been deprecated or removed; only the ‘new’ compilers (icx, icpx and ifx) are supported and are the only ones that support GPUs.
To enable SYCL support:
icpx -fsycl
For OpenMP offload (note -fiopenmp, not -fopenmp):
# C
icx -fiopenmp -fopenmp-targets=spir64
# Fortran
ifx -fiopenmp -fopenmp-targets=spir64
Both Intel MPI and the oneMKL performance libraries support both CPU and the PVC GPUs, and can be found as follows:
module av intel-oneapi-mpi
module av intel-oneapi-mkl
Other recommendations
Further useful information about running on Intel GPUs can be found in Intel’s oneAPI GPU Optimization Guide.
Machine Learning & Data Science frameworks
We provide a set of pre-populated Conda environments based on the Intel Distribution for Python:
module av intelpython-conda
conda info -e
This module provides environments for PyTorch and Tensorflow.
Please note that Intel code and documentation sometimes refers to ‘XPUs’, a more generic term for accelerators, GPU or otherwise. For Dawn, ‘XPU’ and ‘GPU’ can usually be considered interchangeable.
PyTorch
PyTorch on Intel GPUs is supported by the Intel Extension for PyTorch. On Dawn this version of PyTorch is accessible as a conda environment named pytorch-gpu:
module load intelpython-conda
conda activate pytorch-gpu
Adapting your code to run on the PVCs is straightforward and only takes a few lines of code. For details, see the official documentation - but as a quick example:
import torch
import intel_extension_for_pytorch as ipex

...

# Enable GPU
model = model.to('xpu')
data = data.to('xpu')

model = ipex.optimize(model, dtype=torch.float32)
TensorFlow
Intel supports optimised TensorFlow on both CPU and GPU, using the Intel Extension for TensorFlow. On Dawn this version on TensorFlow is accessible as a conda environment named tensorflow-gpu:
module load intelpython-conda
conda activate tensorflow-gpu
To run on the PVCs, there should be no need to modify your code - the Intel optimised implementation will run automatically on the GPU, assuming it has been installed as intel-extension-for-tensorflow[xpu].
Jax/OpenXLA
Documentation can be found on GitHub: Intel OpenXLA
Julia
This is currently known not to work correctly on PVC GPUs. (Mar 2024)