5. Orchestration Service: OpenStack Heat
This section will introduce you the main concepts regarding the OpenStack orchestration service (Heat) and it will help you deploy you first service in order to get familiar with this service.
5.1. Cloud Orchestration
Cloud orchestration is the use of programming technology to manage the interconnections and interactions among workloads on public and private cloud infrastructure. It connects automated tasks into a cohesive workflow to accomplish a goal.
Cloud orchestration is typically used to provision, deploy or start servers; acquire and assign storage capacity; manage networking; create VMs; and gain access to specific software on cloud services. This is accomplished through three main, closely related attributes of cloud orchestration: service, workload and resource orchestration.
Given the many moving parts in cloud, orchestration brings dependency management, scaling resources, failure recovery, and numerous other tasks and attributes into a single process that can tremendously reduce staff effort.
5.1.1. Cloud orchestration vs. Cloud automation
Cloud Orchestration provides coordination among and across many automated activities. Cloud Automation focuses on making one task repeatable rapidly with minimal operator intervention, but Cloud Orchestration also provides the capacity of manage dependecies between different tasks and an automatic failure recovery in case something goes wrong aling the process (rollback). Actually, we can say Cloud Automation is a subset of Cloud Orchestration.
5.1.2. Benefits
Cloud orchestration is of interest to many IT organizations and DevOps adopters as a way to speed the delivery of services and reduce costs. A cloud orchestrator automates the management, coordination and organization of complicated computer systems, and services. In addition to reduced personnel involvement, orchestration eliminates the potential for errors introduced into provisioning, scaling or other cloud processes.
Orchestration software helps IT organizations standardize templates and enforce security practices. In addiction, the centralized nature of an orchestration platform enables administrators to review and improve automation scripts.
5.2. What is Heat?
Heat is the main project in the OpenStack Orchestration program and its mission is to create a human- and machine-accessible service for managing the entire lifecycle of infrastructure and applications within OpenStack clouds.
It implements an orchestration engine to launch multiple composite cloud applications based on templates in the form of text files that can be treated like code. A native Heat template format is evolving, but Heat also endeavours to provide compatibility with the AWS CloudFormation template format, so that many existing CloudFormation templates can be launched on OpenStack.
5.2.1. How it works
A Heat template describes the infrastructure for a cloud application in a text file using resources, parameters, and functions. Thes infrastructure resources that can be described include: servers, floating ips, volumes, security groups, users.
Templates can also specify the relationships between resources (e.g. this volume is connected to this server). This enables Heat to call out to the OpenStack APIs to create all of your infrastructure in the correct order to completely launch your application.
Heat manages the whole lifecycle of the application, so when you need to change your infrastructure, you only need to modify the template and use it to update your existing stack. Heat knows how to make the necessary changes. It will delete all of the resources when you are finished with the application, too.
Heat primarily manages infrastructure, but the templates integrate well with software configuration management tools such as Puppet and Chef. The Heat team is working on providing even better integration between infrastructure and software.
5.2.2. Basic concepts
The Orchestration service provides a template-based orchestration for describing a cloud application by running OpenStack API calls to generate running cloud applications. The software integrates other core components of OpenStack into a one-file template system.
- The templates allow you to create most OpenStack resource types such as instances, floating IPs, volumes, security groups, and users.
- Templates can also specify the relationships between resources (e.g. this volume is connected to this server). This enables Heat to call out to the OpenStack APIs to create all of your infrastructure in the correct order to completely launch your application.
- Heat provides an autoscaling service that integrates with Telemetry, a component that provides performance monitoring, so you can include a scaling group as a resource in a template.
- It also provides advanced functionality such as instance high availability and nested stacks.
- Heat manages the whole lifecycle of the application - when you need to change your infrastructure, simply modify the template and use it to update your existing stack. Heat knows how to make the necessary changes. It will delete all of the resources when you are finished with the application, too.
- Even Heat primarily manages infrastructure, the templates integrate well with software configuration management tools such as Puppet and Chef. The Heat team is working on providing even better integration between infrastructure and software.
The Orchestration service consists of the following components:
- A stack stands for all the resources necessary to operate an application. It can be as simple as a single instance and its resources, or as complex as multiple instances with all the resource dependencies that comprise a multi-tier application.
- Templates are YAML scripts that define a series of tasks for Heat to execute.
It is preferable to use separate templates for certain functions, for example:
- Template File: This is where you define thresholds that Telemetry should respond to, and define auto scaling groups.
- Environment File: Defines the build information for your environment: which flavor and image to use, how the virtual network should be configured, and what software should be installed.
Then, we can describe these three elements in the way how they interact:
- Template: Static architectural design of your application
- Environment: Specific details that affect the instantiation of the Template
- Stack: Template + Environment
5.2.2.1. Template files
HOT is a template format supported by the heat, along with the other template format, i.e. the Heat CloudFormation-compatible format (CFN). A detailed specification of HOT can be found at Heat Orchestration Template (HOT) specification.
The most basic template you can think of may contain only a single resource definition using only predefined properties (along with the mandatory Heat template version tag). For example, the template below could be used to simply deploy a single compute instance:
heat_template_version: 2015-04-30
description: Simple template to deploy a single compute instance

resources:
  my_instance:
    type: OS::Nova::Server
    properties:
      key_name: my_key
      image: F18-x86_64-cfntools
      flavor: m1.small
5.2.2.2. Environment files
An environment file as a container for anything that affects the behavior of the Template. So parameters can be written into an environment file or automatically inserted if you pass them on the cli or using the dashboard, like define any extra/non-keystone credentials in the Environment.
An example of environment file:
parameters:
  InstanceType: m1.xlarge
  DBUsername: angus
  DBPassword: verybadpass
  KeyName: heat_key
credentials:
  rackspace_creds:
      username: myusername
      api_key: 012345abcdef67890
resources:
  provider: rackspace.com
  DatabaseServer:
      ImageId: this_image_please
5.3. Why could Heat do for you?
You can configure Orchestration (heat) to use pre-defined rules that consider factors such as CPU or memory usage, add and remove additional instances automatically when they are needed. This allows you to configure an Auto Scaling service for Compute Instances, so you could automatically scale out your compute instances in response to heavy system usage.
The core components providing automatic scaling are Orchestration (heat) and the Telemetry service. Orchestration allows you to define rules in templates, and Telemetry does performance monitoring of your OpenStack environment, collecting data on CPU, storage, and memory utilization for instances and physical hosts. Orchestration templates examine Telemetry data to assess whether any pre-defined action should start.
Here you will find a complete Auto Scaling example based on CPU usage, that shows you how to automatically increases the number of instances in response to high CPU usage.
5.3.1. Cloud init and Heat
The OpenStack Heat project implements injection in Python for cloud-init-enabled virtual machines. Injection occurs by passing information to the virtual machine that is decoded by cloud-init.
IaaS paltforms require a method for users to pass data into the virtual machine and OpenStack provides a metadata server which is co-located with the rest of the OpenStack infrastructure. When the virtual machine is booted, it can then make a HTTP request to a specific URI and return the user data passed to the instance during instance creation.
Cloud-init’s job is to contact the metadata server and bootstrap the virtual machine with desired configurations. You will find more examples here. This template demonstrates some different ways configuration resources can be used to specify boot-time cloud-init configuration:
heat_template_version: 2013-05-23

[ .. ]

resources:
    one_init:
        type: OS::Heat::CloudConfig
        properties:
        cloud_config:
            write_files:
            - path: /tmp/one
            content: "The one is bar"
    two_init:
        type: OS::Heat::SoftwareConfig
        properties:
        group: ungrouped
        config: |
            #!/bin/sh
            echo "The two is bar" > /tmp/two
    server_init:
        type: OS::Heat::MultipartMime
        properties:
        parts:
        - config: {get_resource: one_init}
        - config: {get_resource: two_init}

    server:
        type: OS::Nova::Server
        properties:

        [ .. ]

        user_data_format: RAW
        user_data:
            get_resource: server_init
5.4. Orchestrate your service
This section introduces you in the usage of the OpenStack orquestration service. The main goal is to recreate the scenario of the previous section, but using the Heat service to perform all the operations.
5.4.1. Summary
There are some prerequisites that should be accomplished in order to follow these steps:
- Both Services and Management networks created at the Network section should still remain up and running
- Public router must exist and connected to the CUDN Internet network
- At least a server key should be created beforehand
- Your project needs access to the debian-9-openstack-amd64 image and C1.vss.tiny flavor.
Now, we want to code a new Heat template to deploy the service. It has to create a new server instance, attach required security groups, create and prepare a new volume, and then download and deploy the source code in that server.
A summary of the main goals we want to accomplish inside this template:
- Create a new volume and attach to the server instance
- Create a new Floation IP address and attach to the server instance
- Define some parameters in your template to like the flavor used, volume size, ssh keypair, etc.
- Install required packages and deploy the source code from the file saved in the storage container
- Create the server instance. Ensure this instance has required security groups, volumes, and networks attached
- On first boot, this server should perform the following tasks using cloud-init tasks or an user_data script:
- Install all required packages
- Create a partition on the attached volume
- Format this partition and create a mount point
- Download the Tetris source code from the public container
- Configure Nginx to access the right directory
After creating the template, you should create the Tetris stach using the OpenStack dashboard. The following links will help you through the process:
5.4.1.1. Basic template
The most basic template you can think of may contain only a single resource definition using only predefined properties (along with the mandatory Heat template version tag). For example, the template below could be used to simply deploy a single compute instance.
heat_template_version: 2015-04-30

description: Simple template to deploy a single compute instance

resources:
    my_server:
        type: OS::Nova::Server
        properties:
        key_name: "server-key"
        image: "debian-9-openstack-amd64"
        flavor: "C1.vss.tiny"
        networks:
            - network: Service
            - network: Management
        security_groups:
            - WebServer
As you can see in the example, HOT templates are written as structured YAML text files. This particular example contains three top-level sections:
- heat_template_version is a mandatory section that is used to specify the version of the template syntax that is used.
- description (optional) is used to provide a description of what the template does.
- resources is the most important section in a template, because this is where the different components are defined. In this first example, the only resource is called my_instance, and it is declared with type OS::Nova::Server, which is the type of a Nova compute instance. The properties sub-section identifies which image, flavor, public key and private network to use for the instance.
Notice we alread included some properties in our server definition like flavor, security groups, and networks we are going to use.
5.4.1.2. Adding paramenters
Input parameters defined in the parameters section of a HOT template (see also the Parameters section in the OpenStack template Guide) allow users to customize a template during deployment. For example, this allows for providing custom key-pair names or image IDs to be used for a deployment. From a template author’s perspective, this helps to make a template more easily reusable by avoiding hardcoded assumptions.
Sticking to the example used above, it makes sense to allow users to provide their custom key-pairs and to select a flavor for the compute instance. This can be achieved by extending the initial template as follows:
heat_template_version: 2015-04-30

description: Simple template to deploy a single compute instance

parameters:
key_name:
    type: string
    label: Key Name
    description: Name of key-pair to be used for compute instance
    constraints:
    - custom_constraint: nova.keypair
instance_type:
    type: string
    label: Instance Type
    description: Type of instance (flavor) to be used
    constraints:
    - allowed_values: [ C1.vss.tiny ]
        description: Value must be one of these values.

resources:
    my_server:
        type: OS::Nova::Server
        properties:
        key_name: { get_param: key_name }
        image: "debian-9-openstack-amd64"
        flavor: { get_param: instance_type }
        networks:
            - network: Service
            - network: Management
        security_groups:
            - WebServer
You can also define default values for input parameters which will be used in case the user does not provide the respective parameter during deployment, or restricting user input, to restrict the values of input parameters that users can supply. Find more information about these options at the Heat Orchestration Template (HOT) specification.
5.4.1.3. Attach other resources
The resources section defines actual resources that make up a stack deployed from the HOT template (for instance compute instances, networks, storage volumes). Each resource is defined as a separate block in the resources section with a specific syntax you can check here.
The previous example shows the creation of an instance resource, but the example below shows you how to create the rest of resources -and associations- we need in our deployment:
resources:
    floating_ip:
        type: OS::Nova::FloatingIP
        properties:
            pool: CUDN-Internet

    server_fip_association:
        type: OS::Nova::FloatingIPAssociation
        properties:
        floating_ip: { get_resource: floating_ip }
        server_id: { get_resource: my_server }

    new_volume:
        type: OS::Cinder::Volume
        properties:
        size: 2

    volume_attachment:
        type: OS::Cinder::VolumeAttachment
        properties:
        volume_id: { get_resource: new_volume }
        instance_uuid: { get_resource: my_server }
        mountpoint: /dev/vdc
5.4.1.4. Customize your instance
A user data file is a special key in the metadata service that holds a file that cloud-aware applications in the guest instance can access. For example, one application that uses user data is the cloud-init system, which is an open-source package from Ubuntu that is available on various Linux distributions and which handles early initialization of a cloud instance.
You can place user data in a template file and pass it through user_data property at instance definition. This example shows you how to use the apt command to install some packages when the server is starting:
resources:
    my_server:
        type: OS::Nova::Server
        depends_on: [ new_volume ]
        properties:
        user_data:
            str_replace:
            template: |
                #!/bin/bash -x
                 # Install packages
                sudo apt update && sudo apt -y install parted curl nginx

        key_name: { get_param: key_name }
        image: "debian-9-openstack-amd64"
        flavor: { get_param: instance_type }
        networks:
            - network: Service
            - network: Management
        security_groups:
            - WebServer
5.4.1.5. Create the tetris stack
As a result of combining previous concepts and putting all together, the final Heat template file could look like this example below:
heat_template_version: 2015-04-30

description: Simple template to deploy a tetris game instance

parameter_groups:
- label: Instance
description: instance configuration
parameters:
- key_name
- instance_type
- tetris_url

parameters:
key_name:
    type: string
    label: Key Name
    description: Name of key-pair to be used for compute instance
    constraints:
    - custom_constraint: nova.keypair

instance_type:
    type: string
    label: Instance Type
    description: Type of instance (flavor) to be used
    constraints:
    - allowed_values: [ C1.vss.tiny ]
        description: Value must be one of these values.

tetris_url:
    type: string
    label: Tetris source code URL
    description: Tetris URL
    default: "http://object.staging.vss.cloud.private.cam.ac.uk/swift/v1/mycontainer/tetris.tar.gz"

resources:
my_server:
    type: OS::Nova::Server
    depends_on: [ new_volume ]
    properties:
    user_data:
        str_replace:
        template: |
            #!/bin/bash -x

            # Fix default gateway
            echo "route add default gw 192.168.100.1" >> /etc/rc.local
            echo "route del default gw 192.168.101.1" >> /etc/rc.local
            bash /etc/rc.local

            # Install packages
            sudo apt update && sudo apt -y install parted curl nginx

            # Ensure nginx is enabled
            systemctl enable nginx

            # Create partition and force format
            parted /dev/vdc mklabel gpt
            parted /dev/vdc mkpart primary ext4 0% 100%
            parted /dev/vdc print
            mkfs.ext4 -F /dev/vdc1

            # Create mount point and add to /etc/fstab
            mkdir /data
            echo '/dev/vdc1       /data   ext4    defaults 0 0' >> /etc/fstab
            # Mount and check
            mount /data &&  cat /proc/mounts | tail -1

            # Download from the public container
            curl -X GET $tetris_url -o tetris.tar.gz

            # Decompress the file
            tar xzvf tetris.tar.gz -C /data/

            # Allow access to www-data
            chgrp www-data /data/tetris -R

            # Set nginx root dir
            sed -i 's:.*root /var/www/html:root /data/tetris:' /etc/nginx/sites-enabled/default
            systemctl restart nginx
        params:
            $tetris_url: { get_param: tetris_url }
    key_name: { get_param: key_name }
    image: "debian-9-openstack-amd64"
    flavor: { get_param: instance_type }
    networks:
        - network: Service
        - network: Management
    security_groups:
        - WebServer

floating_ip:
    type: OS::Nova::FloatingIP
    properties:
        pool: CUDN-Internet

server_fip_association:
    type: OS::Nova::FloatingIPAssociation
    properties:
    floating_ip: { get_resource: floating_ip }
    server_id: { get_resource: my_server }

new_volume:
    type: OS::Cinder::Volume
    properties:
    size: 2

volume_attachment:
    type: OS::Cinder::VolumeAttachment
    properties:
    volume_id: { get_resource: new_volume }
    instance_uuid: { get_resource: my_server }
    mountpoint: /dev/vdc

outputs:
server_ip:
    description: Floating IP assigned to the server
    value: { get_attr: [my_server, networks, Service, 0]}
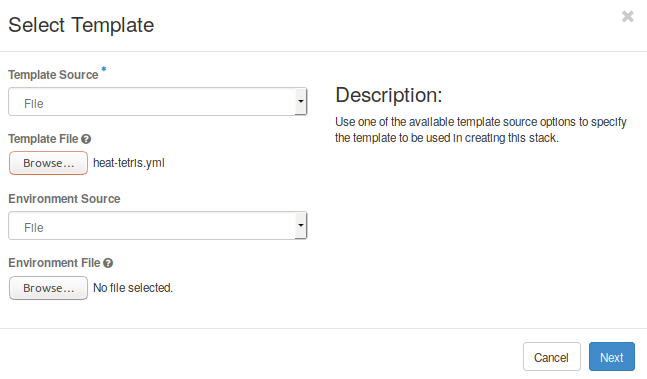
Now you can use this code to create a new stack using the dashboard. Go to Project -> Orchestration -> Stacks and click on the Launch stack button. A new menu should appear allowing to select the Heat template file you created (Fig. 5.2). Optionally, you are able to provide a environment file to use with this template. Click Next.
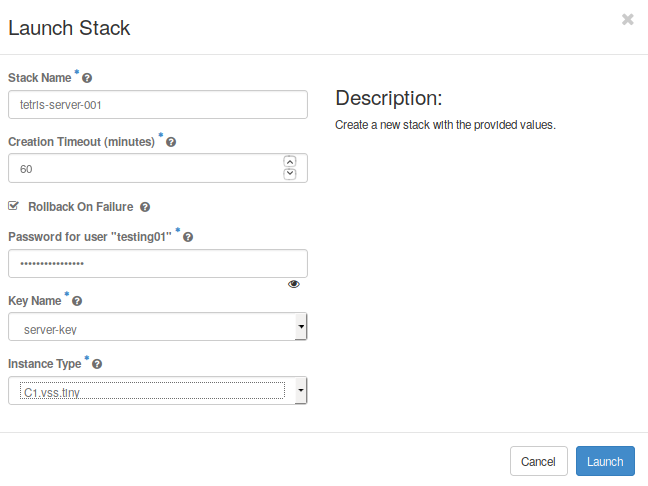
Now, if there are no errors in your template, a Launch stack menu should appear (Fig. 5.3). Notice, along to the mandatory parameters (like Stack Name, password, etc), you will see all parameters defined in your template: ssh keypair, instance type, etc.
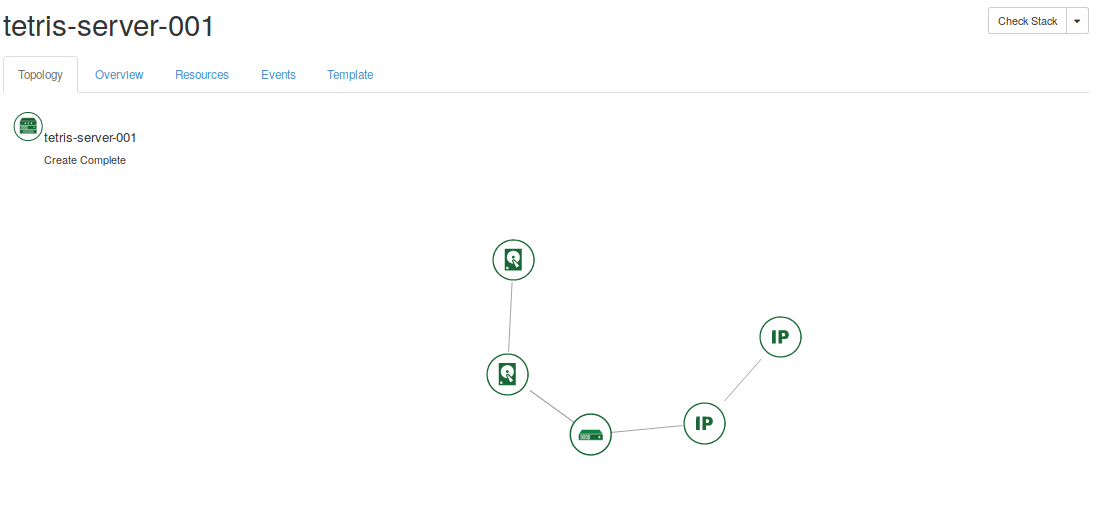
Finally, click on launch and wait until all the stack resources have been created. In the figures below, it can be seen that a set of resources created for this stack.


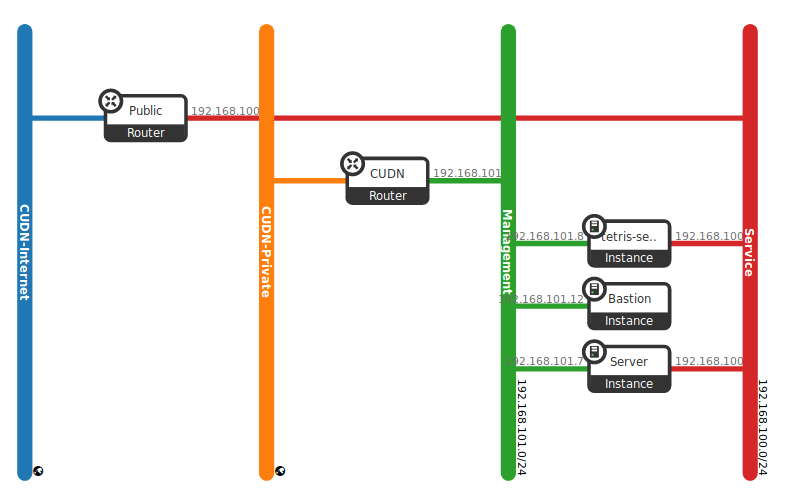
After following all the steps, you should have a new service up and running like the scenarios shown in the Fig. 5.4, and this brings us to the end of this part of the started guide. Try to repeat the process creating new stacks with different parameters, e.g. updating the running stack attaching a bigger storage.
You now have an understanding of how to deploy a completely new service from scratch. That includes how to create networks, subnetworks, create security groups, how to use both block storage and object storage in your service, and how to use the orchestration service to go further in your IaaC deployments.
5.5. Lab 5 - Orchestrate your service
Go to Orchestrate your service and follow the slides to start a hands-on work over this section.
- Lab overview Slide
- Hands-on work


