4. Storage services: OpenStack Cinder and Swift
This section presents the main concepts behind block storage and object storage. It explains how OpenStack provides these services, shows some practical use cases and present some general considerations regarding our platform.
4.1. Basic concepts
Nowadays, a flexible and scalable data storage is a baseline requirement for most applications and services. The needs in terms of storage are growing to support today’s complex deployments, containers, and the need of storing large or small amounts of images, videos, or blobs of text. As a result, cloud providers have developed services to fill the storage needs of modern application deployments, and they mostly fit into two categories: Object storage and Block storage. We offer this two different types of storage possibilities based on OpenStack
4.1.1. Block Storage
Block storage services are relatively simple and familiar. They provide a traditional block storage device -like a hard drive- over the network. Cloud providers often have products that can provision a block storage device of any size and attach it to your virtual machine.
From there, you would treat it like a normal disk. You could format it with a filesystem and store files on it, combine multiple devices into a RAID array, or configure a database to write directly to the block device, avoiding filesystem overhead entirely. Additionally, network-attached block storage devices often have some unique advantages over normal hard drives:
- You can easily take live snapshots of the entire device for backup purposes
- Block storage devices can be resized to accommodate growing needs
- You can easily detach and move block storage devices between machines
This is a very flexible setup that can be useful for most any kind of application.
4.1.2. Object Storage
In the modern world of cloud computing, object storage is the storage and retrieval of unstructured blobs of data and metadata using an HTTP API. Instead of breaking files down into blocks to store it on disk using a filesystem, we deal with whole objects stored over the network. These objects could be an image file, logs, HTML files, or any self-contained blob of bytes. They are unstructured because there is no specific schema or format they need to follow.
Object storage took off because it greatly simplified the developer experience. Because the API consists of standard HTTP requests, libraries were quickly developed for most programming languages. Saving a blob of data became as easy as an HTTP PUT request to the object store. Retrieving the file and metadata is a normal GET request. Further, most object storage services can also serve the files publicly to your users, removing the need to maintain a web server to host static assets.
4.2. What is Cinder?
Cinder is a Block Storage service for OpenStack to provide “block storage as a service”. It’s designed to present storage resources to end users that can be consumed by the OpenStack Compute Project (Nova).
The short description of Cinder is that it virtualizes the management of block storage devices and provides end users with a self service API to request and consume those resources without requiring any knowledge of where their storage is actually deployed or on what type of device.
4.2.1. Concepts
The OpenStack Block Storage service (Cinder) adds persistent storage to a virtual machine. Block Storage provides an infrastructure for managing volumes, and interacts with OpenStack Compute to provide volumes for instances. The service also enables management of volume snapshots, and volume types.
The OpenStack Block Storage service provides persistent block storage resources that OpenStack Compute instances can consume. This includes secondary attached storage similar to the Amazon Elastic Block Storage (EBS) offering. In addition, you can write images to a Block Storage device for Compute to use as a bootable persistent instance. Howerver, the Block Storage service does not provide a shared storage solution like NFS. With the Block Storage service, you can attach a device to only one instance. Quota controls are available to limit to the number of volumes that can be created, the number of snapshot, and the total number of GBs allowed per tenant (shared between snapshots and volumes).
The user’s access to particular volumes is limited by tenant, but the user name and password are assigned per user. Key pairs granting access to a volume are enabled per user, but quotas to control resource consumption across available hardware resources are per tenant.
The basic resources offered by the Block Storage service are volumes and snapshots which are derived from volumes and volume backups:
- Volumes: Allocated block storage resources that can be attached to instances as secondary storage or they can be used as the root store to boot instances
- Snapshots: Snapshots are a Read Only point in time copy of a volume. The snapshot can be created from a volume that is currently in use - even is not recommended- or in an available state. The snapshot can then be used to create a new volume through create from snapshot
- Backups: An archived copy of a volume currently stored in OpenStack Object Storage (Swift).
4.2.2. Manage volumes
Volumes are block storage devices that you attach to instances to enable persistent storage. A volume is a durable, block-level storage device that you can attach to a single instance. You can use these volumes as primary storage for data that requires frequent updates, such as the system drive for an instance or storage for a database application, or for throughput-intensive applications.
Instances and volumes persist independently from each other, so you can attach a volume to a running instance or detach a volume and attach it to another instance at any time. You can also create a snapshot from or delete a volume. After a volume is attached to an instance, you can use it like any other physical hard drive.
The Horizon dashboard allows you to perform all common tasks over volumes using the Volumes (Compute -> Volumes) tab (Fig. 4.1). There you can both create a new volume or edit an existing one. Available menu options may change whether the volume is attached or not, but the available edit options over a selected volume are:
- Extend Volume: Expand the size of this volume.
- Manage attachements: Attach or detach a volume from an instance
- Create Snapshot: Create a snapshot from current volume. Notice it should be dettached to avoid snapshot corruption.
- Upload to image: Create a new image from current volume.
- Create a transfer: Transfer this volume to another OpenStack project. Notice you will lost the ownership of this volume.
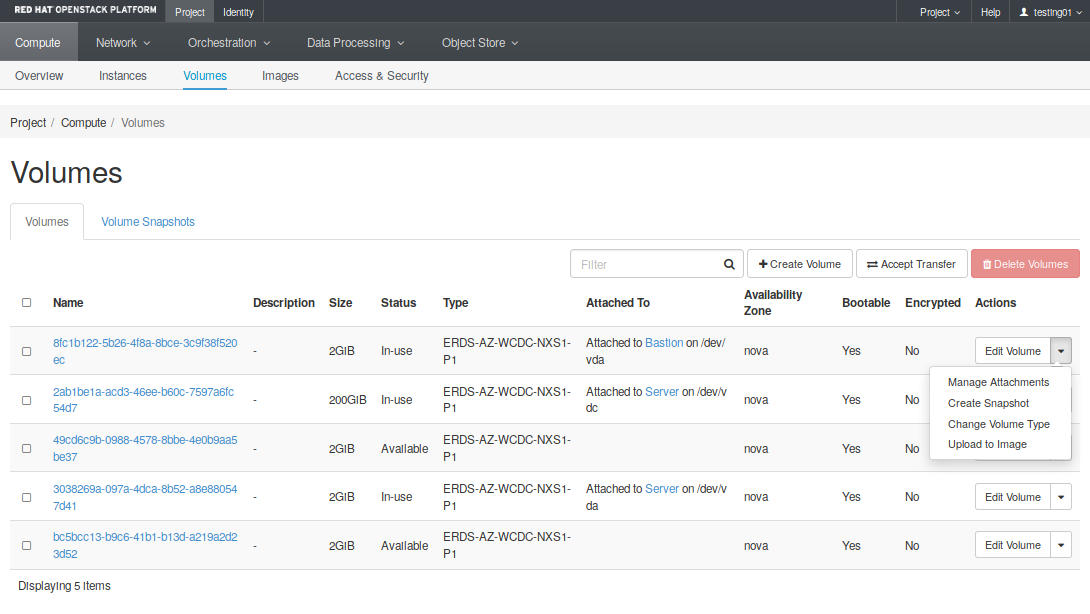
Fig. 4.1 Project -> Compute -> Volumes tab
When creating a new volume (Fig. 4.2), you need to provide a name, a description (optional), and select the Volume Source. You will be able to create a volume empty, but also allows you to choose create this volume from a previous volume, an existing image or a snapshot. These options are very useful because they provide a great flexibility.
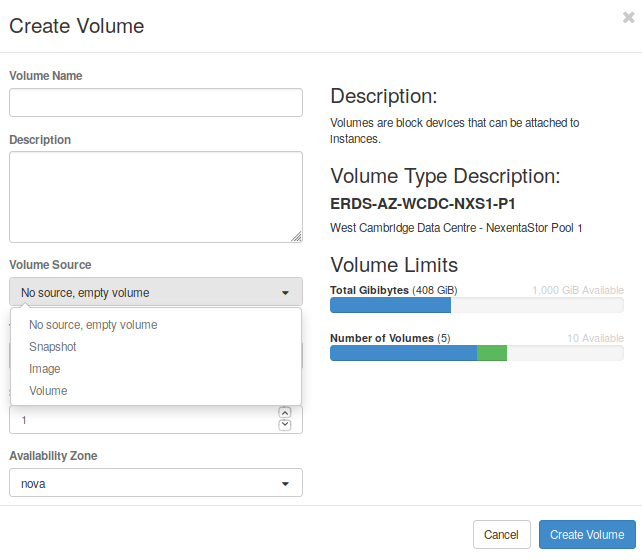
Fig. 4.2 Create a new volume
On the other hand, the Volume Snapshots tab show all snapshots created in this project. When selecting an snapshot, the menu allows to perform some common operations over the selected one (Fig. 4.2), like create a volume from this snapshot, delete it, or launch an image directly from this snapshot.
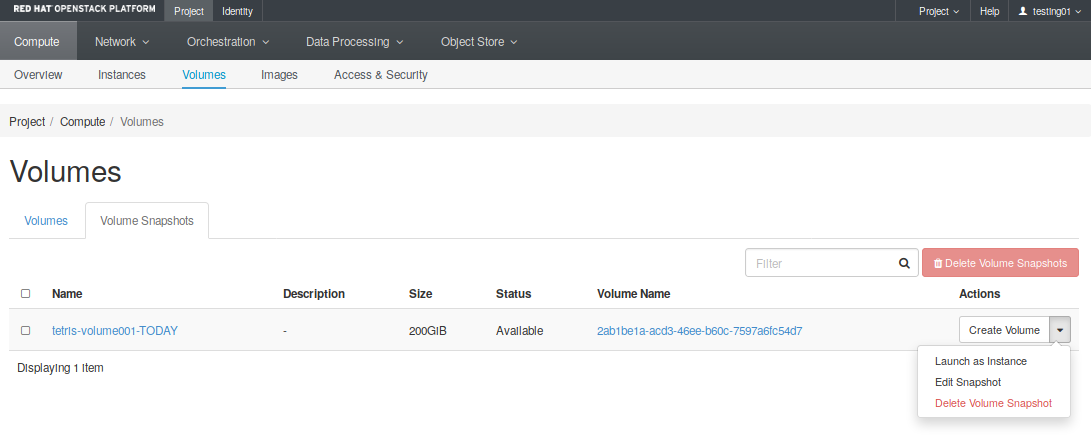
Fig. 4.3 Project -> Compute -> Volumes Snapshots tab
4.3. What is Swift
The OpenStack Object Store project, known as Swift, offers “object storage as a service”. OpenStack Object Storage (swift) is used for redundant, scalable data storage using clusters of standardized servers to store petabytes of accessible data. It uses a distributed architecture with no central point of control, providing greater scalability, redundancy, and permanence, and it ensures data replication and integrity across the cluster.
It is a long-term storage system for large amounts of static data which can be retrieved and updated, and it is ideal for storing unstructured data that can grow without bound.
Swift also provides a fully distributed, API-accessible storage platform that can be integrated directly into applications or used for backup, archiving, and data retention.
4.3.1. Concepts
The Object Storage system organizes data in a hierarchy, as follows:
Account. Represents the top-level of the hierarchy. In the OpenStack environment, account is synonymous with a project or tenant. The account defines a namespace for containers. A container might have the same name in two different accounts.
Container. Defines a namespace for objects. An object with the same name in two different containers represents two different objects. You can create any number of containers within an account.
In addition to containing objects, you can also use the container to control access to objects by using an access control list (ACL). You cannot store an ACL with individual objects. In addition, you configure and control many other features, such as object versioning, at the container level.
You can set a storage policy on a container with predefined names and definitions from your cloud provider.
Object. Stores data content, such as documents, images, and so on. You can also store custom metadata with an object. With the Object Storage API, you can:
- Store an unlimited number of objects. Each object can be as large as 5 GB, which is the default. You can configure the maximum object size.
- Upload and store objects of any size with large object creation.
- Use cross-origin resource sharing to manage object security.
- Compress files using content-encoding metadata.
- Override browser behavior for an object using content-disposition metadata.
- Schedule objects for deletion.
- Bulk-delete up to 10,000 objects in a single request.
- Auto-extract archive files.
- Generate a URL that provides time-limited GET access to an object.
- Upload objects directly to the Object Storage system from a browser by using form POST middleware.
- Create symbolic links to other objects.
The account, container, and object hierarchy affects the way you interact with the Object Storage API. Specifically, the resource path reflects this structure and has this format:
/v1/{account}/{container}/{object}
For example, for the flowers/rose.jpg object in the images container in the 12345678912345 account, the resource path is:
/v1/12345678912345/images/flowers/rose.jpg
Notice that the object name contains the / character. This slash does not indicate that Object Storage has a sub-hierarchy called flowers because containers do not store objects in actual sub-folders. However, the inclusion of / or a similar convention inside object names enables you to create pseudo-hierarchical folders and directories
You will find more information about the Swift API here: https://docs.openstack.org/swift/latest/api/object_api_v1_overview.html
4.3.2. Swift and AWS S3 comparison
General compatibility statement. S3 is a product from Amazon, and as such, it includes “features” that are outside the scope of Swift itself. For example, even it is possbile provide that functionality, log delivery is a service outside of Swift. There are also other features not supported by the Swift’s API like: Versioning, Bucket Policy, Lifecycle and Accelerate (CDN), or serverless Public Website.
4.3.3. Manage containers and objects
The Containers tab (Projects -> Object Storage -> Containers) is the main menu in Horizon that will allow you to create and manage all containers in your project.
The option Add container creates a new container in this project (Fig. 4.4). It also provides an option to allow public access to this container. You can also perform common operations like upload/download objects, upload directories to your container, create folders inside this container, or remove it (and all objects inside) from this project.
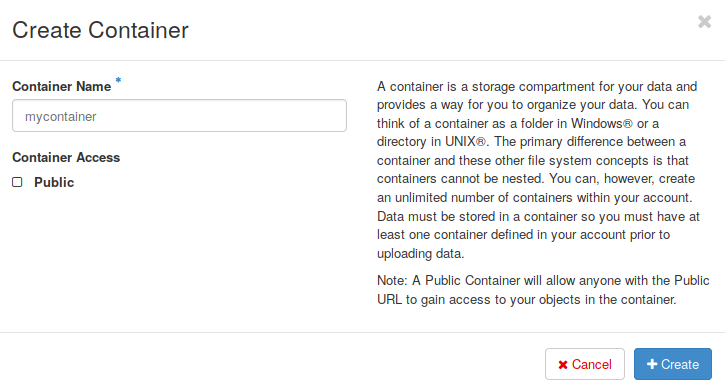
Fig. 4.4 Creating a new container using the Horizon dashboard
In addition to the Horizon dashboard, there are also command line clients and libraries that work with the SWIFT API, like the python-swiftclient. The python-swiftclient project comprises a command line tool and two separate APIs for accessing swift programmatically. Moreover, other tools like curl allows you to interact directly with the SWIFT API, as we wiil see below in this section.
4.4. Storage use cases
Choosing a storage solution can be a complex decision in most cases, but it is likely that any sufficiently complex application will need both types of storage to cover all its needs. Let’s summarize the general advantages, disadvantages, and use cases of both block and object storage technologies, that may help when you have to choose between use one of them.
First, because of its fast IO characteristics, block storage services are well suited for storing data in traditional databases. Additionally, applications that require normal filesystem storage will need to use a block storage device.
Some advantages of block storage are:
- Block storage is a familiar paradigm. People and software understand and support files and filesystems almost universally
- Block devices are well supported. Every programming language can easily read and write files
- Filesystem permissions and access controls are familiar and well-understood
- Block storage devices provide low latency IO, so they are suitable for use by databases.
The disadvantages of block storage are:
- A Block Storage can be only attached to one server at a time
- You can only access block storage through a running server
- Block storage needs more hands-on work and setup vs object storage (filesystem choices, permissions, versioning, backups, etc.)
On the other hand, even Object storage isn’t the right solution for every situation, it has some speciall characteristics that could be applied in different scenarios.
Some advantages of object storage are:
- Object storage services can easily scale from modest needs to really intense use-cases
- Using an object storage service means you don’t have to maintain hard drives and RAID arrays, as that’s handled by the service provider
Some disadvantages of object storage are:
- You can’t use object storage services to back a traditional database, due to the high latency of such services
- Object storage doesn’t allow you to alter just a piece of a data inside the object. Instead, you must read and write an entire object at once.
Regarding object storage, there are other important considerations and things to avoid when integrating an object store into your workflow.
- An object store is not a filesystem: It cannot be stressed enough that your usage of the object store should reflect the proper use case, and not treat the storage like a traditional filesystem.
- There are two main restrictions to bear in mind when designing an application that uses an object store:
- You cannot rename objects. Due to fact that the name of an object is one of the factors that determines where the object and its replicas are stored, renaming would require multiple copies of the data to be moved between physical storage devices. If you want to rename an object you must upload to the new location, or make a server side copy request to the new location, and then delete the original.
- You cannot modify objects. Objects are stored in multiple locations and are checked for integrity based on the MD5 sum calculated during upload. In order to modify the contents of an object, the entire desired contents must be re-uploaded. In certain special cases it is possible to work around this restriction using large objects, but no general file-like access is available to modify a stored object.
- Objects cannot be locked: There is no mechanism to perform a combination of reading the data/metadata from an object and writing an update to that data/metadata in an atomic way. Any user with access to a container could update the contents or metadata associated with an object at any time.
4.5. Add persistence to your services
This section will help you to add a new volumen to your instance, create snapshots, copy a file to Swift and access from your instance to do deploy your service.
4.5.1. Summary
A summary of the main goals we want to accomplish:
- Create a container in the Storage service to keep our assets: tar.gz files.
- Using the scenario obtained from the previous sections, we now want to provision an extra storage capacity for the server instance.
- Install required service and deploy the source code from the file saved in the storage container.
- create a snapshot of the deployment status.
With the OpenStack dashboard, but also using a SSH session, the workflow for creating the scenario proposed is as follows:
- Create a public container (bucket) used to keep the source code package.
- Create an extra volume to save all data and attach it to the instance. Mount it in the /data directory.
- Log in to tge server instance, prepare the volume, and configure the server installing required packages
- Download the source code using curl and the swift API.
- Decompress the source code into the /data directory. Configure and restart the web server. Check the service is working
- If everything is OK, create a snapshot of the volume using the dashboard.
4.5.1.1. Create the container and upload the source code
First, we need the source code to deploy inside our server. Download a tar.gz file with the source code from here.
Now, to create a container to store the file (as an object) in the OpenStack Object Storage system.
- You can go to the section menu Project -> Object Storage and click on + Container button.
- Then, set the name you want to assign to your container. In this example we want to create a mycontainer container. Notice you should also allow public access to this container.
- Finally, click on create.
Fig. 4.5 Creating a new container mycontainer
Now, on the Object Storage tab, select your recently created container and upload the tar.gz file. You also have operations to upload and entire folder to this container.
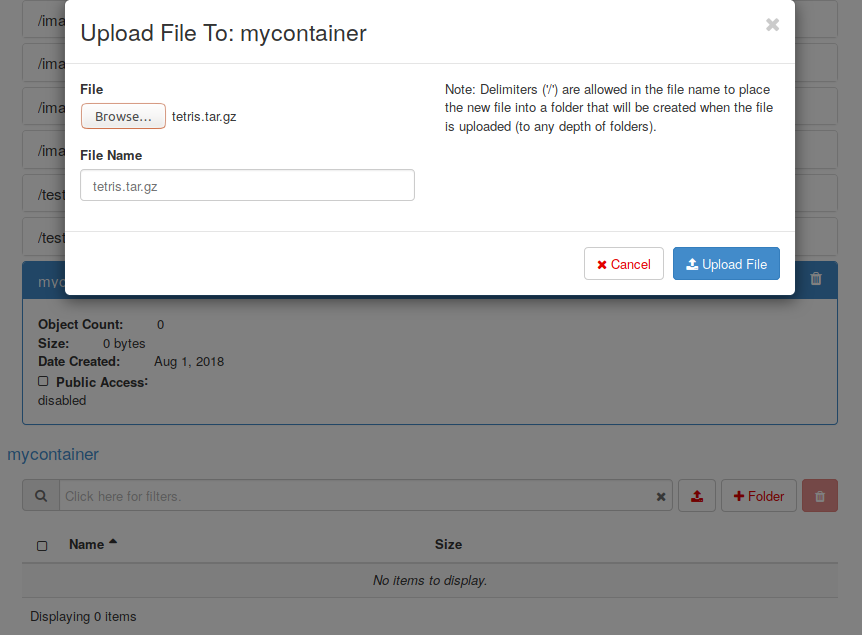
Fig. 4.6 Uploading a file in mycontainer
4.5.1.2. Add extra storage capacity to your instance
First, we need to create a volume that will contain our application and attach it to our webserver. There are several options available: you can create from an existing image, previous snapshot, or create an empty volume. Select this option.
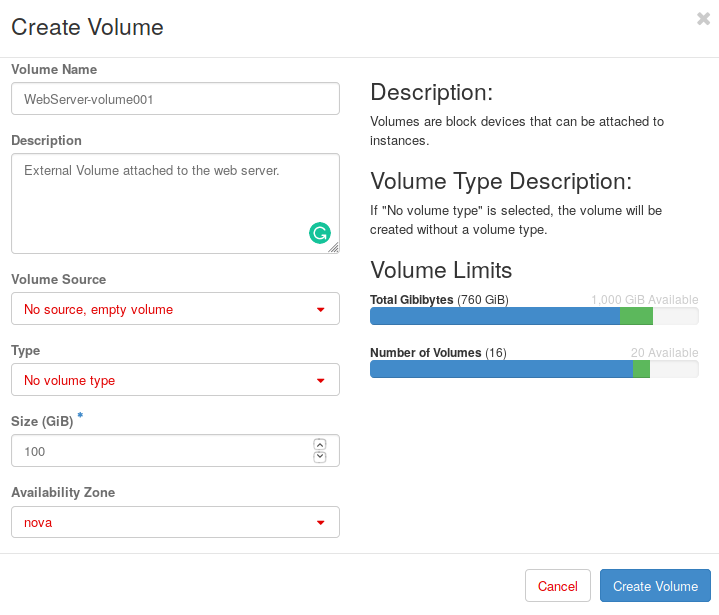
Fig. 4.7 Create a volume using the dashboard
After that, we need to perform few operations to prepare the attached volumen like: format the new attached volume, create a mount point, and add a fstab entry. These operations need to be done using a SSH terminal, so we need to connect to the server instance through the bastion.
Check you can login to your bastion host using the bastion-key, and the to the web server using the server-key file.
# First copy the server-key file to the bastion host
$ scp -i ~/.ssh/bastion-key.pem -p /home/jnavarro/.ssh/server-key.pem debian@172.24.46.41:~/
server-key.pem

# Login to the bastion host and the ssh the server (use your bastion's floating IP address)
$ ssh -i ~/.ssh/bastion-key.pem debian@172.24.46.41
$ ssh -i ~/.ssh/server-key.pem debian@192.168.101.7
Or you just can use the ProxyCommand option with SSh to login directly to the web server, connecting through the bastion host. The command is quite long, but can be included in your ~/.ssh/config file, so you don’t need to remember this line:
# Using the SSh ProxyCommand option example
ssh -i ~/.ssh/server-key.pem -o ProxyCommand="ssh -i ~/.ssh/bastion-key.pem -W %h:%p debian@172.24.46.41" debian@192.168.101.7
Now we need to chech that a new volume attached is visible for the instance. Then create a partition, format, and mount the new volume.
# Install parted
sudo apt update && sudo apt -y install parted

# Check there is a new attached volume in /dev/vdc as expected
$ lsblk
NAME   MAJ:MIN RM  SIZE RO TYPE MOUNTPOINT
vda    254:0    0    2G  0 disk
└─vda1 254:1    0    2G  0 part /
vdb    254:16   0    2G  0 disk
vdc    254:32   0  200G  0 disk

# Partition, format, and mount the volume
$ sudo parted /dev/vdc mklabel gpt
$ sudo parted /dev/vdc mkpart primary ext4 0% 100%
$ sudo parted /dev/vdc print
Model: Virtio Block Device (virtblk)
Disk /dev/vdc: 215GB
Sector size (logical/physical): 512B/512B
Partition Table: gpt
Disk Flags:
Number  Start   End    Size   File system  Name     Flags
1      1049kB  215GB  215GB  ext4         primary

$ sudo mkfs.ext4 /dev/vdc1
Now, created the final mountpoint and add a new fstab entry:
$ sudo mkdir /data
# Add this line to you /etc/fstab
$ vim /etc/fstab
/dev/vdc1       /data   ext4    defaults 0 0

# Mount and check
$ sudo mount /data &&  cat /proc/mounts | tail -1
/dev/vdc1 /data ext4 rw,relatime,data=ordered 0 0
At this point, our server has a fully functional volume available to deploy the source code.
Next video shows how to work with Volumes using the Horizon dashboard.
4.5.1.3. Configure the server and deploy the code
Now we have the volume ready to use, we should configure the server and deploy the source code. That means to install the required packages and download the previously uploaded object that contains the source code from our public container.
We will serve the application using Nginx and also need the curl tool to download the source code from the container A. You can easily install required packages running this command:
sudo apt update && sudo apt -y install curl nginx
Now, in your $HOME directory run:
# Download from the public container
curl -X GET http://object.vss.cloud.private.cam.ac.uk/swift/v1/mycontainer/tetris.tar.gz -o tetris.tar.gz

# Decompress the file
$ sudo tar xzvf tetris.tar.gz -C /data/

# Allow access to www-data
$ sudo chgrp www-data /data/tetris -R
Finally, you need to point the default site to the data directory
$ sudo sed -i 's:.*root /var/www/html:root /data/tetris:' /etc/nginx/sites-enabled/default
$ sudo systemctl enable nginx
$ sudo systemctl restart nginx
Check your service is up and running pointing your browser to the service IP (floating IP address connected to CUDN Internet). Hopefully, you will see a figure as follows:
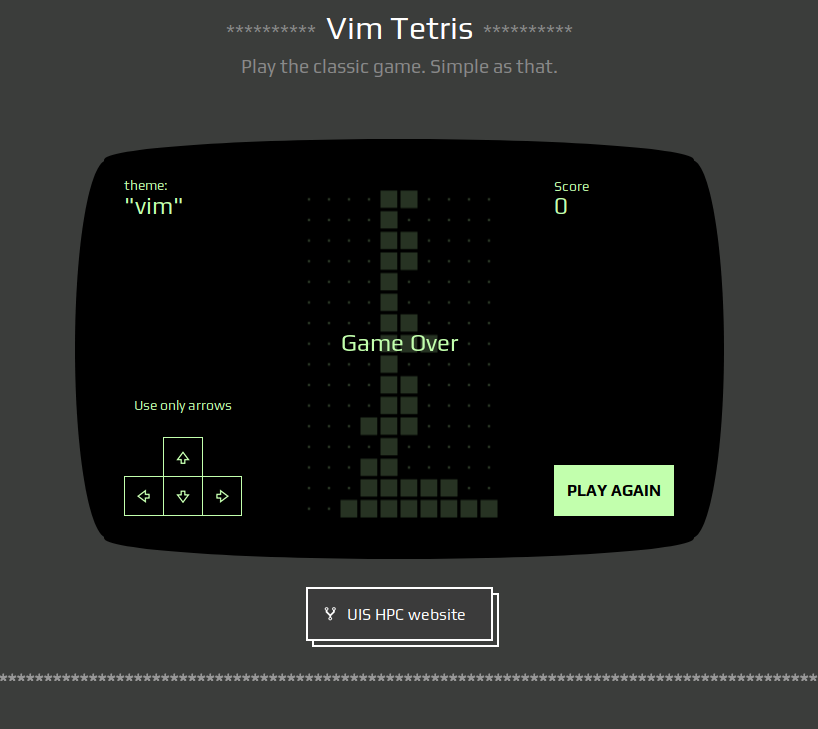
Fig. 4.8 Tetris game running in your instance
Note
If you cannot access to the service, check all security rules are OK to allow HTTP traffic from your browser.
The last step is to create a snapshot of the volume’s current state. Go to Compute -> Volumes tab, select the desired volume, click on the rigth button and select Create snapshot:
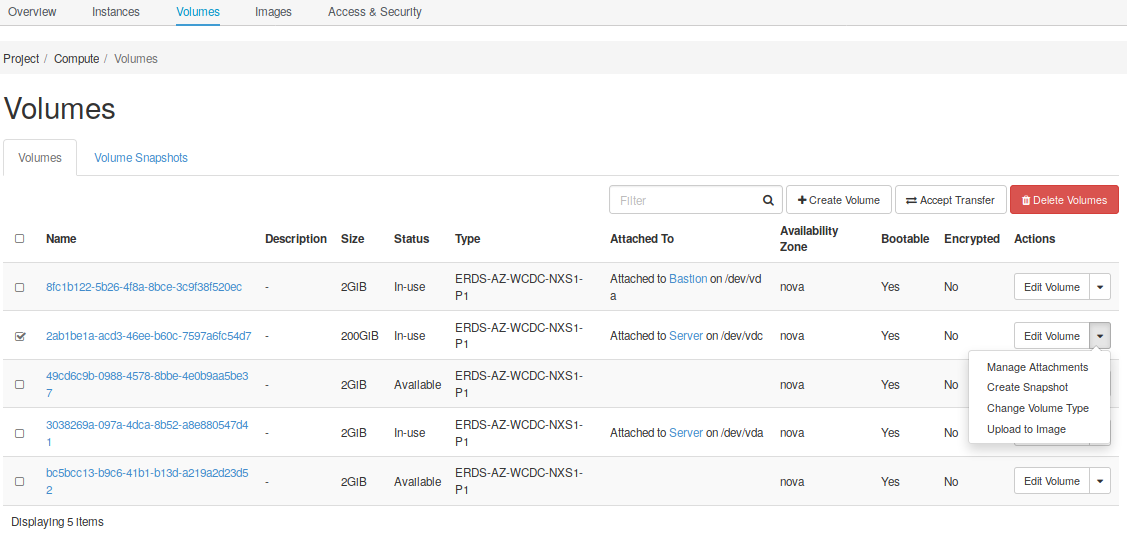
Fig. 4.9 Create a snapshot from a volume
Set the snapshot’s name and click on create. Notice there is a message warning you that this volume is currently attached to an instance, and there is a risk creating a snapshot, because it can result in a corrupted snapshot. Allways take snapshots from detached volumes, or stop your instance (not destroy), take the snapshot of the attached volume, and then resume the instance.
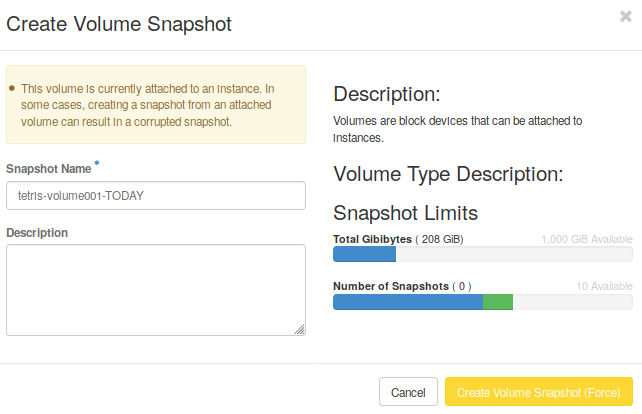
Fig. 4.10 Create a snapshot from a volume
You now have an understanding of how to deploy a complete new service from scratch, using block storage to provision the required space for your service, upload and download assets from the object storage service, and keep your service more secure using snapshots as a backup.
Next sections will show you how to use the orchestration service to perform all these steps automaticaly, creating a new instance, attaching the existing volume, and install required packages to start your service.
4.6. Lab 4 - Add persistence to your services
Go to Add persistence to your services and follow the slides to start a hands-on work over this section.
- Lab overview Slide
- Hands-on work