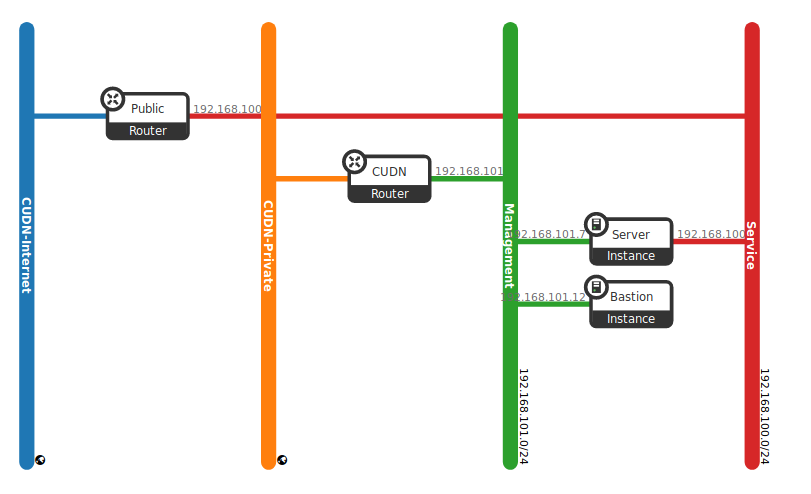
3. Computing service: OpenStack Nova
This section explains the main concepts behind the OpenStack Computing service (Nova) and it will help you perform simple actions in order to get familiar with this service.
3.1. What is Nova?
The OpenStack Compute Service (Nova) is a cloud computing instance controller, which is the main part of an IaaS system. Nova is the OpenStack project that provides a way to provision compute instances (aka virtual servers), which is used to host and manage cloud computing systems.
This is a service that provides resizable compute capacity in OpenStack. It provides you with complete control of your computing resources and lets you run on OpenStack’s computing environment. That reduces the time required to obtain and boot new server instances to minutes, allowing you to quickly scale capacity, both up and down, as your requirements change.
Nova runs as a set of daemons on top of existing Linux servers (Compute Node) to provide that service. The compute node runs the hypervisor portion of Compute that operates instances. By default, Compute uses the kernel-based VM (KVM) hypervisor. The compute node also runs a Networking service agent that connects instances to virtual networks and provides firewalling services to instances via Security Groups.
Nova is typically deployed in conjunction with other OpenStack services (e.g. Block Storage, Object Storage, Image, etc) as part of a larger, more comprehensive cloud infrastructure. OpenStack uses the following services for provide basic functionality:
- Keystone: This provides identity and authentication for all OpenStack services.
- Glance: This provides the compute image repository. All compute instances launch from glance images.
- Neutron: This is responsible for provisioning the virtual or physical networks that compute instances connect to on boot.
It can also integrate with other services to include other features like persistent block storage and encrypted disks.
As an end user of nova, you’ll use nova to create and manage servers with either tools or the API directly. Current tools available for using Nova are:
- Horizon: The official web UI for the OpenStack Project.
- OpenStack Client: The official CLI for OpenStack Projects. You should use this as your CLI for most things, it includes not just nova commands but also commands for most of the projects in OpenStack.
3.1.1. Basic Concepts
Instances
An instance is the fundamental resource unit allocated by the OpenStack Compute service. It represents an allocation of compute capability (most commonly but not exclusively a virtual machine), along with optional ephemeral storage utilized in support of the provisioned compute capacity. Unless a root disk is sourced from Cinder (see the section called “Root Disk Choices When Booting Nova Instances”, the disks associated with VMs are “ephemeral,” meaning that (from the user’s point of view) they effectively disappear when a virtual machine is terminated.
An instance could be optionally referred to by a human-readable name, though this string is not guaranteed to be unique within a single tenant or deployment. Instead, they can be identified uniquely through a UUID assigned by the Nova service at the time of instance creation.
Flavors
In OpenStack, virtual hardware templates are called flavors, defining sizes for RAM, disk, number of cores, and so on. You will find a section of all available flavors later on this section. Flavors define a number of parameters, resulting in the user having a choice of what type of virtual machine to run just like they would have if they were purchasing a physical server. The table lists the elements that can be set. Flavors may also contain extra_specs, which can be used to define free-form characteristics, giving a lot of flexibility beyond just the size of RAM, CPU, and Disk in determining where an instance is provisioned.
Root (and ephemeral) disks
Each instance needs at least one root disk (that contains the bootloader and core operating system files), and may have optional ephemeral disk (per the definition of the flavor selected at instance creation time). The content for the root disk either comes from an image stored within the Glance repository or from a persistent block storage volume (via Cinder).
There are several choices for how the root disk should be created which are presented to cloud users when booting Nova instances.
- Boot from image: This option allows a user to specify an image from the Glance repository to copy into an ephemeral disk.
- Boot from snapshot: This option allows a user to specify an instance snapshot to use as the root disk; the snapshot is copied into an ephemeral disk.
- Boot from volume: This option allows a user to specify a Cinder volume (by name or UUID) that should be directly attached to the instance as the root disk; no copy is made into an ephemeral disk and any content stored in the volume is persistent.
- Boot from image (create new volume): This option allows a user to specify an image from the Glance repository to be copied into a persistent Cinder volume, which is subsequently attached as the root disk for the instance.
- Boot from volume snapshot (create new volume): This option allows a user to specify a Cinder volume snapshot (by name or UUID) that should be used as the root disk; the snapshot is copied into a new, persistent Cinder volume which is subsequently attached as the root disk for the instance.
Leveraging the “boot from volume”, “boot from image (create new volume)”, or “boot from volume snapshot” options in Nova, will result in volumes that are persistent beyond the life of a particular instance and can be detached from one instance and attached to another easily
However, you can select the “delete on terminate” option in combination with any of the aforementioned options to create an ephemeral volume that will be marked for deletion when the instance itself is terminated.
Instance Snapshots vs. Cinder Snapshots
Instance snapshots allow you to take a point in time snapshot of the content of an instance’s disk. Instance snapshots can subsequently be used to create an image that can be stored in Glance which can be referenced upon subsequent boot requests.
While Cinder snapshots also allow you to take a point-in-time snapshot of the content of a disk, they are more flexible than instance snapshots. For example, you can use a Cinder snapshot as the content source for a new root disk for a new instance, or as a new auxiliary persistent volume that can be attached to an existing or new instance. For more information on Cinder snapshots, refer to the Storage section.
3.1.2. Available Computing “Flavors”
Dependant on the type of research workload that must be carried out, different flavours of virtual machine can be created and operated by research groups. Broadly these flavours fall into compute and memory-focused categories.
3.1.2.1. Compute-focused flavours
Usage cases: Scientific modelling & analytics, batch processing, virtual laboratories, scientific web applications/web servers and data warehouses.
Flavor
|
vCPU | Memory (MiB) | Disk (GiB) |
|---|---|---|---|
C1.small
|
2 | 12 | 30 |
C1.medium
|
4 | 24 | 60 |
C1.large
|
8 | 48 | 120 |
C1.xlarge
|
12 | 72 | 180 |
C1.2xlarge
|
16 | 96 | 240 |
C1.3xlarge
|
20 | 120 | 300 |
C1.4xlarge
|
24 | 128 | 360 |
C1.5xlarge
|
32 | 192 | 480 |
C1.6xlarge
|
40 | 240 | 600 |
3.1.2.2. Memory-focused flavours
Usage cases: Memory-intensive applications, in-memory databases, big data processing using frameworks such as Apache Spark, Kafka
Flavor
|
vCPU | Memory (MiB) | Disk (GiB) |
|---|---|---|---|
M1.small
|
2 | 24 | 30 |
M1.medium
|
4 | 48 | 60 |
M1.large
|
8 | 96 | 120 |
M1.xlarge
|
12 | 144 | 180 |
M1.2xlarge
|
16 | 192 | 240 |
M1.3xlarge
|
20 | 240 | 300 |
Usage of these flavours would be charged at different rates for the duration of their life-time, please see the resource pricing page to know more about this.
3.1.3. Using cloud init
On a physical server, it is necessary a method to install the Operating System (OS) -you might insert the install disk and start installing the operating system. Then there still are a few things to configure before actually installing the software. Among those are setting up a user account, telling it which packages to install, etc. When all these steps are finished, a reboot could be needed, and you could start using the server.
In a cloud environment, you do not need to install the operating system from scratch. Instead, you build an instance using an image already ready to use. In fact, this image is a pre-installed disk image (a block-for-block copy of an existing installation), that OpenStack copies on an ephemeral storage, and spins up a new server from that.
This method is much faster and flexible. Except, that server copied from that disk image, for example, could have the same hostname and IP addresses, the same default root password, etc. This could cause conflicts with other server instances on the network, and also there is a security risk with the root password. So, you still have to configure this kind of things. Imagine repeating the same process with 100 servers over and over.
So instead, we can use Cloud-init to do that for you. Cloud-init is the defacto multi-distribution package that handles early initialization of a cloud instance. This program is a bootstrapping utility for pre-provisioned disk images that run in virtualized environments. Basically, Cloud-init talks with a metadata service to request all the info during provisioning/boot and it sets up the server instance to be usable when it is finished booting.
You could use Cloud-init to add SSH keys, install packages, set hostnames, run post-install scripts or install provisioning agents (like Chef, Puppet, or Ansible).
In OpenStack you can use Cloud-init to perform any configuration taks on booting the instance you launch. You can find a lot of examples of Cloud-init scritps here <http://cloudinit.readthedocs.io/>. Below you will find an example that shows how to install apt packages on first boot using Cloud-init:
#cloud-config

# Install additional packages on first boot
#
# Default: none
#
# if packages are specified, this apt_update will be set to true
#
# packages may be supplied as a single package name or as a list
# with the format [<package>, <version>] wherein the specifc
# package version will be installed.
packages:
 - pwgen
 - pastebinit
 - [libpython2.7, 2.7.3-0ubuntu3.1]
3.1.4. How to access to your Instance
When you launch an instance, you should specify the name of the key pair you plan to use to connect to the instance. If you don’t specify the name of an existing key pair when you launch an instance, you won’t be able to connect to the instance. When you connect to the instance, you must specify the private key that corresponds to the key pair you specified when you launched the instance.
OpenStack doesn’t keep a copy of your private key; therefore, if you lose a private key, there is no way to recover it. If you lose the private key for an instance store-backed instance, you can’t access the instance; you should terminate the instance and launch another instance using a new key pair.
Key Pairs for Multiple Users
If you have several users that require access to a single instance, you can add user accounts to your instance. You can create a key pair for each user, and add the public key information from each key pair to the .ssh/authorized_keys file for each user on your instance. You can then distribute the private key files to your users. That way, you do not have to distribute the same private key file that’s used for the root account to multiple users.
3.2. Deploying your first service
To deploy a new intance in OpenStack, you basicaly need to follow this workflow:
- Select a pre-configured image from the to get up and running immediately. You also can created a image containing your applications, libraries, data, and associated configuration settings.
- Configure security and network access on your instance using the Segurity Groups and selecting apropiate networks.
- Choose which flavor you want, then start, terminate, using the Dashboard or the OpenStack client application.
- Determine whether you want to run one or more instance of the same type, utilize Floating IP adresses, or attach persistent block storage to your instances.
This example will help you to deploy your first service inside this project. First of all, in order to launch an instance that will run our service, we need a network to attach this instance. Fortunatelly, we could use the network create in the previous section. Check your network topology (Project -> Network -> Topology) before start.
If everything is in place, follow all the necessary steps to launch your instance:
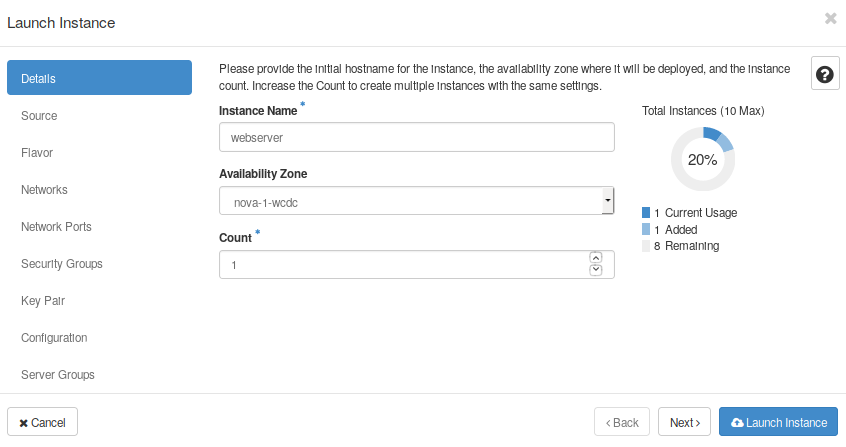
- First, go to the Compute->Instances tab and click on “Launch Instance”. This will open a new box to allow you to set the name, the instance source, flavor, security groups, and so on.
- In details, set “webserver” as a name.
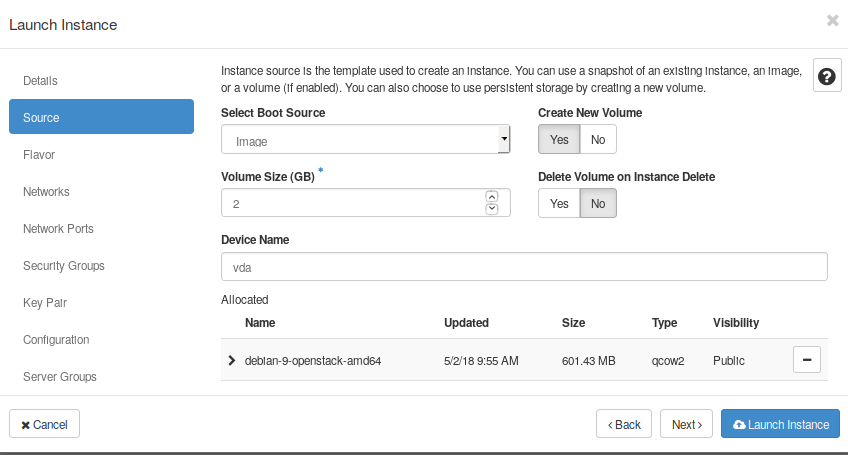
- Then, select image as a “Boot source”, and show all available images. Find the distro “debian-openstack-9” on the list.
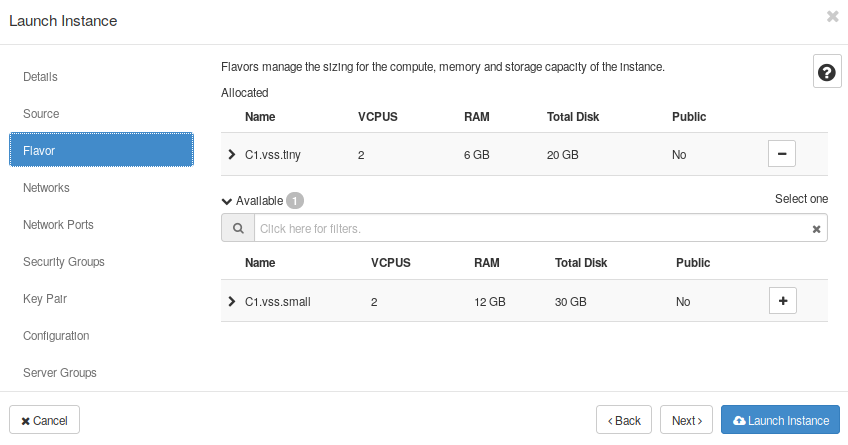
- Now, select any of the flavors availables
- In “Networks”, select the “Service network”
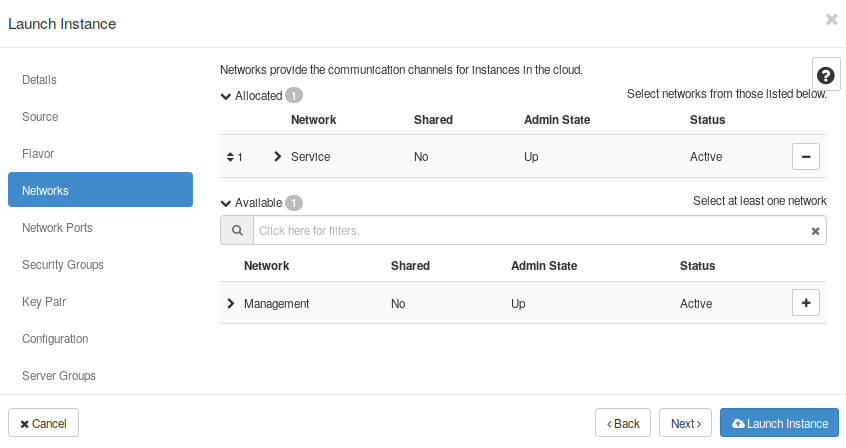
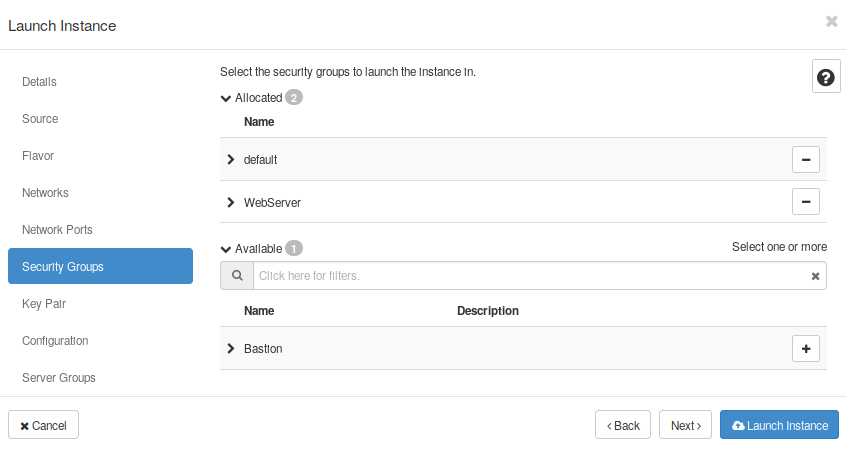
- Goto to Security Groups and select one of the SGs created at the Nerworking section (e.g. the “Webserver” SG}.
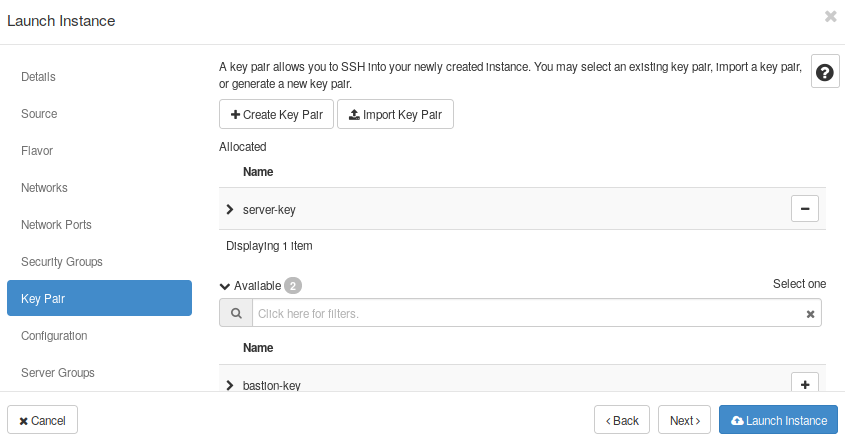
- Create a Key Pair, or select one of the Key Pairs available, in case you already have one.
- Now you should be able to launch this instance. Click on the button “Launch Instance”
Find your new instance and explore all available properties and options. You now should be able to launch some operations like take a snapshot, attach interfaces or volumes, and more. You also can destroy or resize the instance.
Repeat the steps to launch your secure Bastion host in this project. Notice you should already have a special Security Group and Key Pair to launch this image. After following these steps, you now have a new service up and running like the scenarios shown in the Fig. 3.3, and this brings us to the end of this part of the started guide.
Optionally, try to connect to your new server instance through the bastion host. Remember you created a specific key for every instance. Then, install a webserver package ( e.g. nginx or apache) and create a Hello World! site.
Next video shows step-by-step how to start a server instance. It is a complete example that also displays how to attach a Security Group, allocate a Floating IP address, and connect through SSh to this instance.
You now have an understanding of how to deploy a new service and create the required network topology using different networks and routers in the OpenStack. You also looked at blocking traffic per virtual machine through the use of security groups, and you used floating IPs to allow external connectivity to virtual machines.
Next sections will show you how to use the different options of storage available in OpenStack and different uses cases, to expand your new service adding persistence, running snapshots over your instances, and expanding the storage available in your VM.
3.3. Lab 3 - Deploying a service
Go to Deploying your first service and follow the slides to start a hands-on work over this section.
- Lab overview Slide
- Hands-on work
