Backups & Redundancy
Research File Store offers highly resilient storage and consistent backups, keeping up to a month of data changes.
RFS is built using the Dell Powerscale OneFS filesystem. RFS project snapshots are replicated to a secondary off-site location, so that there are two-copies on-disk of all data.
The diagram below illustrates a high level overview of the service architecture.

High Level overview of the RFS architecture.
Redundancy
Data is replicated asynchronously at hourly intervals to the off-site storage system located in our Soulsby Data Centre. All connections to RFS are routed through a proxy, which enables the service to switch over to the off-site replica in the event of a major failure of our primary Data Centre, with a Recovery Point Objective (RPO) of one hour. This means that in the event of a catastrophic failure of the West Cambridge storage system, up to at most one-hour of data could be lost.
Backups
Data on RFS are backed up using a technology called snapshots. This is builtin thanks to the filesystem RFS is built on.
Key facts:
Read only. Data within snapshots cannot be modified, providing protection against cryptolocker and it’s many variants.
Scheduled Backups. Snapshots are taken on a schedule.
Easy Restore. Snapshots can be easily accessed by users.
One Month Restore Window. Users can easily restore data, going back a month.
Snapshot Policy
The snapshot retention periods are staggered with hourly, daily and weekly snapshots going back a month. By default all RFS projects have the same policy of:
24 hourly snapshots
7 daily snapshots
5 weekly snapshots
How to Access Backups
Snapshots in RFS are self-service, meaning that users can access data from snapshots themselves, without needing to contact the Support team.
MacOS Clients
Important
Due to limitations within MacOS in handling so called ‘hidden’ directories, users with Mac clients will find they cannot access the .snapshot directory where backups are stored. This is a technical decision by Apple, which we aren’t able to bypass without significant impacts on all other users and also requiring all Mac clients to alter their configuration settings.
Users with Mac clients and without access to a machine running Windows/Linux/etc., can raise a ticket with the servicedesk for assistance in recovering the data at support@hpc.cam.ac.uk
Linux / *nix / Clients
Snapshots on these operating systems can be accessed through a special hidden directory that exists in each directory, for example:
# In each directory of the share is a special 'hidden' directory called
# '.snapshot'. This contains directories for each individual snapshot of the share
[matt@machine]:rfs-mjr208-testproject/ $ ls -1
[matt@machine]:$ ls -1
test-excel2.xlsx
test-excel.xlsx
testfile
testfile2
testfile3
test.txt
[matt@machine]:rfs-mjr208-testproject/ $ cd .snapshot
[matt@machine]:.snapshot/ $ ls -1
FSAnalyze-Snapshot-Current-1656367206           hourly_2022-06-27_23:10                         hourly_2022-06-28_12:10
SIQ-23a11f77353771d5c270daa29f95b67b-latest     hourly_2022-06-28_00:10                         hourly_2022-06-28_13:10
SIQ-23a11f77353771d5c270daa29f95b67b-new        hourly_2022-06-28_01:10                         hourly_2022-06-28_14:10
daily_2022-06-22_02:15                          hourly_2022-06-28_02:10                         hourly_2022-06-28_15:10
daily_2022-06-23_02:15                          hourly_2022-06-28_03:10                         hourly_2022-06-28_16:10
daily_2022-06-24_02:15                          hourly_2022-06-28_04:10                         hourly_2022-06-28_17:10
daily_2022-06-25_02:15                          hourly_2022-06-28_05:10                         hourly_2022-06-28_18:10
daily_2022-06-26_02:15                          hourly_2022-06-28_06:10                         hourly_2022-06-28_19:10
daily_2022-06-27_02:15                          hourly_2022-06-28_07:10                         weekly_2022-06-05_02:30
daily_2022-06-28_02:15                          hourly_2022-06-28_08:10                         weekly_2022-06-12_02:30
hourly_2022-06-27_20:10                         hourly_2022-06-28_09:10                         weekly_2022-06-19_02:30
hourly_2022-06-27_21:10                         hourly_2022-06-28_10:10                         weekly_2022-06-26_02:30
hourly_2022-06-27_22:10                         hourly_2022-06-28_11:10


# Each of these snapshots are a copy of the share at the time that
# they were taken - the date of the snapshot is in the directory name.
#
# Here we enter a snapshot taken on 22nd Jun 2022, at 02:15am.
[matt@machine]:daily_2022-06-22_02:15/ $ ls -1
project.dat
testfile
testfile2
testfile3
test.txt

# So above the 'project.dat' file is a file that was deleted sometime
# since this snapshot.
#
# To restore this file, you can simply copy this file with usual *nix
# tools like 'cp' or 'rsync'
[matt@machine]:daily_2022-06-22_02:15/ $ cp project.dat ../../
Windows 10
Note
The following information should work on Windows 7 as well, however it has not been tested (yet).
Within the Windows File Explorer, RFS snapshots can be accessed through the ‘Previous Versions’ feature, which appears when you right-click on a directory.
To be used optimally, it is recommended to open the ‘Previous Versions’ at the root of the share, since this works even if the underlying files or directories have changed names or been moved.
Below we show the process of opening this menu and locating the copy of the share at the previous snapshot:
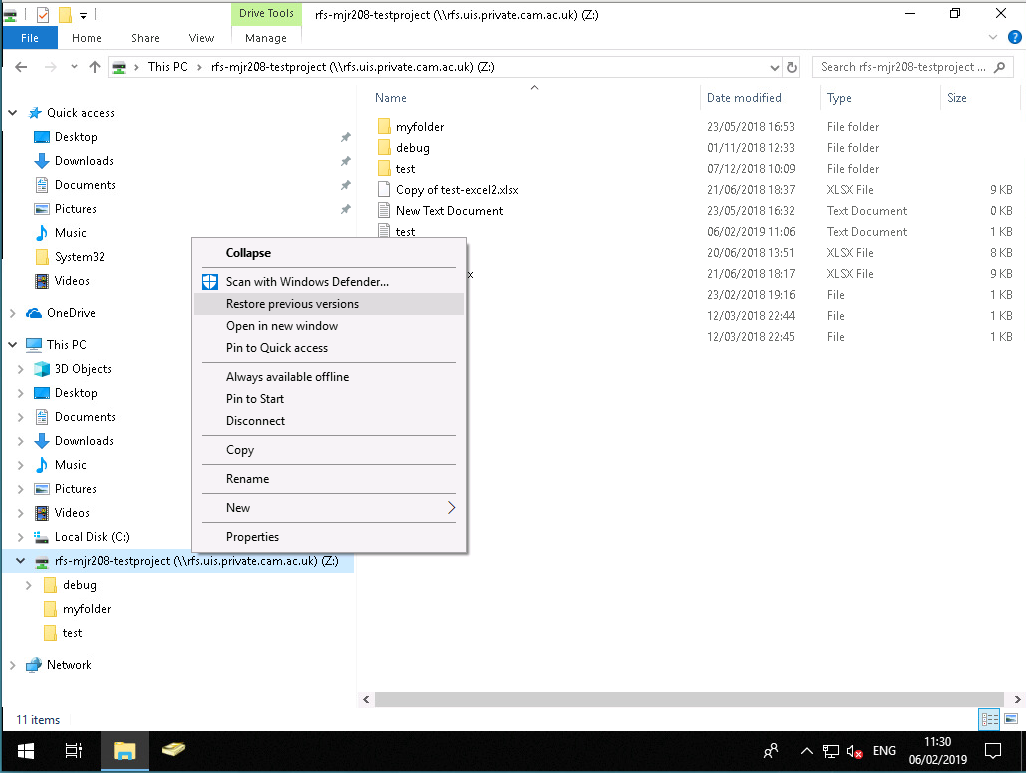
The right-click context menu for ‘Previous Versions’ on a Share
Opening the ‘Restore previous versions’ menu, shows a list of all the snapshots as entries, with the ‘Date modified’ field showing when the snapshot was taken.
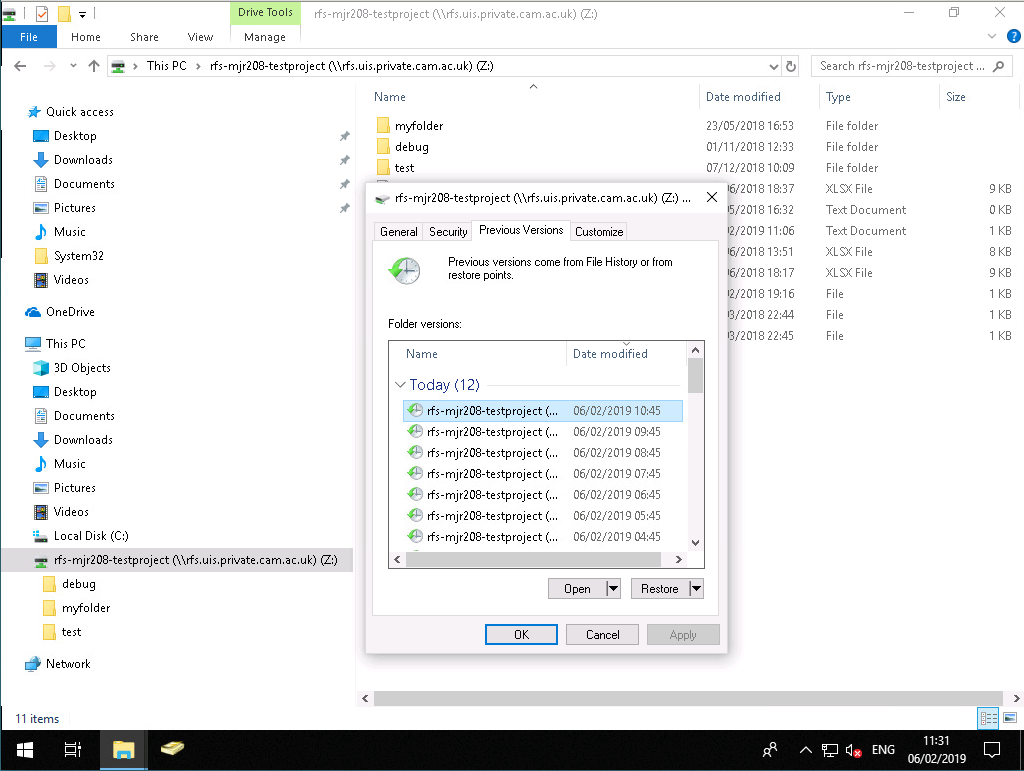
Example list of ‘Previous Versions’ on a Share
Double-clicking on any of these entries, will open a new File explorer window that then let’s you browse the share at the time the snapshot was taken. For example you can put both the original window and the snapshot window side-by-side to make comparing and restoring files easier. Files can then simply be dragged and dropped from the snapshot back into the current share to restore them.
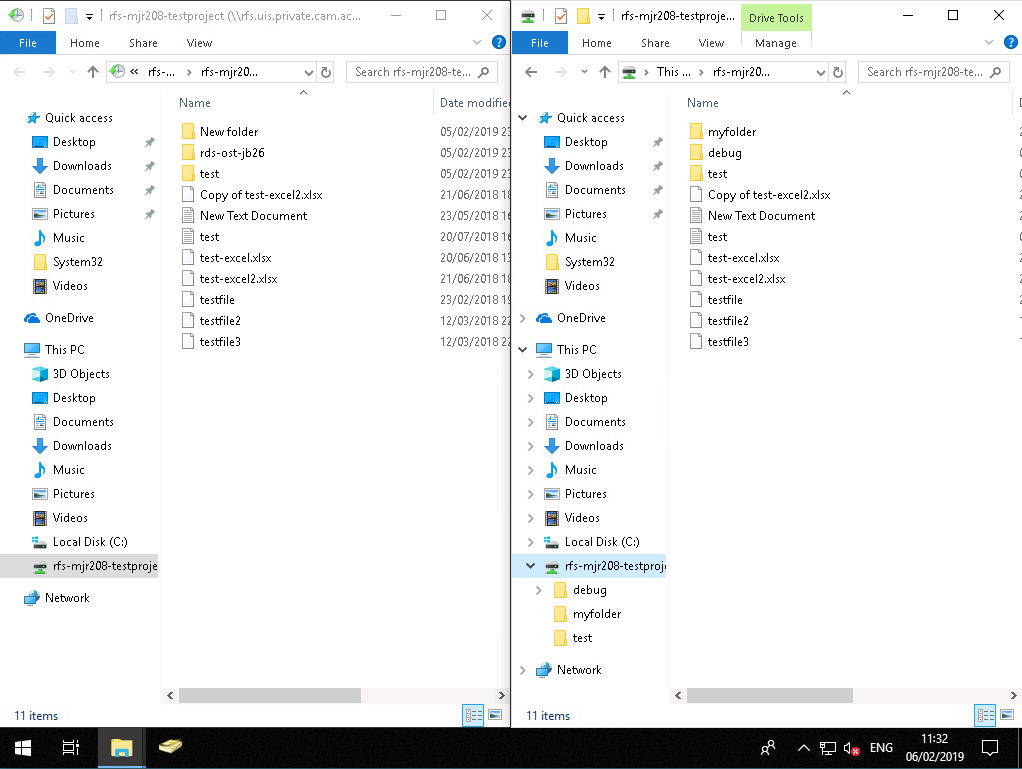
Example of two file explorer windows side-by-side, with the snapshot copy on the left, and the current share on the right. Files can then be dragged and dropped from left to right to restore them.