Purchasing Storage
The self-service portal is where you can purchase and manage your additional storage allocations. This guide is an overview of the site, purchasing, extending, increasing, and deleting storage.
Storage Portal Roles
Before you proceed with purchasing storage or reading any further, familiarise yourself with the storage portal roles found on this page: Self-Service Storage Portal
Any actions detailed below can only be carried out by the Data Owner or Data Managers (not Data Project Managers)
Getting Support
If you are unsure about anything, please contact support@hpc.cam.ac.uk before taking any action, this will help reduce workload if any accidental purchases occur.
Purchasing New Storage Projects
Note
Data Owners should be the individuals to purchase new storage. If you are unsure what this means or how to carry out the intended operations, stop and contact support@hpc.cam.ac.uk
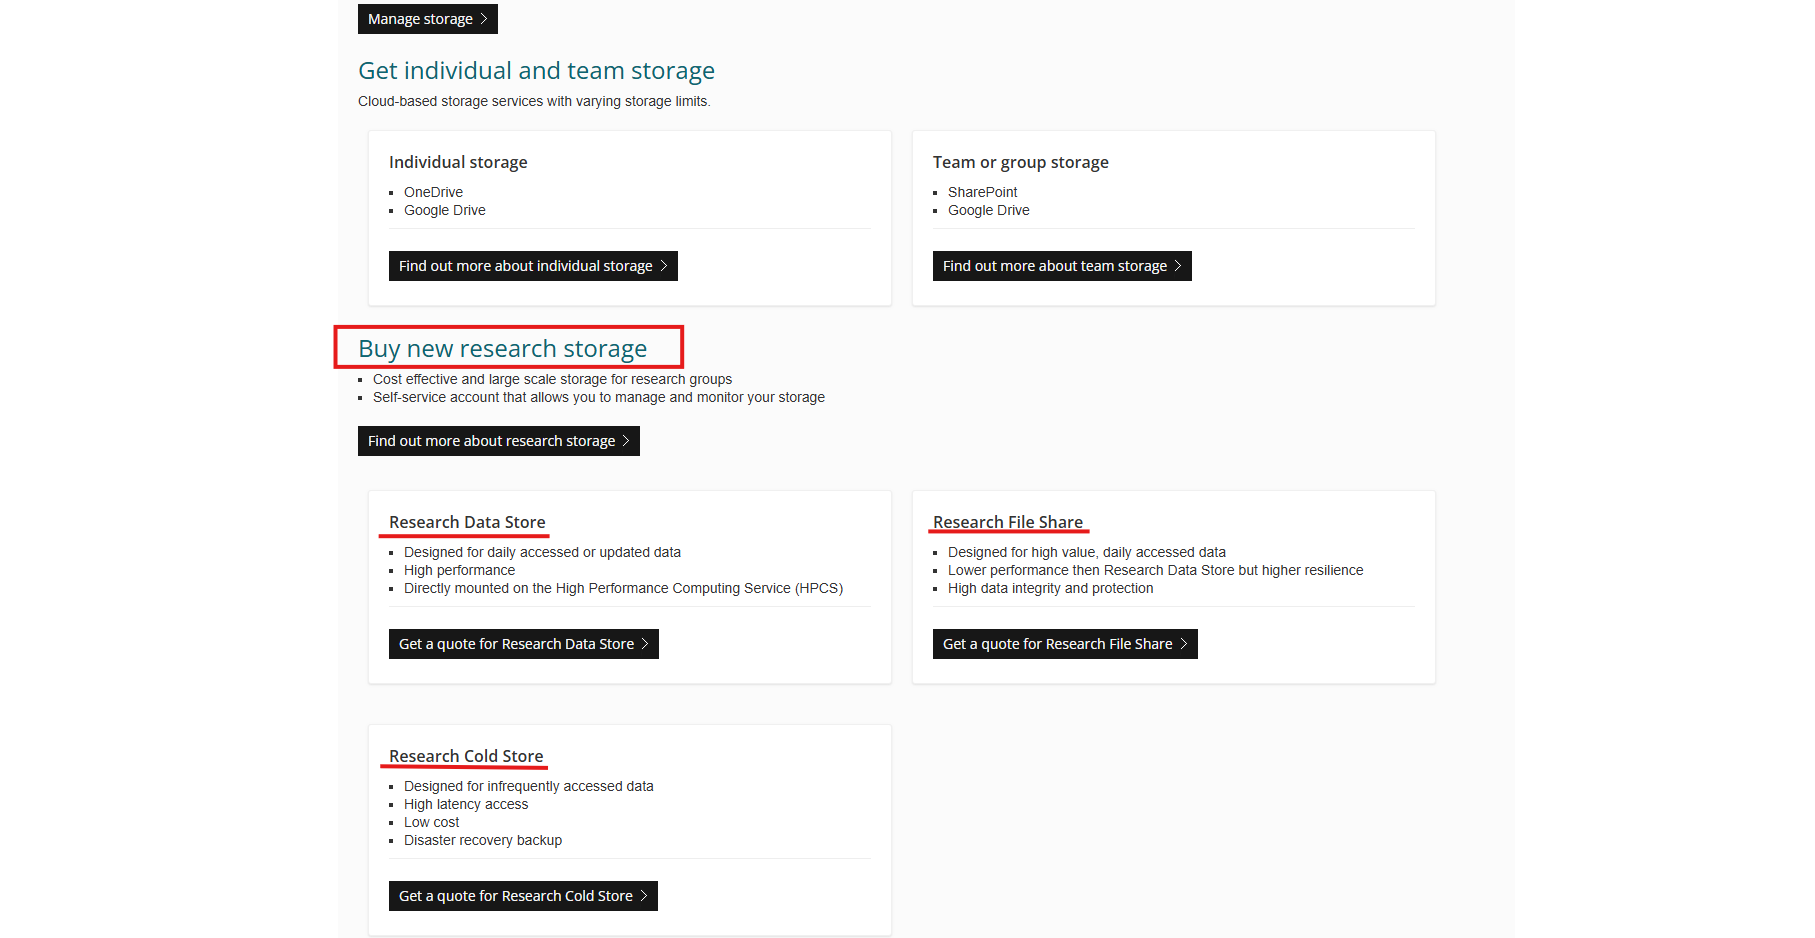
Navigate to https://selfservice.uis.cam.ac.uk/ and select the desired storage option from the home page. We will use RDS in this example.
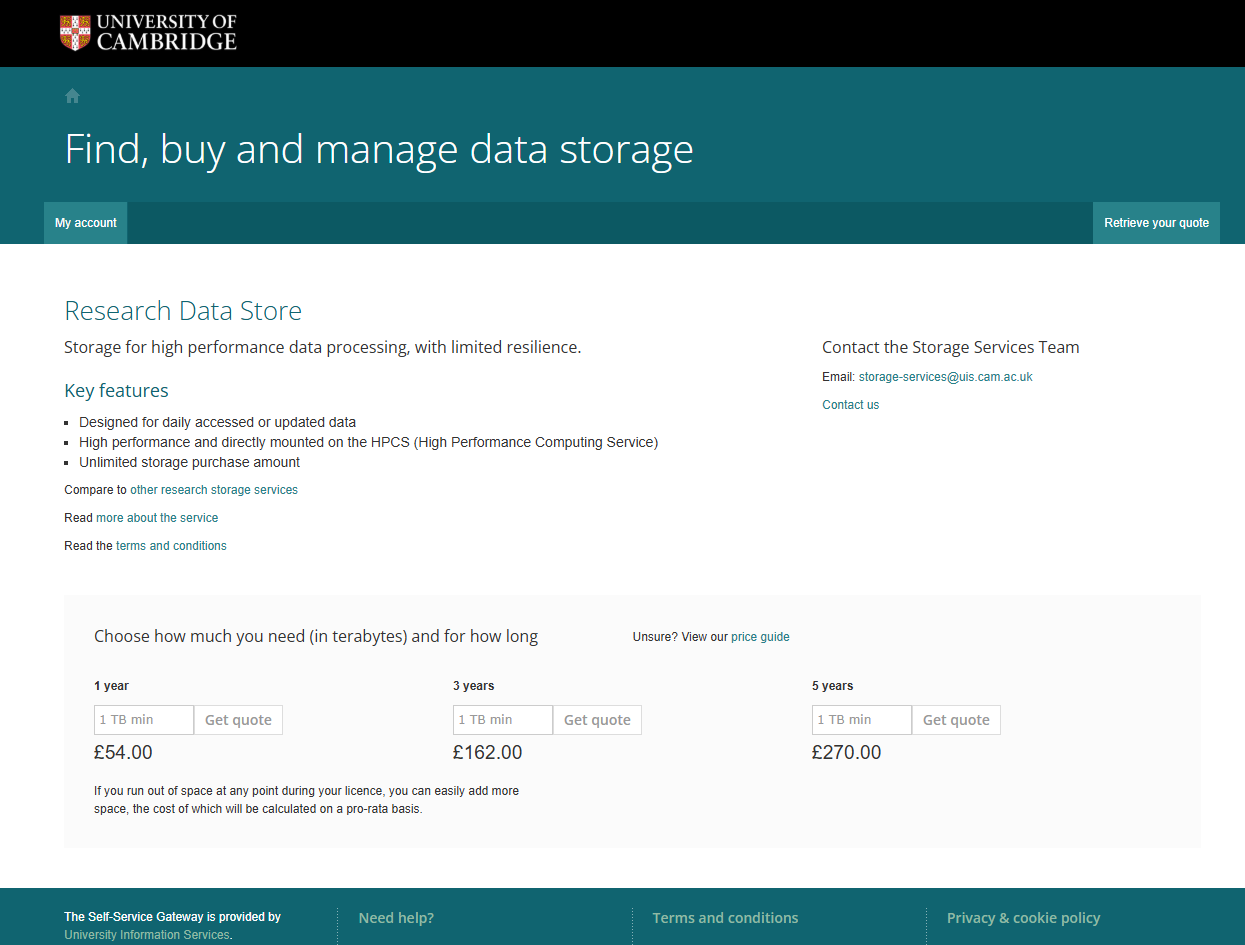
2. This new page allows the purchase of new storage for 1, 3 or 5 years with the minimum purchase of 1TB. There are links to information pages, including the comparison matrix and the terms and conditions. Input the desired amount of storage in TB in the appropriate box and then click “Get Quote”. In this example, we will get a quote for 10TB for 1 year.
Warning
If you are trying to purchase additional storage for an existing storage project, DO NOT PROCEED HERE. Please consult the guide for Increasing Storage further down this page.
3. Here is the quote generated by the portal, click the button that says “Email Quote”, this will give you a quote that you can use to generate a Purchase Order (PO) with your departmental finance team. The email will have the subject line of “UIS data storage: your quote (storage-####)” and is sent by ssgw-admin@uis.cam.ac.uk.
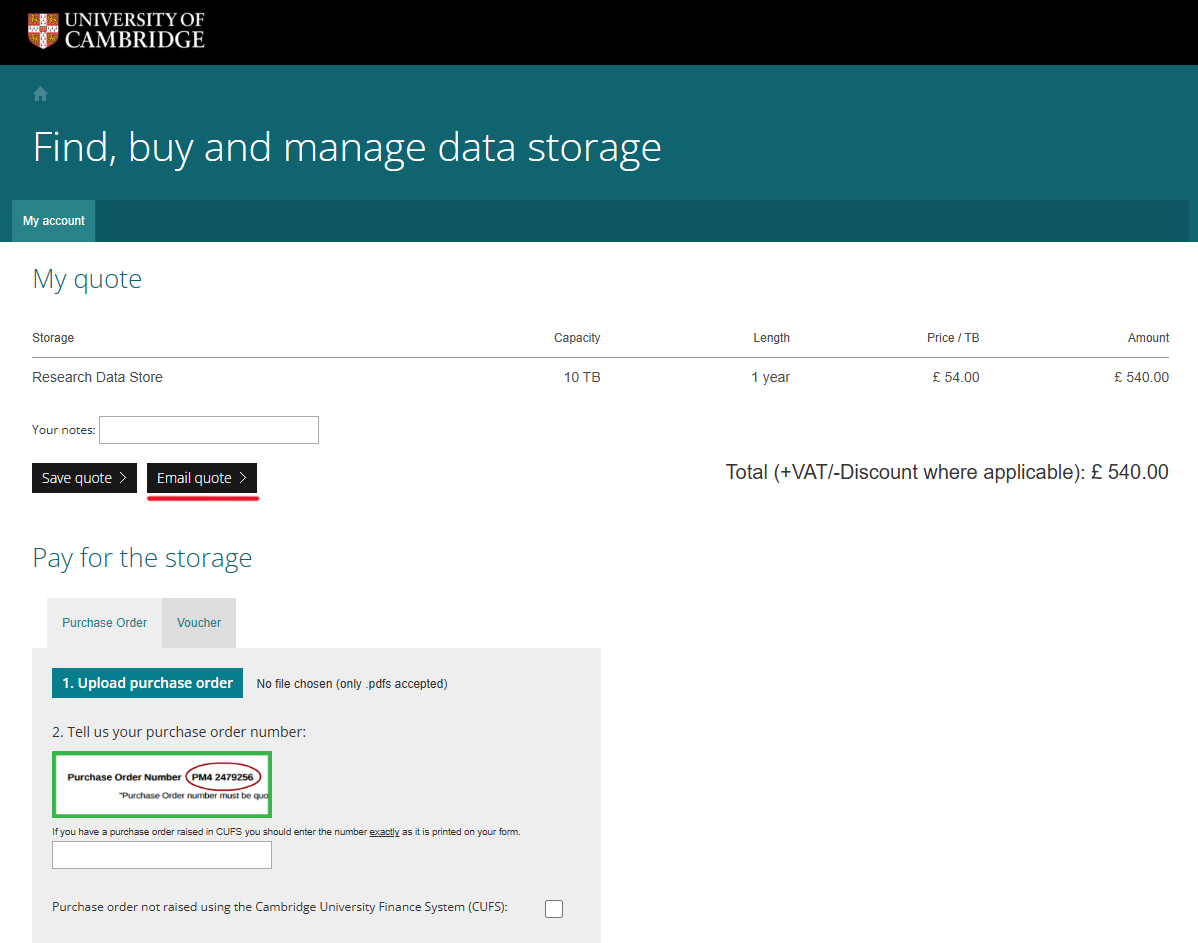
If you have not received the quote by email, check your spam and ensure that ssgw-admin@uis.cam.ac.uk is added as a safe sender.
Your quote will be saved within the storage portal and you will be able to retrieve it to apply the PO against when you have received it. Go to the “My Account” page by clicking the applicable button in the top left to return to where your quotes are saved at the bottom of the page.
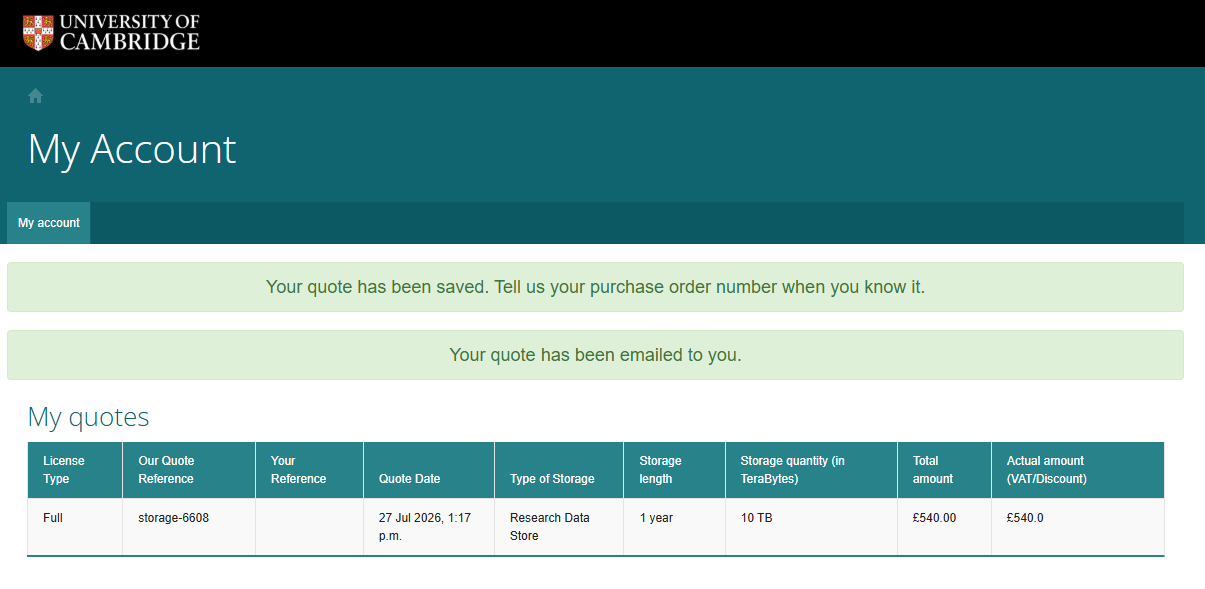
Once you have your PO, return to your quote, double check the amount on the portal is the same as on the PO and upload the pdf. Your PO should only be for one storage purchase, if you have multiple purchases, ensure they have one PO each as the system only recognises one PO number per upload.
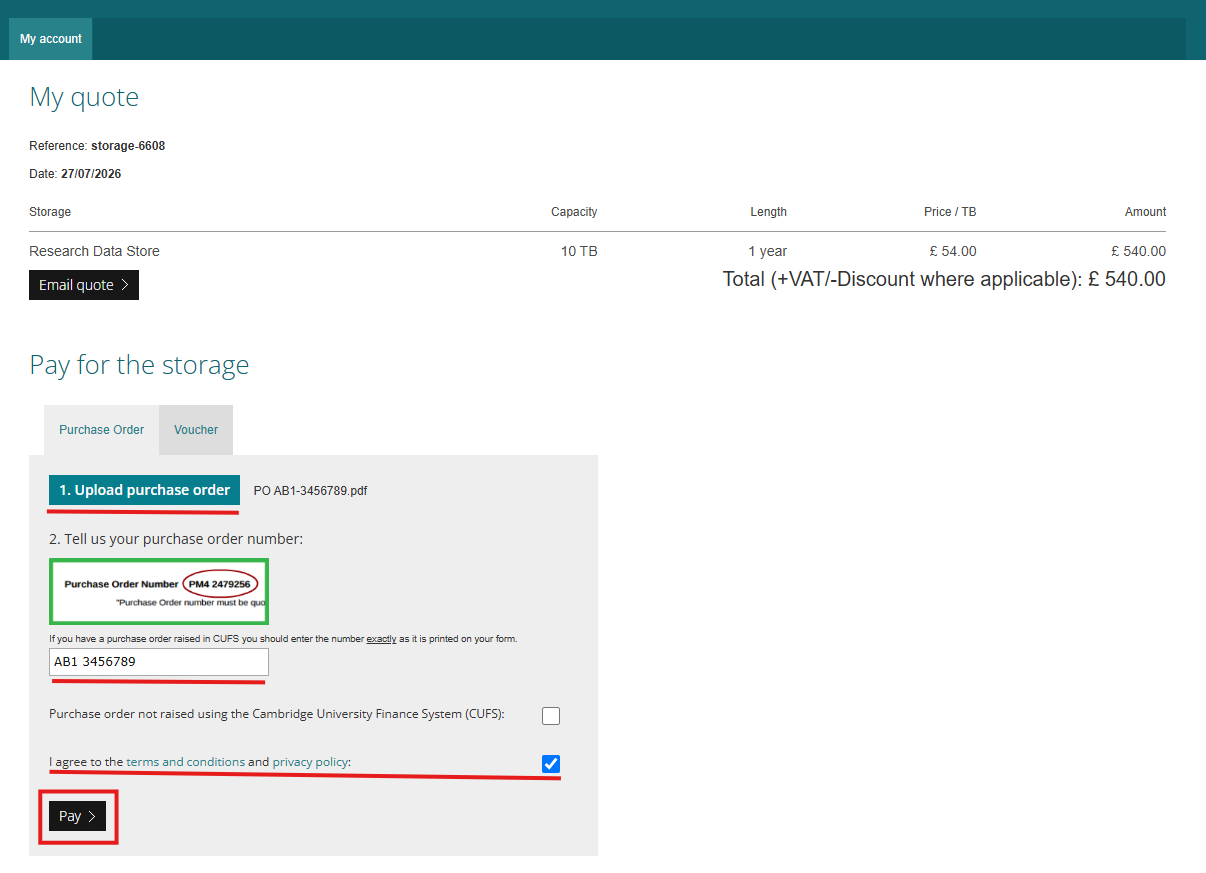
Your new storage is ready to be activated. Assign yourself as the Data Owner on the storage license page and accept the terms and conditions in order to activate the storage.
Note
You will not get invoiced until you have activated the storage.
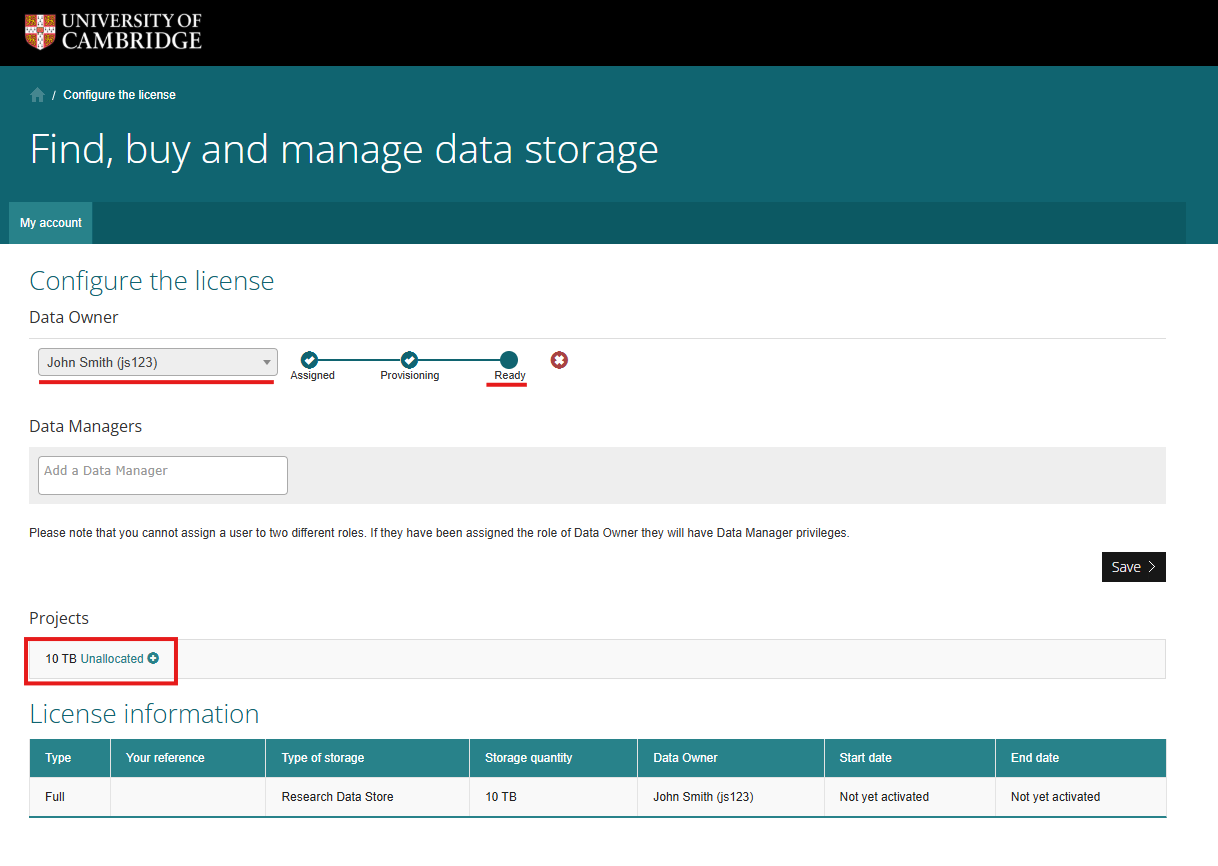
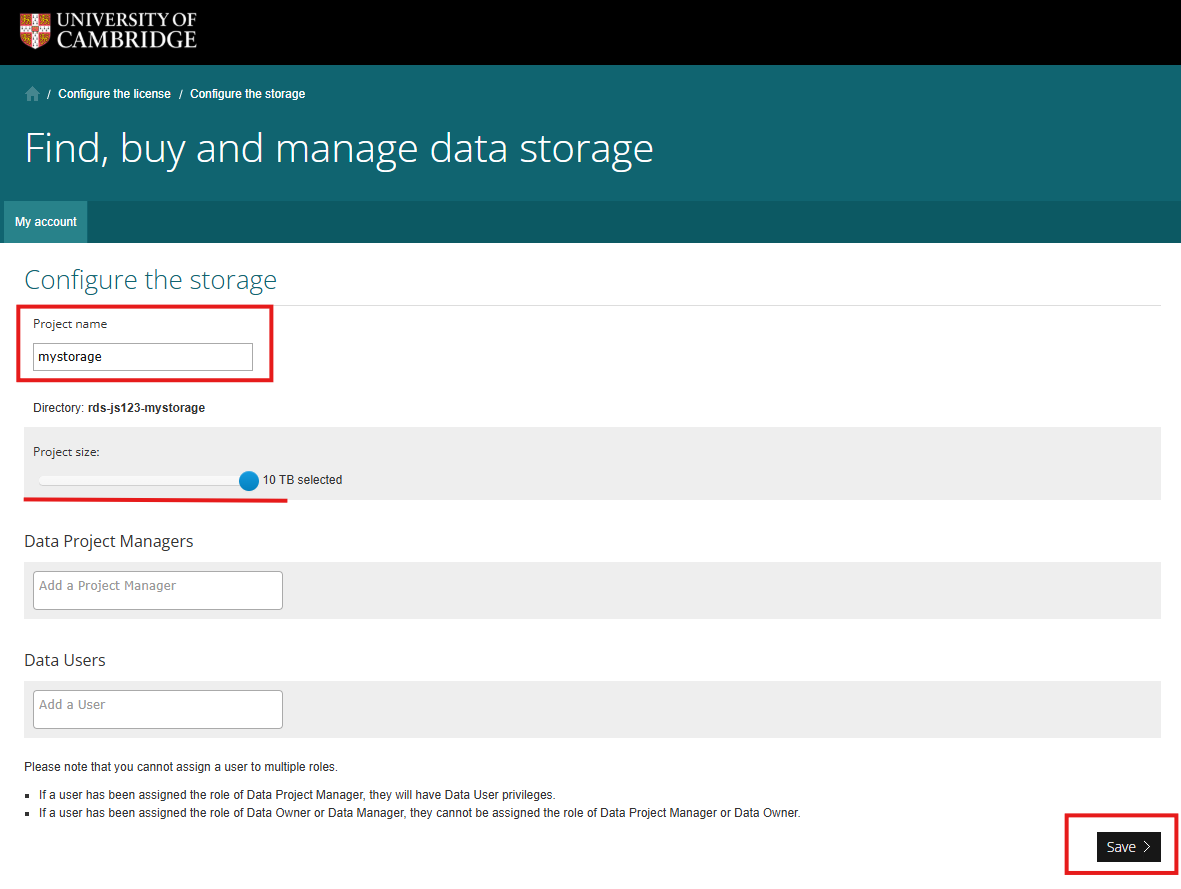
7. Now to name and allocate your storage so it gets provisioned and ready to use. Click on the link that says “Unallocated” with the plus sign next to it. This indicates how much storage is not allocated and not provisioned. This page is the storage project page. You will need to give your storage a name and then use the slider underneath to allocate storage to be provisioned, you do not have to use all the storage you purchased at once. Click save when you are happy.
8. The RCS service desk will receive notification to provision your storage; it is not automatic. You will now see the status of your storage provisioning as well as your storage project id, this serves as the id for your storage within the system and informs the naming convention of the user groups that control access. Once your storage has been provisioned and ready to access, you will receive an email, with the subject line of “UIS data storage: Your storage is ready to use” and is sent by ssgw-admin@uis.cam.ac.uk.
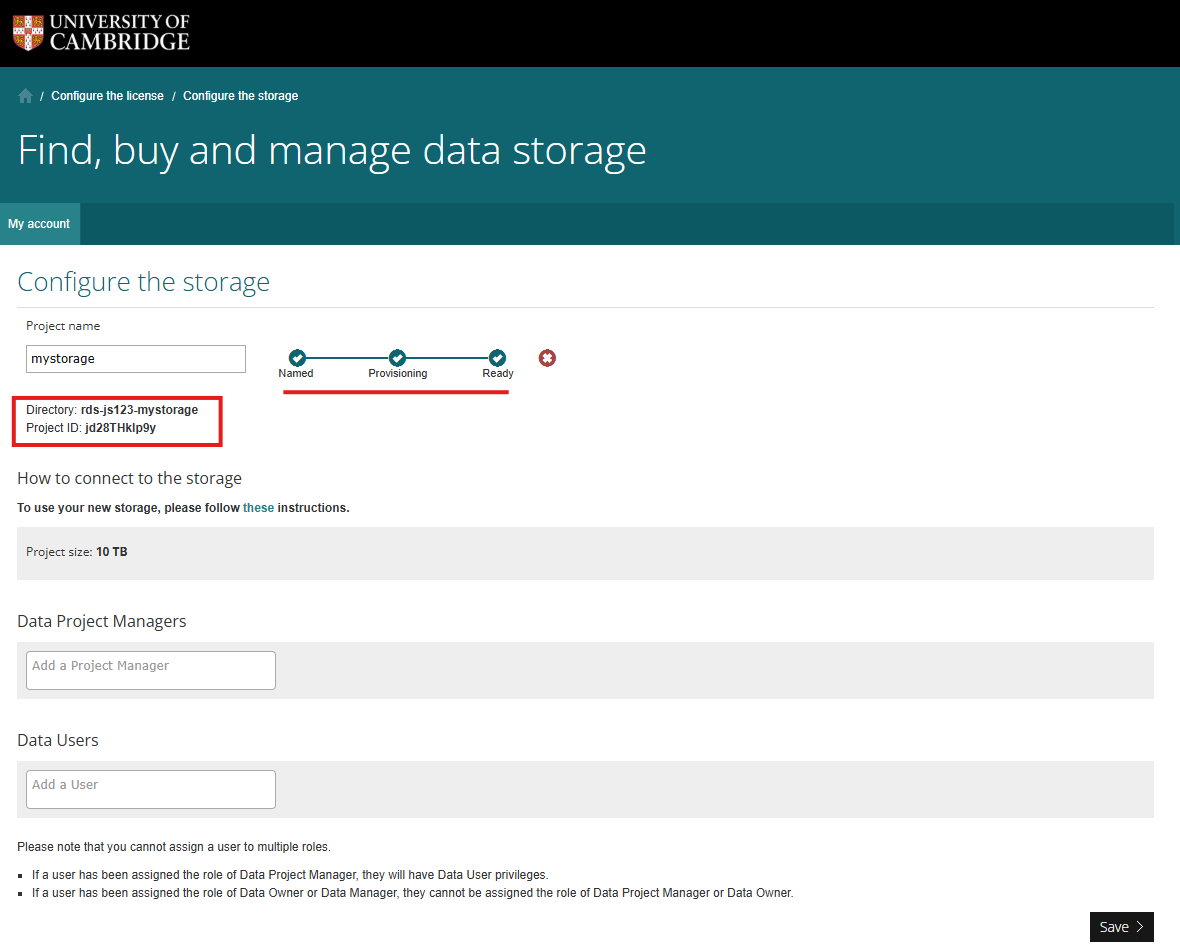
This is how your storage project page will look once your storage has been fully provisioned.
Please see Storage Portal Roles page for more on adding users to different roles of your storage. For further information on how to access your storage, please see the relevant Research Storage pages on the left-hand navigation bar of this user documentation.
Purchasing New NFS-RFS Storage
NFS-RFS is an RFS storage type that is mounted directly on CSD3, unlike standard RFS which is accessed over the CUDN. The same storage project cannot be provided through both access methods (mounted on CSD3 and over the CUDN) because they use different permission models.
This storage type is not readily available to purchase via the self-service storage portal.
If you are looking to purchase this RFS storage type, you will need to contact support@hpc.cam.ac.uk before you make your purchase so we can discuss your needs.
Read more about NFS-RFS storage here: https://docs.hpc.cam.ac.uk/storage/rfs/accessing-rfs/rfs-nfs.html
Increasing Storage for Existing Storage Projects
Note
Data Owners and Data Managers (Not Data Project Managers) are able to complete the following actions. If you are unsure what this means or how to carry out the intended operations, stop and contact support@hpc.cam.ac.uk
Navigate to https://selfservice.uis.cam.ac.uk/ and click the box that says, “Manage Storage”.
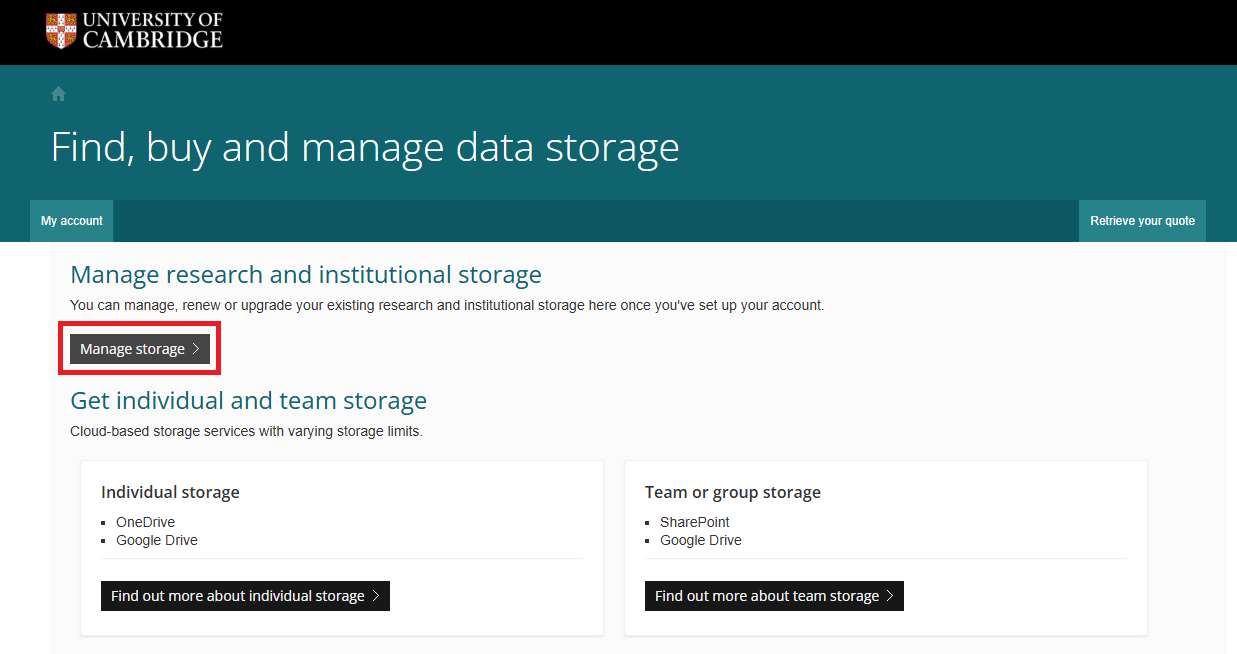
Selecting the storage options from the front page will not generate the appropriate quote for your storage.
Find the storage project that you wish to increase and click the link that says “View License”
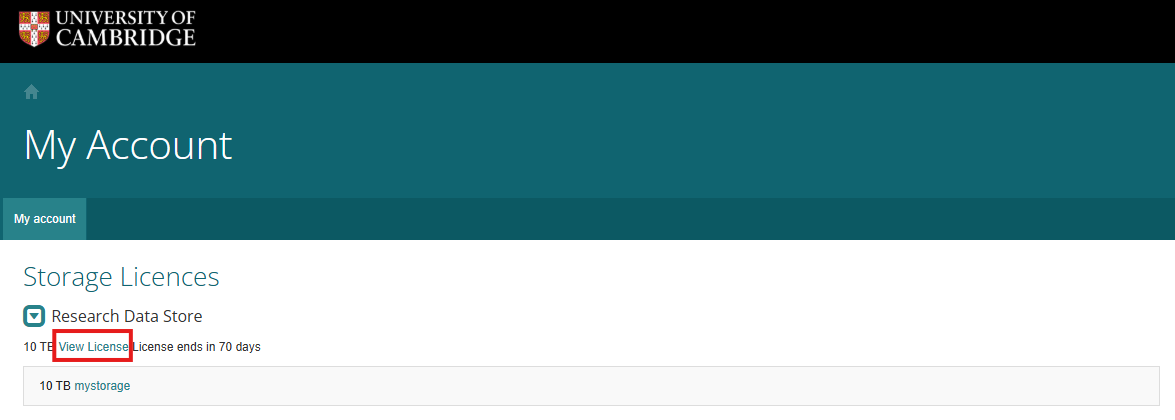
If you are not a Data Owner or Data Manager (Not Data Project Manager) you will not be able to see the “view license” link.
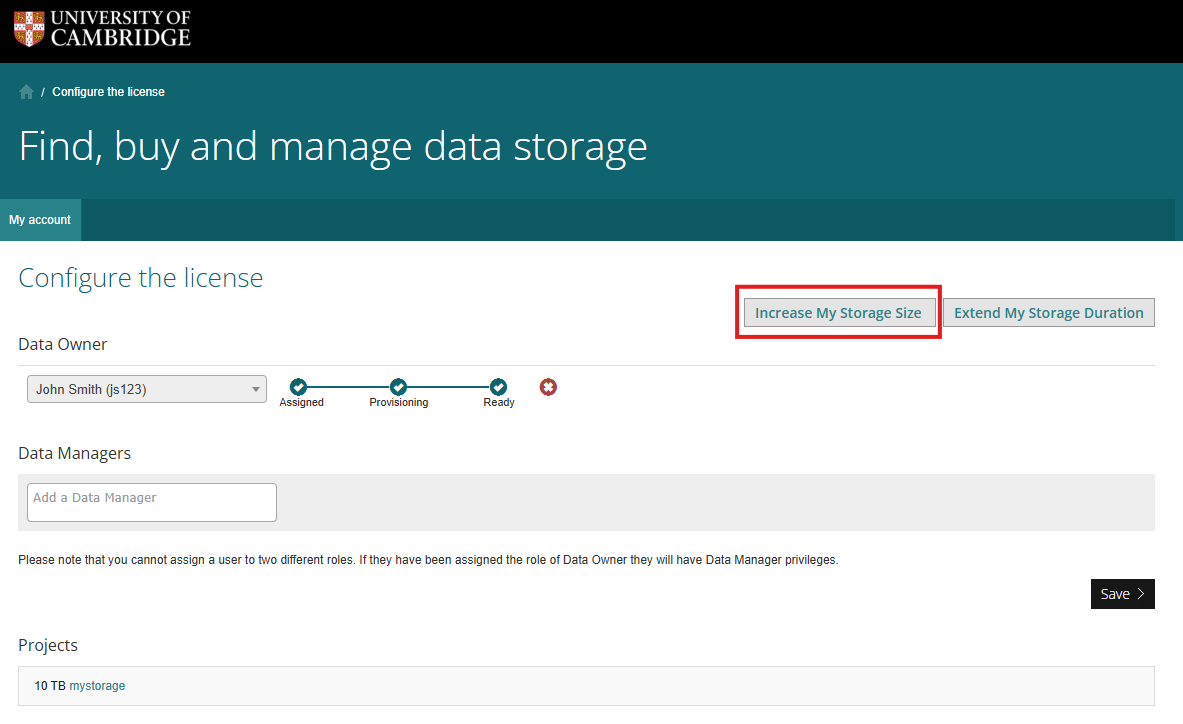
Now click the button labelled “Increase My Storage Size”
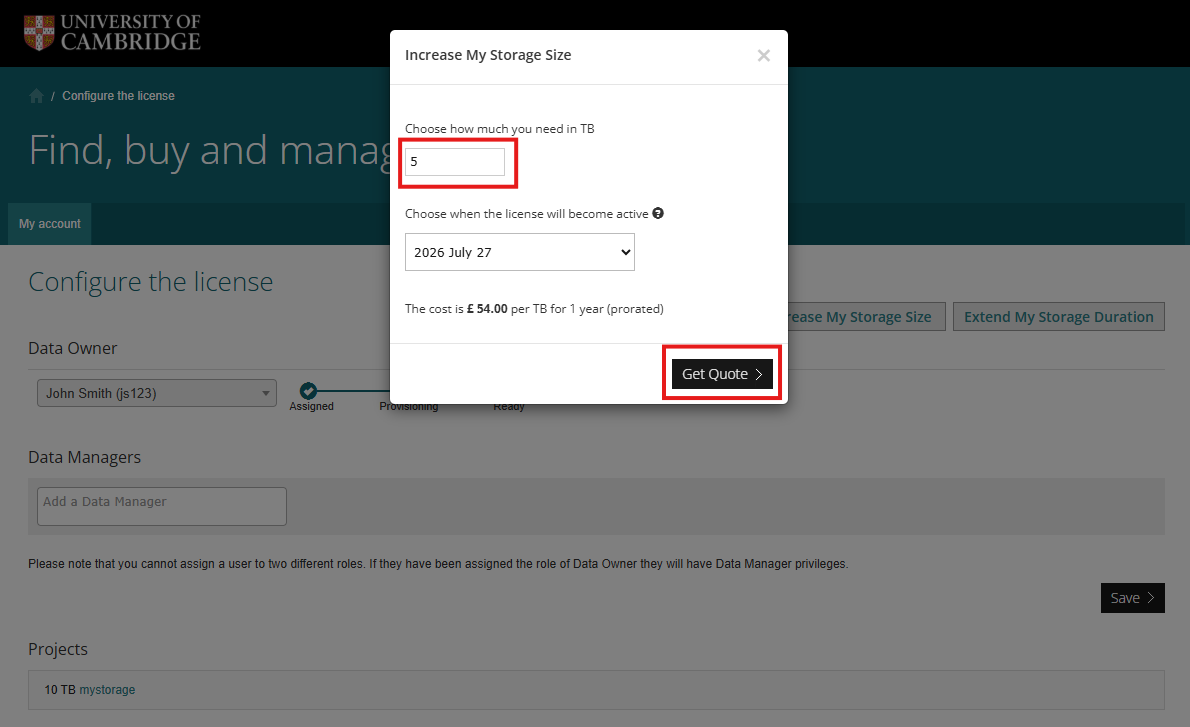
A pop-up box will appear where you need to input how much additional storage you wish to purchase, not the total storage project size. In this example, we are adding 5 TB to our 10TB project.
5. Here is the quote generated by the portal, click the button that says, “Email Quote”, this will give you a quote that you can use to generate a Purchase Order (PO) with your departmental finance team. The email will have the subject line of “UIS data storage: your quote (storage-####)” and is sent by ssgw-admin@uis.cam.ac.uk.
Note that the amount will be different to if you were to purchase new storage, this is because you are purchasing additional storage to the remaining time on the license.
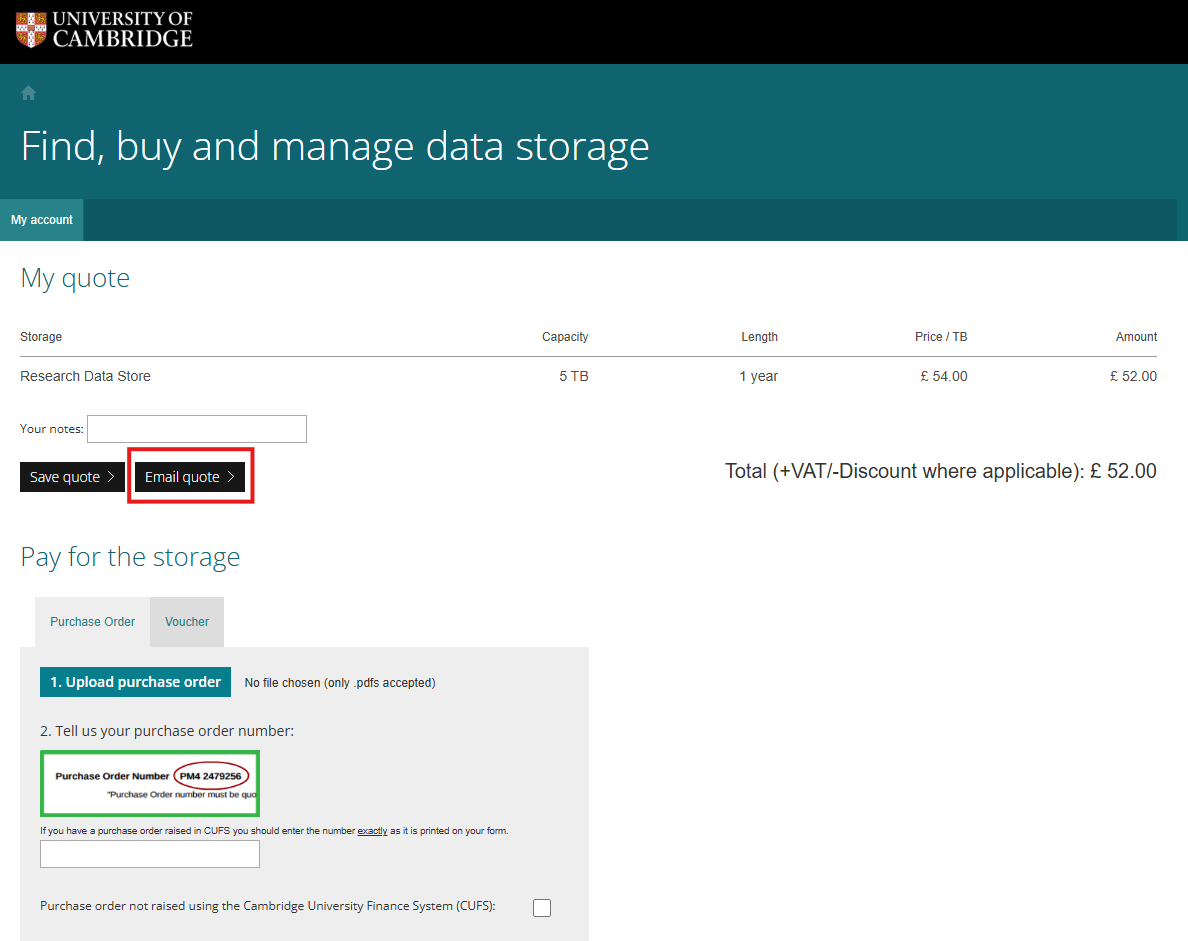
6. Your quote will be saved within the storage portal, and you will be able to retrieve it to apply the PO against when you have received it. Go to the “My Account” page by clicking the applicable button in the top left to return to where your quotes are saved at the bottom of the page. Once you have your PO, return to your quote, double check the amount on the portal is the same as on the PO and upload the pdf. Your PO should only be for one storage purchase, if you have multiple purchases, ensure they have one PO each as the system only recognises one PO number per upload.
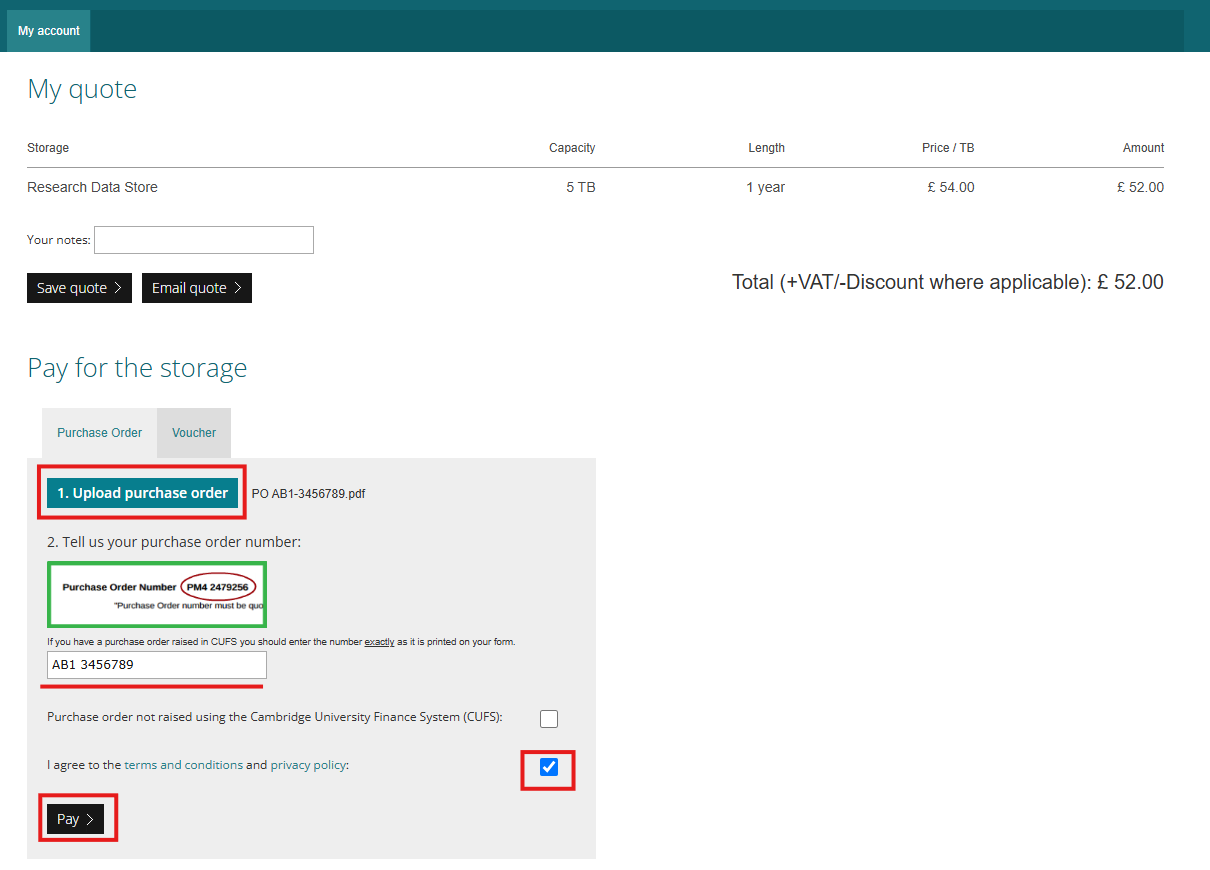
7. Now to allocate your storage so it gets provisioned and ready to use. You will have your storage project and a new “Unallocated” storage, click on the storage project name to go to the storage page. There will be a new slider underneath the storage name, use this to add the newly purchased additional storage to your existing storage project. Click save when you are happy.
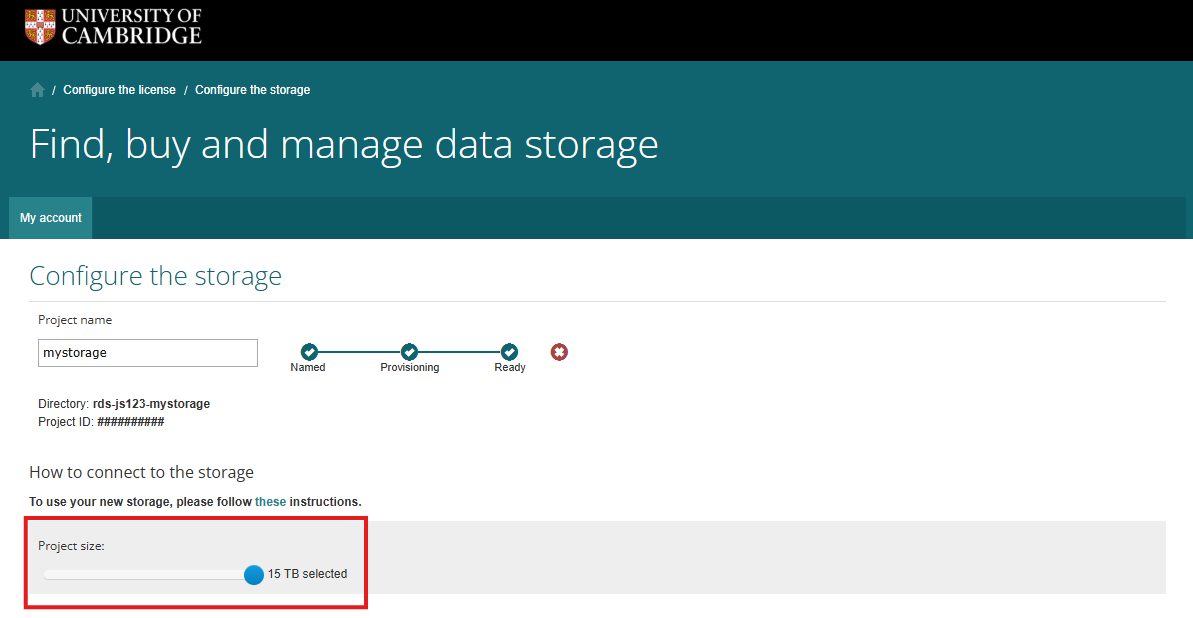
The RCS service desk will receive a notification to provision your storage; it is not automatic. Once it has been provisioned, you will receive an email from the service desk to say it’s been added.
Decreasing Storage for Existing Storage Projects
You cannot decrease your storage via the self-service storage portal. Please contact support@hpc.cam.ac.uk if you wish to decrease your storage project. Please ensure to include the project name and project id, you may also provide a link to the storage in question. Before requesting a reduction, ensure that your current storage usage is below the new capacity you are requesting. This includes the storage size quota and the innodes (number of files) quota associated with the new storage capacity.
Extending the Duration of Existing Storage Projects
Note
Data Owners and Data Managers (Not Data Project Managers) are able to complete the following actions. If you are unsure what this means or how to carry out the intended operations, stop and contact support@hpc.cam.ac.uk
Navigate to https://selfservice.uis.cam.ac.uk/ and click the box that says, “Manage Storage”.
Selecting the storage options from the front page will not generate the appropriate quote for your storage.
Find the storage project that you wish to extend and click the link that says “View License”
If you are not a Data Owner or Data Manager (Not Data Project Manager) you will not be able to see the “view license” link.
Now click the button labelled “Extend My Storage Duration”
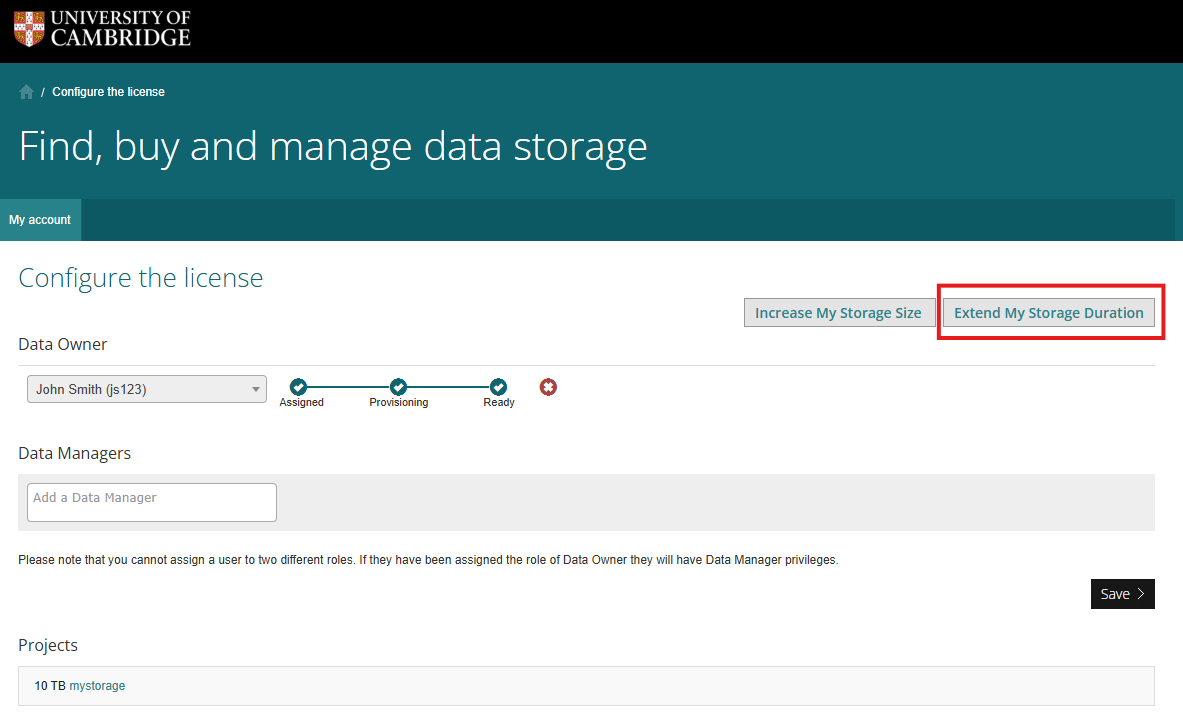
A pop-up box will appear where you need to select how long you wish to extend the project for (1, 3, or 5 years). In this example, we will extend for 1 year on our 10TB project.
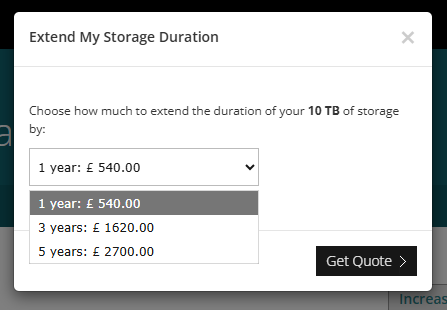
5. Here is the quote generated by the portal, click the button that says, “Email Quote”, this will give you a quote that you can use to generate a Purchase Order (PO) with your departmental finance team. The email will have the subject line of “UIS data storage: your quote (storage-####)” and is sent by ssgw-admin@uis.cam.ac.uk.
6. Your quote will be saved within the storage portal, and you will be able to retrieve it to apply the PO against when you have received it. Go to the “My Account” page by clicking the applicable button in the top left to return to where your quotes are saved at the bottom of the page. Once you have your PO, return to your quote, double check the amount on the portal is the same as on the PO and upload the pdf. Your PO should only be for one storage purchase, if you have multiple purchases, ensure they have one PO each as the system only recognises one PO number per upload.
Once submitted, your storage project will reflect the extension with a new end date found at the bottom of the page.
Deleting Storage Projects
Deleting storage projects is easy from the storage portal. Just click the red cross next to the storage project name.
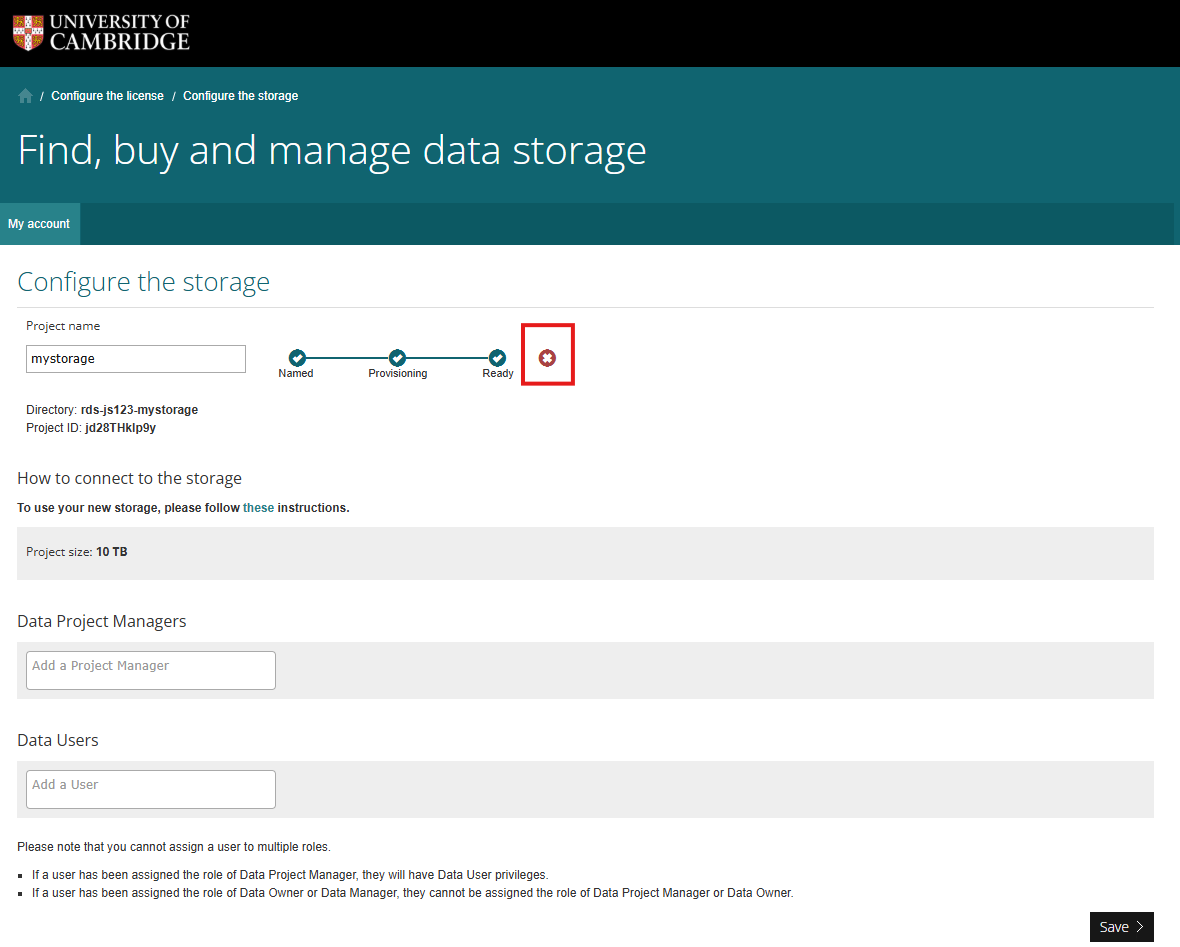
This will suspend the project and the RCS service desk will receive a notification to suspend and remove the project.
RCS deals with these in line with data retention policies. Before proceeding, ensure that any data you need to retain has been copied or backed up elsewhere.